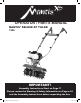
OPERATOR / PARTS MANUAL Mantis® Deluxe XP Tiller 7566 IMPORTANT! Assembly Instructions Start on Page 7! Please review the Warning & Safety Information on Pages 4-6 and the Assembly Instructions before unpacking the box. 401780 Mantis XP Deluxe tiller manual.
Welcome to the World of Mantis Gardening Here’s your new MANTIS® Deluxe XP Tiller . . . the lightweight wonder that is making gardening easier. Unlike big tillers, your MANTIS® Deluxe XP Tiller weighs only 36.3 pounds (16.5 kg) and is like no other. So it lifts easily, handles smoothly, tills and weeds precisely. And, unlike other small tillers, it features dual serpentine tines that churn soil to ten inches deep. It creates a soft, smooth seed bed, even in problem soil.
IMPORTANT MESSAGE Thank you for purchasing this Mantis® product from Schiller Grounds Care, Inc. You have purchased a world class product, one of the best designed and built anywhere. This machine comes with Operation and Safety instructions, Parts and Service instructions and Engine instructions. The useful life and good service you receive from this machine depends to a large extent on how well you read and understand this manual.
Safety Rules & Warnings You will notice throughout this Owners Manual Safety Rules and Important Notes. Make sure you understand and obey these warnings for your own protection. I. Special Safety Information Attention: This symbol points out our important safety instructions. When you see this symbol, heed it’s warning!! Stay alert!! To reduce the potential for accidents, comply with the safety instructions in this manual.
Safety Rules & Warnings If the tiller is used improperly or safety precautions are not followed, the users risk serious injury to themselves and others. Read and understand this manual before attempting to operate this tiller. IV. Warnings - Dos Read and understand the owner’s manual. Pay particular attention to all sections regarding safety. 1. Always keep a firm grip on both handles while the tines are moving and/or the engine is running.
Safety Rules & Warnings V. Warnings - Don’ts (continued) Don’t attempt to repair this tiller. Have repairs made by a qualified dealer or repairman. See that only original Mantis parts are used. Don’t operate tiller with tines having the 3 rods extending from end without having second set of tines attached. Failure to have tines in place will damage tine assembly. Do not reach you fingers and\or hands in between the tine blades. Do not attempt to remove the inner tines before removing the outer tines.
Assembly A W2 V2 C M N D Improper assembly of this tiller can result in serious injury. Make sure to follow all instructions carefully. If you have any questions, contact our factory at 1-800-366-6268 or an authorized Mantis dealer. W1 V1 O B Y Bag Contents K I Q G P Z F R E L G,H, J, P, Q, R, S,T, X, U X What comes in the box Key Qty. Part No.
Assembly Let’s Begin • With the box upright, open the box and remove insert. • Remove second cardboard insert and all loose parts that are at the top of the tillers cradle. • Lay the box on the side and open the bottom flaps. • Return the box to an upright position and pull the box straight up. • Right throttle handle attached to tiller assembly with installed tines will be in the box cradle. • Lay everything out so you can easily identify the parts (see parts image and list on page 7).
Assembly Lower Handle Assembly (continued) 8 7 9 • Slide loop handle through bolts and over top lower left handle, then take two lock nuts and fasten them finger tight. • Slide the left loop handle into the foam grip and right loop handle. • Place the carry handle between the lower handles and line up the holes • Place two of the 1.125” bolts through holes with hex head on inside of carry handle and with two lock nuts fasten them tight with wrench and socket.
Assembly Upper Handle Assembly 1 • To assemble the upper handles, first put the kickstand down. 4 7 3 2 • Layout the middle and upper handles and the handle brace as shown above. 5 • Take the right upper handle, the one with the throttle, and slide it between the middle handle and the lower flange of the brace. • Line up the top holes of the upper handles with the holes on the top of the brace so the handles are in the lowest position.
Assembly Upper Handle Assembly (continued) 10 11 • With a 7/16 in. wrench and socket, tighten the nuts and bolts that hold the brace onto the handles. 13 12 • Insert the carriage bolts into the bottom holes of the upper handles then through the top holes of the lower handles. 14 • Lift the upper handles until they line up with the lower handles and fully tighten the knobs at the pivot point. • Loosely thread the other 2-pronged knobs onto the carriage bolts.
Mantis® Deluxe XP Tiller Fueling & Starting Mantis® Deluxe XP Tiller Fueling and Oil IMPORTANT! It is normal for your 4-stroke engine to smoke for the first minute or two of operation, however it is not necessary for this to occur every time. This is a result of the oil being pulled through the engine for lubrication. • Rock the tiller forward so that it rests on its front loop handle.
Mantis® Deluxe XP Tiller Fueling & Starting Corrective Action If you suspect the engine is overfilled the following procedure should remove the excess oil from the crankcase and valve cover. If the engine is overfilled, oil will enter the crankcase and it does not simply pour out of the oil fill opening. The excessive oil has to be pumped out as the engine runs. Checking the oil level and draining any excess between multiple 30 second running intervals will bring the oil back to the proper level. 1.
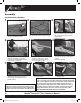
Mantis® Deluxe XP Tiller Operation Figure 1 Figure 2 Figure 3 Read the instructions carefully. Be familiar with the controls and the proper use of the equipment. Now You’re Ready to Use Your MANTIS® Deluxe XP Tiller. If you’ve seen other tillers, your Mantis® Deluxe XP Tiller may surprise you. It tills best when you pull it backward! You see, when you pull your Mantis® Deluxe XP Tiller backward, you give extra resistance to the tines, so they dig deeper.
Mantis® Deluxe XP Tiller Operation How to Switch From Tilling to Cultivating Position 1. First, you will need to understand that your Mantis® Deluxe XP Tiller has an inner and an outer set of tines on each side of the tiller as shown in Figure 1. 2. Make sure the tiller is turned off. 3. R emove the retaining pins from the outer set of tines (Figure 2) and remove the outer tines. 4.
Mantis® Deluxe XP Tiller Operation Your Mantis® Deluxe XP Tiller Can Weed Between Rows! Your Mantis® Deluxe XP Tiller is a precision weeder that can easily fit in tight places. So don’t be afraid to weed anywhere: between plants and shrubs, in corners, against fences, on raised beds, in wide rows, even in very narrow rows. Your Mantis® Deluxe XP Tiller weeds six* to nine inches wide. So you can run it in a tightly planted garden without damaging your delicate plants.
Tiller Storage Mantis® Deluxe XP Tiller Storage Do not store in an area where fuel fumes may accumulate and reach a flame or spark. Each fall, or before you store your Mantis® Deluxe XP Tiller for any long period, be sure to take these measures: 1. D o not store your tiller with fuel still in it. Even under ideal conditions, stored fuel containing ethanol or MTBE can start to go stale in 30 days.
Tiller Maintenance Mantis® Deluxe XP Tiller Basic Maintenance Air Filter Your Mantis® Deluxe XP Tiller will require some basic maintenance to keep it performing year after year. If you are storing your tiller for the season or longer than 30 days it is very important to empty the fuel tank to prevent engine damage. Undoubtedly, you will be putting your tiller through rigorous use. Check engine oil level, air filter and fuel filter. Refer to your Honda® engine manual for more details.
Deluxe XP Tiller Basic Maintenance Air Filter Maintenance 5. To clean the air filter a. Clean the filter element in warm soapy water, rinse and allow to dry thoroughly. Or, clean in a non-flammable solvent and allow to dry. b. Dip the filter element in clean engine oil, then squeeze out all excess oil. The engine will smoke when started if too much oil is left in the element. c. Wipe dirt from the air cleaner body and cover, using a moist rag. Be careful to prevent dirt from entering the carburetor. 6.
Deluxe XP Tiller Basic Maintenance Transmission Care Figure 1 How to Check the Grease Level Inside the Worm Gear Housing When we built your Mantis® Deluxe XP Tiller, we added Lithium EP #0 grease to properly lubricate the transmission for the first 10 hours of operation. As part of the regular maintenance of your tiller, it is imperative that you inspect the grease level and add grease if necessary. This will help your tiller give you years of excellent usage.
Contact us at mantis.com or Your Local Authorized Mantis® Dealer 401780 Mantis XP Deluxe tiller manual.
14 22 401780 Mantis XP Deluxe tiller manual.indd 22 48 16 41 67 57 21 53 41 7 2 43 58 12 56 61 Rev.
Contact us at mantis.com or Your Local Authorized Mantis® Dealer 401780 Mantis XP Deluxe tiller manual.
Troubleshooting Problem Cause Remedy 1. T ines don’t turn when throttle is depressed. • Engine is not seated properly on the gear housing. • Re-install engine following the instructions on page 18 (How to reseat the flange). • O/I switch is in “O” position. • No fuel in tank. • Fuel strainer clogged. • Fuel line clogged. • Spark plug shorted or fouled. • Spark plug is broken (cracked porcelain or electrodes broken). • Ignition lead wire shorted, broken or disconnected from spark plug.
EPA PHASE 2 / CALIFORNIA TIER III EMISSION CONTROL WARRANTY STATEMENT YOUR RIGHTS AND OBLIGATIONS The Environmental Protection Agency (EPA) and the California Air Resources Board (C.A.R.B.) and The Equipment Manufacturer are pleased to explain the emission control system warranty on your EPA Phase 2 / C.A.R.B. Tier III model year 2005 and later small off road engine (SOREs). New small off road engines must be designed, built and equipped to meet stringent EPA and C.A.R.B. anti-smog standards.
LIMITED WARRANTY MANTIS extends this limited warranty against defects in material and workmanship for a period of five (5) years under normal usage for residential purposes and two (2) years under normal usage for commercial purposes, from the date of purchase by the original purchaser. MANTIS will repair or replace, at its option, any part or parts of the product found to be defective in material or workmanship during the warranty period.