Tiller/Cultivator with Honda Engine OWNER’S MANUAL Motobêche-bineuse avec moteur Honda MANUEL D'UTILISATION Gartenfräse/Motorhacke mit Honda-Motor BEDIENERHANDBUCH
Welcome to the world of Mantis gardening Here’s your new MANTIS Tiller . . . the lightweight wonder that’s changing the way we garden. Unlike big tillers, your MANTIS Tiller weighs only 24 pounds (11 kg). So it lifts easily, handles smoothly, tills and weeds precisely. And, unlike other small tillers, it features serpentine tines that churn soil to 25 cm deep. It creates a soft, smooth seed bed, even in problem soil. Once you know how to use your tiller correctly, we guarantee you’ll love it.
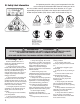
Safety rules & warnings You will notice throughout this owners manual safety rules and important notes. Make sure you understand and obey these warnings for your own protection. I. Special safety information ! WARNING • DANGER ! ATTENTION: THIS SYMBOL POINTS OUT OUR IMPORTANT SAFETY INSTRUCTIONS. WHEN YOU SEE THIS SYMBOL, ! HEED IT’S WARNING!! STAY ALERT!! ! WARNING • DANGER ! TO REDUCE THE POTENTIAL FOR ACCIDENTS, COMPLY WITH THE SAFETY INSTRUCTIONS IN THIS MANUAL.
III. Safety label information An important part of the safety system incorporated in this tiller are the warning and information labels found on various parts of the tiller. These labels must be replaced in time due to abrasion, etc. It is your responsibility to replace these labels when they become hard to read. The location and part numbers (P/N) of these labels are illustrated on Page 27. P/N 400620 CUTTING HAZARD; KEEP FEET AND HANDS AWAY FROM ROTATING TINES.
V. Warnings - don'ts Don’t work on excessively steep slopes. Don’t attempt to clear tines while they are moving. Never try to remove jammed material before switching the engine off and making sure the tines have stopped completely. Don’t allow children or incapable people to operate this tiller. Don’t use tiller with one hand. Keep both hands on handles with fingers and thumbs encircling the handles, while tines are moving, and engine is running. Don’t overreach. Keep a good footing at all times.
Assembly ! WARNING•DANGER ! 20,21,55 IMPROPER ASSEMBLY OF THIS TILLER CAN RESULT IN SERIOUS INJURY. MAKE SURE TO FOLLOW ALL INSTRUCTIONS CAREFULLY. 40 39 1 IF YOU HAVE ANY QUESTIONS CONTACT, YOUR LOCAL AUTHORISED MANTIS OFFICE. 2 8 53 Your MANTIS Tiller comes partially assembled. You must install only the handlebars, the carrying handle, and the tines. This will take just a few minutes if you follow the directions. First, take all items out of the carton.
Assembly (continued) HOW TO ASSEMBLE LOWER HANDLES To identify part numbers, see pages 6 and 18. 1. Use the protective cardboard sleeve to stabilise your tiller. Stand the engine assembly (no. 21) up. (Picture 1) 2. Lay the handle parts within easy reach. You’ll need one of the handle clamps (no. 51) and one of the lower handles (no. 6). Note that the lower handles have a short leg on one end. 3. Fit the handle clamp along the outside of the short leg. Line up the holes on the clamp and the leg. 4.
Assembly (continued) How to assemble upper handles and carrying handle 1. Lightly squeeze the lower handles (no. 6) toward one another so that they line up with the two smaller holes on the carrying handle (no. 42). Then slide the carrying handle over and down the lower handles. It will rest about 10 to 15 cm above the fender. (Picture 1) 2. Gently pull the lower handles out to their original position. 3. Attach the upper handle assembly (no.
Assembly (continued) Assembling the tines for tilling 1. Remove the cardboard from around your tiller’s base. 2. Slide the tines onto the axle shafts. The “D” hole goes on the outside. 3. Make sure you’ve installed the tines properly for tilling. Liken the tines to your fingers. When your palm faces the ground, your fingers curl down. Stand behind the tiller and hold your hand next to the tines. Do the tine blades curl down, as your fingers do? If so, they are in the tilling position.
Starting TO START YOUR TILLER FOR THE FIRST TIME: ! WARNING ! Warm engine AVOID ACCIDENTAL BLADE ENGAGEMENT 1. Push ignition switch to I “start/on” position. DO NOT SQUEEZE THE THROTTLE TRIGGER WHEN STARTING. First, fill the fuel tank with the proper amount of petrol (Use branded 89 octane (R+M+2) unleaded petrol or ethanol— maximum 10% ethyl alcohol, or 15% MTBE, no methyl alcohol.) Mantis Tiller starting instructions (Honda 31cc engine) Cold engine 1.
Additional information ! WARNING • DANGER ! IF ENGINE DOES NOT STOP WHEN SWITCH IS PUT IN THE STOP POSITION, RELEASE THE THROTTLE, ALLOW ENGINE TO IDLE. PUT THE TILLER DOWN, AND SLIDE THE CHOKE LEVER FORWARD TO THE COLD START (CLOSED) POSITION. CHECK AND RETURN IGNITION SWITCH TO ON POSITION BEFORE STARTING ENGINE AGAIN.
Tilling/cultivating ! WARNING • DANGER ! IF YOUR TINES GET JAMMED OR ENTANGLED, SHUT OFF THE ENGINE AT ONCE. REMOVE THE OBSTRUCTION WHILE THE ENGINE IS OFF. NEVER TRY TO REMOVE AN OBSTRUCTION WHILE THE ENGINE IS RUNNING. SERIOUS INJURY CAN RESULT. How about a familysize vegetable garden? Nowadays many gardeners prefer small gardens — especially in the suburbs, where space is at a premium. But, if you’re fortunate enough to own a large plot, you can create a bigger garden — a half acre or more.
Cultivating Now you’re ready to cultivate or weed. Tilling position Tine teeth point in the same direction as the rotation of the tine; or toward the front of the tiller, away from the operator. Guide your tiller where you want to weed and start it up. Pull your tiller backward slowly, then let it move forward a bit, in a gentle rocking motion. Watch it slice, shred, and bury those weeds! Got tough weeds? Lighten your pressure on the throttle to slow your tiller down.
Maintenance How to check the grease level inside the worm gear housing When we built your MANTIS Tiller, we lubricated the worm gear housing thoroughly. It is imperative that you inspect the grease level once a year. Simply remove the cover plate on the worm gear housing. (Picture 1) Then check to make sure the grease comes almost to the top of the housing. If it doesn’t, add lithium no. 0 grease (Item M9985.) This is the only way to add grease to the worm gear housing.
Storage ! WARNING • DANGER ! DO NOT STORE IN AN AREA WHERE FUEL FUMES MAY ACCUMULATE AND REACH A FLAME OR SPARK. Each autumn, or before you store your Mantis Tiller for any long period, be sure to take these measures: 1. Do not store your tiller with fuel still in it. Even under ideal conditions, stored fuel can start to go stale in 30 days. And, since stale fuel has a high gum content, it can clog the carburettor, this, in turn, will restrict fuel flow.
Mantis Tiller assembly
Mantis Tiller assembly KEY QTY 1 1 400256 2 6 1 2 400255 400224 7 8 12 1 1 1 400620 148 910502 13 20 21 2 1 1 478 465 400905 22* 23 1 1 468 466 24 25 26 1 1 4 436 437A 651 27 28 29 1 2 1 423 425 424 30 31 32 33 1 1 1 1 422 426 428 429 MATERIAL KEY QTY MATERIAL TRIGGER HANDLE ASSM. RH HANDLE ASSM. LH LOWER HANDLE FOLD DOWN LABEL HANDLE BRACE 10-32 X 3/4 FLANGED BOLT THROTTLE CLIP FENDER GUARD ENGINE ASSY - 31CC HONDA DRIVE SHAFT WORM GEAR HOUSING GASKET HOUSING COVER RD. HD.
Troubleshooting Problem Cause Remedy 1. Tines don’t turn when throttle is depressed – Engine is not seated properly on the gear housing. – Re-install engine following the instructions 2. Engine fails to start – – – – – – “o/I” switch is in “o” position. No fuel in tank. Fuel filter clogged. Fuel line clogged. Spark plug shorted or fouled. Spark plug is broken (cracked porcelain or electrodes broken) – Ignition lead wire shorted, broken or disconnected from spark plug.
The Mantis Promise Try any product you buy from Mantis with NO-RISK! If you’re not completely satisfied, send it back to us within 1 year for a complete, no-hassle refund. All you have to pay is the return insured postage. Tines Guaranteed Our tines not only work better than the rest: they’re also guaranteed for life against breakage. If any tine breaks in normal use, send the broken tine back to us and we’ll send you a replacement tine under warranty.
For repair or refunds! Address: City, Postcode: Phone (day): Phone (evening): Customer No: (not necessary but helpful) Product(s) being returned: For ® Repair ® Repair quotation Refund: If you are requesting a refund, please tell us why: ® Product is different than I expected ® Not satisfied with performance ® Not satisfied with quality ® Other ® Refund ® Other Repair: If you return a product or part for repair or for a cost estimate, please indicate what could be damaged.