
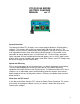
Owner`s manual


8
VOLTS TRIM CALIBRATION:
Final tuning is best accomplished when the battery pack is fully charged. The lower the
state of charge, the more the user will need to monitor and adjust the unit during the
first charge cycle.
1. Turn the amps knob all the way down (full counterclockwise).
2. Make sure the charger is plugged into the battery pack and that there are no open breakers or
open fuses in the DC battery circuit.
3. With the charger’s AC breaker switch in the OFF position, plug the charger into the AC power
outlet.
4. Now turn ON the charger’s AC breaker switch. The fans should come on.
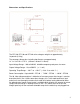
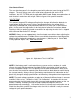
5. Using an appropriate insulated screw driver, stick it into the VOLTS TRIM access hole (see figure
04) and turn the internal adjustment potentiometer until you find the threshold where the yellow
LIMITS LED changes state. If the yellow LED is off, turn the trim pot counterclockwise to get it to
turn on. If the yellow LED is on, turn the trim pot clockwise to get it to go off. Once you find the
threshold where the LED changes states, the cutoff voltage is set to the actual battery voltage and
the charger will not charge the pack above this voltage. Therefore, when you are ready to charge
you will need to turn the trim pot clockwise to raise this voltage ceiling. Then turn the AMPS knob
up until you can put the amount of amps you want into the battery pack while not letting the
batteries go over their peak voltage limit according to their manufacturer’s data.
While charging, when the battery pack voltage hits the peak limit the yellow LIMITS
LED will come on along with the flashing blue TIMER LED.
figure 04. VOLTS TRIM Adjustment