
Installation Guide


• Steam cleaning and power washing of MAPEI Flexcolor CQ
is acceptable after 6 to 7 days. Do not use a power-washer
setting with greater than 1,800 psi.
• Use for interior/exterior commercial and residential
installations under Res 1, 2, 3 and 6 and Com 1, 2, 3
and 6 per TCNA Environmental Classifications. MAPEI
Flexcolor CQ is not for installations in submerged areas or
areas hotter than 125ºF (52ºC).
• For heavy industrial installations where fatty acids are
present, such as commercial kitchens, use MAPEI's
Kerapoxy
®
IEG CQ.
LIMITATIONS
• Use only at temperatures between 50°F and 95°F
(10°C and 35°C). Drying time will vary depending
on temperature, humidity, tile porosity and grout joint
depth/width.
• MAPEI Flexcolor CQ cures faster in lower humidity
conditions (less than 50% is ideal).
• Do not use in water submersion installations such as
pools and hot tubs.
• MAPEI Flexcolor CQ is not recommended for
installation in steam rooms or saunas.
• Do not use in areas exposed to continuous high surface
temperatures (greater than or equal to 140°F [60°C]),
such as areas near fireplaces or wood stoves.
• Some types of sensitive tiles such as glass mosaic or
marble can be permanently stained, scratched, dulled
or damaged when grouting. Always test the grout on a
separate sample area before grouting to determine the
suitability of the tile with the grout color selected.
• Do not use for distressed or tumbled travertine tiles
if no grout is desired in the pits of these tiles.
• Do not use with pebble-stone or river-rock tile or mosaics,
irregularly shaped tile or stone, or any time the grout joint
width or depth equals or exceeds 1/2" (12 mm).
• Do not use for commercial kitchen floors or environments
where “no-rinse” enzymatic cleaners will be used.
Consult MAPEI’s Technical Services Department for
installation recommendations regarding substrates and
conditions not listed.
SURFACE PREPARATION
• Before grouting, make sure that tiles are firmly set and
the adhesive or mortar is completely dry.
• Remove all tile spacers.
• Grout joints must be clean and free of standing water,
dust, dirt and foreign matter.
• Remove excess adhesive or mortar from the joint area
so that 2/3 of the tile depth is left available for grouting.
• Clean the tile surface thoroughly to remove dust,
dirt and other contaminants that may cause grout
discoloration.
• See MAPEI's “Surface Preparation Requirements”
reference guide in the Related Documents section of
the Tile & Stone Installation Systems page on MAPEI’s
Website.
MIXING
Before product use, take appropriate safety precautions.
Refer to the Safety Data Sheet for details.
• No mixing is required.
PRODUCT APPLICATION
Read all installation instructions thoroughly before installation.
Using consistent application procedures will produce consistent
results.
1. To aid in spreading the grout, slightly moisten the tile
surface with a damp, rounded grout sponge just before
application.
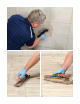
2. Force the grout into the joints with a medium- to hard-
rubber float held at a 45-degree angle to the tile surface.
3. Make sure all joints are well-compacted and are free
of voids and gaps.
4. Remove excess grout from the tile surface, holding the
float at an almost 90-degree angle to the surface and
moving the float diagonally to the joints while the grout
is still fresh.
5. The grout surface should be flush with the tile edge.
CLEANUP
1. Cleaning should begin after the surface develops a dry,
skinned-over appearance – within 5 to 10 minutes,
depending upon the temperature, humidity and
absorption rate of the tile. Grout small areas of between
30 to 40 sq. ft. (2,79 to 3,72 m
2
) at a time, so that
cleaning can begin before the grout skins over and
dries on the tile surface.
2. Move a moderately damp, rounded grout sponge
across the tile surface in a circular motion to loosen
grout and to shape the joints. Drag a clean and
moderately damp sponge diagonally across the tile
joints, applying slight pressure. Use one side of the
sponge for each pass over the tile, rinsing the sponge
after the second pass.
Note: Under certain conditions, a milky film can appear
on the grout surface. This film will dissipate in 20 to 30
minutes after the washing step is completed.
3. Change the water bucket frequently to prevent the
development of a haze on the tile surface.
4. If residue is observed on the tile surface, a final wash
can be performed (if needed) about 1 hour after the
initial wash. If needed in the cleaning process, add
1 U.S. oz. (30 mL) of a clear dishwashing soap to a pail
containing 3 U.S. gals. (11,4 L) of clean water; then
use a clean, white, moistened scrub pad to loosen any
Continued on Page 6
Fl
exc
olor
™
CQ
Fl
exc
olor
™
CQ
MAPEIMAPEI