
Installation Guide


SURFACE PREPARATION
• Certaintileswithhighabsorption,surfaceporosityor
rough surfaces may require sealing before grouting to
prevent permanent staining.
• Theapplicationofagroutreleaseovercertaintypes
of porcelain or textured surface tiles or stone may be
advantageous where a fine surface porosity might trap
fine cement particles or color pigments. Seek the advice
of the tile or stone manufacturer and site-test (mock up)
on separate samples before grouting.
• Caution:Sometypesofglazedceramictiles,marble,
granite and marble agglomerates can be permanently
stained, scratched, dulled or damaged when grouted
with pigmented grout or sanded grout formulas.
Generally, white grout is best suited for grouting white
or light-colored marble or granite. Take all the necessary
precautions to ensure that the marble, granite or tiles are
compatible with colored grouts. Check the tile or marble
manufacturer’s literature and test grout on a separate
sample area before grouting to determine the suitability
of the product with colored and/or sanded grouts.
• Beforegrouting,makesurethetilesorstonesarermly
set and the adhesive or mortar is completely dry.
• Removeallspacers,pegs,ropesandstrings.
• Groutjointsmustbecleanandfreeofstandingwater,
dust, dirt and foreign matter. Remove excess adhesive or
mortar from the joint area so that 2/3 of the depth of the
tile is left available for grouting.
• Cleanthetileorstonesurfacethoroughlytoremove
dust, dirt and other contaminants that may cause grout
discoloration.
• RefertoMAPEI’sSurfacePreparationRequirements
document for tile and stone installation systems at
www.mapei.com.
MIXING
Note: Choose all appropriate safety equipment before use.
Refer to MSDS for more information.
1. For best results, have the same person mix all of the
grout. Consistent mixing techniques will promote more
uniform results.
2. Before mixing the grout with water, dry-blend the product
to avoid color variations in the finished grout, which may
arise from pigment settling during shipment. If two or
more bags are to be used, dry-blend all of the contents
together.
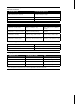
3. Mix Keracolor U with cool, clean water only or approved
MAPEI additives. Mix by using the following water-to-
grout proportions:
Water Keracolor U powder
4.8to5.4U.S.oz.
(0,14 to 0,16 L)........................................1 lbs. (0,45 kg)
24to27U.S.oz.
(0,71 to 0,80 L) .......................................5 lbs. (2,27 kg)
48to54U.S.oz.
(1,42 to 1,60 L) .....................................10 lbs. (4,54 kg)
3.75 to 4.22 U.S. qts.
(3,55 to 3,99 L) .................................... 25 lbs. (11,3 kg)
4. Pour the required measured amount of clean, cool
water into a clean mixing container. Gradually add
the proportionate amount of Keracolor U while slowly
mixing. To avoid shade variation of the finished
joint, always add the powder to the water while being
consistent in the mixing process and the quantity of
water used from batch to batch.
5. Mix thoroughly with a low-speed mixer (at about 350
rpm) for about 3 to 5 minutes, or until obtaining a
smooth, creamy, homogenous paste consistency and a
uniform shading of the colored grout.
6. Avoid air entrapment from prolonged mixing, which will
shorten the pot life.
7. Allow the grout to sit (“slake”) in the container for about
5 minutes.
8. Remix for about 1 to 2 minutes without adding more
liquid or powder.
9. Wash hands and mixing tools with water immediately
after mixing.
PRODUCT APPLICATION
1. Read all installation instructions thoroughly before
installation.
2. Useonlyattemperaturesbetween50°Fand100°F
(10°Cand38°C).
3. Using consistent application and cleaning procedures
will produce consistent results.
4. To aid in spreading the grout, slightly moisten the
tile or stone surface with a damp sponge just before
application. Do not flood the tiles or allow water to stand
in the ungrouted joint areas.
5. Force Keracolor U into the joints with a rubber grout
float. Make sure all joints are well-compacted and free of
voids and gaps.
6. Remove excess grout from the tile surface, moving the
grout float diagonally to the joints while the Keracolor U
is still fresh.
K e r a c o l o
r
™
U
K e r a c o l o r
™
U