
Manual


142 EZwarePlus Programming Manual
1010-1015, Rev. 03
To change the active common window:
1. Create a new project. The Common Window (Window 4) is automatically created.
2. Create a base window that is full screen. This will be used as another common window.
Note that when a base window is used as a common window, the Start Pos:, Style, Frame, and
Background settings are ignored by the HMI. For this example, let’s use Window #30 as the alternate
common window.
3. Create another full screen base window that can be displayed along with the common windows, (such as a
startup window). Let’s use Window #10, the initial window, for our example.
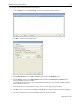
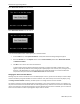
4. On Window #10, create a Function Key object that is used to change the common window. From the Objects
menu, click Function Key. The New Function Key Object dialog box appears.
5. On the General tab, select the Change common window option button.
6. In the same section, select 30 from the Window no. drop down menu.
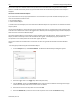
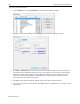
7. Click the Shape tab. Click Use Shape... and then click on the Shape Library… button. Select Shape #1 from
the button1 library. Click OK to return to the Create Function Key Object dialog box.
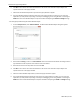
8. Click the Label tab. Click the Use label checkbox.
9. For our example, type CCW (meaning Change Common Window) into the Content box. Click OK to exit the
Create Function Key Object dialog box and go back to the EZwarePlus main screen.
10. Place the new Function Key object somewhere on Window #10.
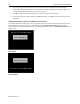
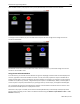
Below is an illustration of what the default common window, Window#30 (alternate common window), and
Window#10 (startup window) might look like:
Default Common Window #4 Alternate Common Window #30 Initial Window #10