Model PMD660 User Guide Portable Solid State Recorder
CAUTION ENGLISH RISK OF ELECTRIC SHOCK DO NOT OPEN CAUTION: TO REDUCE THE RISK OF ELECTRIC SHOCK, DO NOT REMOVE COVER (OR BACK). NO USER-SERVICEABLE PARTS INSIDE. REFER SERVICING TO QUALIFIED SERVICE PERSONNEL. The lightning flash with arrowhead symbol within an equilateral triangle is intended to alert the user to the presence of uninsulated "dangerous voltage" within the product's enclosure. It may be of sufficient magnitude to constitute a risk of electric shock to persons.
READ BEFORE OPERATING EQUIPMENT This product was designed and manufactured to meet strict quality and safety standards. There are, however, some installation and operation precautions which you should be particularly aware of. 1. Read Instructions – All the safety and operating instructions should be read before the product is operated. 2. Retain Instructions – The safety and operating instructions should be retained for future reference. 3.
ENGLISH 17. Servicing – Do not attempt to service this product yourself as opening or removing covers may expose you to dangerous voltage or other hazards. Refer all servicing to qualified service personnel. 18. Damage Requiring Service – Unplug this product from the wall outlet and refer servicing to qualified service personnel under the following conditions: a. When the power-supply cord or plug is damaged. b. If liquid has been spilled, or objects have fallen into the product. c.
English This product is in conformity with the EMC directive and low-voltage directive. Français Cet appareil est conforme á la directive EMC et á la de directive sur les basses tensions. Deutsch Dieses Gerät entspricht den EMC-Richtlinien und den Richtlinien für Niederspannungsgeräte. Nederlands Dit apparaat voldoet aan de EMC-richtlijnene en de richtlijnen voor apparatuur met laag voltage. Italiano Quest' unitá è conforme alle direttive EMC ed alla direttiva sulle basse tensioni.
ENGLISH This Class A digital apparatus complies with Canadian ICES-003. Cet appareil numérique de la Classe A est conforme á la norme NMB-003 du Canada. SI DICHIARA CHE L'APPARECCHIO SINTO-AMPLIFACATORE SR-39 RISPONDE ALLE PRESCRIZIONI DELL'ART. 2 COMMA 1 DEL D.M. 28 AGOSTO 1995 N° 548. FATTO A EINDHOVEN, IL 1/1/1997. MARANTZ EUROPE B.V.
Package contents ................................ 3 Introduction .......................................... 4 Features .............................................................. 4 Preparation ........................................... 6 Installing the carry strap ..................................... 6 Installing batteries .............................................. 6 Controls and Connections .................. 7 Top side ...............................................................
ENGLISH Virtual Track and Copy Segment ......29 Additional Functions ......................... 38 Virtual Track .......................................................29 Copy Segment ...................................................29 Virtual Track Edit Mode ......................................29 Battery ............................................................... 38 Auto power off ................................................... 38 Beep Alarm ..................................................
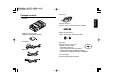
Package contents • Carry strap ENGLISH • PMD660 • Security screws (2) ISO 3x10 (3mm x 10mm long) For CF card door. • 64MB CF card (US only) (shipped formatted and installed) • AC adapter • USB cable • Audio cable • Plastic pin and retainer (spare - for Memory compartment door) • CD-ROM Contents of the CD may vary. Contents usually include: • PDF format manual(s) Several languages may be included.
Introduction ENGLISH Thank you for selecting the Marantz Professional PMD660 Portable Solid State Recorder. The PMD660 is an audio recorder that records in digital audio formats onto a Compact Flash™ memory card (CF card) or Microdrive™. CF cards, also used in digital cameras, are widely available at consumer electronics retailers and computer resellers. Features • Stereo (2 channels) and mono (1 channel) audio recording and playback.
• Pre-Recording memory buffer records 2 seconds of audio before recording is started. • During playback, you can instantly locate EDL marks. • Up to 255 EDL marks can be added to a CF card. EDL marks are numbered consecutively starting at one. During recording, you can manually add an EDL mark by pushing the MARK button. EDL marks can also be added automatically. * The EDL marking system is proprietary to Marantz Professional solid state recorders.
Preparation Installing batteries Installing the carry strap 1. Remove the battery compartment. ENGLISH 1. Put the carry strap through the shaft of PMD660. 2. Insert the new batteries (AA type) with correct +/ -polarity. 2. Put the carry strap through the stopper of PMD660. 3. Secure the carry strap by putting it through the second stopper. 6 3. Close the battery compartment.
Top side 1. Speaker When "Output" in the preset menu is set to SP/HP, the played back audio signal is output the internal speaker. Headphones plugged into the PHONES jack mute the internal speaker. HP/SPK VOL controls the built-in Speaker and Headphone volume. See Page 44, How to select an output for playback. ENGLISH Controls and Connections 2. MIC (internal microphones) 1 2 3 4 3. MARK button Push the MARK button to add an EDL Mark manually during pause, recording, or playback.
ENGLISH 5. COPY / USB button • Copy (Copy segment) During playback, push the COPY button to copy mode and setup the start point and end point. See page 29, How to Virtual Track and Copy Segment. 5 6 7 8 9 8 • USB Push and hold the USB button while you turn on the PMD660's POWER switch. The CF card in the PMD660 appears as an external drive on a connected computer. It may also be removed for data transfer. See page 36, How to connect via the USB port. 6.
9. TRACK JUMP / / MARK- button • TRACK JUMP During playback, push to jump to the previous track. If pushed while playing, the first track jumps to the last track on the CF card. 8. PLAY/PAUSE / ENTER button • PLAY/PAUSE (playback) From stop, push to begin playback. During playback, push to pause playback. During play - pause, push to resume playback. • • ENTER (menu) During menu functions, push to accept the current setting and switch to the next menu item to be set.
ENGLISH 10. TRACK JUMP / / MARK+ button • TRACK JUMP During playback, push to jump to the next track. If pushed while playing, the last track jumps to the first track on the CF card. • 10 11 12 13 14 15 10 • During playback, push and hold the button to "fast forward" and do a 2X speed audible search in the forward direction. Release to return to normal forward playback. • During play - pause, push and hold the button to fast forward quickly.
ENGLISH 11. SHIFT button Push and hold the SHIFT button while you push other buttons (white labels) to activate alternate functions. 12. Display Labels, icons and alphanumeric messages on the display communicate the status of PMD660. 13. REC button From Stop, push to start recording. From Record - pause, push to resume recording. During recording, push to increment the track (start a new audio file), if "Manual Trk" is turned on in the Preset menu. 14.
16. Level meter The louder the sound input to the recorder on the Left/Right channel, the more LED lights are displayed. When the "Meter Mode" of preset menu is "Peak Only", only a peak level is displayed. (page 52) Front side ENGLISH 17. REC indicator Red indicator light is lit and steady during Record and flashing during Record pause. 16 18. PHONES jack Stereo headphones are plugged into this jack. Set “Output” of the preset menu to SP/HP (See Page 44). 17 18 19 20-a 19.
22. Carry strap shaft Attach the supplied carry strap here. 21 22 23 23. DC IN jack Plug the supplied AC adapter in this jack. The power supplied is 2.0A at 5V DC. The PMD660 automatically switches to adapter power if it was running on battery power. If AC power is interrupted by a power outage or unplugging the adapter, the PMD660 automatically switches to battery power. 24. USB port Plug the supplied USB cable in this port and connect the other end to your computer. 25.
Rear side ENGLISH 26-a 26-b 27 28 29 26. LINE IN/OUT jack Plug external line level audio devices in this jack. a. LINE IN Plug stereo audio cable in this jack to record from the output of an external unit. b. LINE OUT Plug stereo audio cable in this jack to connect to the input of an amplifier or other external unit.. Set “Output” of the preset menu to LINE (See Page 44). 27. REMOTE jack This jack accepts the optional wired remote Marantz model RC600PMD.
a bc d j l n e fg h i k m o MARK IN REMAIN ALC ATT S.SKIP STEREO 44.1K I.MIC 48K LINE MP3 LOCK p q r s a. MARK The MARK label appears when the number displayed on the upper alphanumeric display refers to EDL marks. b. INThe IN- label appears when the beginning (start point) of Copy segment function has been set. c. REMAIN The REMAIN label appears to indicate remaining time. d. Upper alphanumeric display Displays track number, number of tracks on CF card, EDL mark number, number of EDL's on CF card. e.
Basic operation 3. Slide the POWER switch to turn on. POWER OFF ON ENGLISH The PMD660 comes factory preset for recording voice using its built-in (internal) microphone. These are settings for recording a meeting, not settings for recording a vocal performance. 1. Unpack the AC adapter and the PMD660. a. Plug AC adapter into 100 - 240VAC power. b. Plug the adapter jack into the PMD660 at DC IN. a. A full display will appear. Wait for the PMD660 to initialize. Load i ng POWER OFF ON b.
To eject a CF card a. Slide the POWER switch to turn off. The PMD660 records onto various types of CF (Compact Flash) cards. Please refer to the Marantz Professional web site at www.d-mpro.com for what kinds of media are recommended. To insert a CF card POWER OFF ON ENGLISH CF cards b. Open the CF card door. a. Open the CF card door. c. Push the card eject button so it is in click out position. b. Fully insert the CF card. in position out position d.
ENGLISH CF card security CF card Format The supplied CF card compartment security screw requires using a small Phillips screwdriver to open the CF card compartment door. This reduces the possibility that the CF card will be misplaced or stolen. Formatting a CF card erases all audio files on the CF card and prepares it for use in the PMD660. If the CF card is formatted other than FAT16 or FAT32 (FAT=file allocation table), please format in your computer. a. Remove the plastic pin and then the retainer.
Recording Recording Procedure Connection Diagram 1. Slide the POWER switch to turn on. ENGLISH POWER OFF ON 2. Push the REC button to begin recording. MIC IN L R LINE IN The Rec indicator will be lit and steady while recording. The display will show the information display of recording. (page 40) 001 STEREO 44.1K I.
3. Push the REC PAUSE button to pause recording. Audio inputs for recording Audio inputs for recording are selected using the Input Menu. ENGLISH Channel : Stereo Display Input Menu I. MIC Internal Mic Recording (Stereo, L/R ch) MIC External Mic Recording (Stereo, L/R ch) LINE LINE Recording (Stereo, L/R ch) 4. Push the STOP button to stop recording and end the track (close the audio file). Channel : Mono Display Input Menu I.
Recording time chart The PMD660 can record in several compression algorithms. • Compressed recording using MPEG1 Layer III (MP3) mono and stereo. • Uncompressed recording using 16-bit linear Pulse Code Modulation (PCM). All times are approximated record times. Different media manufacturers allow more or less space for error correction and the like on their respective products. Channel : Stereo RecFormat Sampling Rate MP3-44.1kHz 44.1kHz MP3-48kHz 48kHz PCM-44.1kHz 44.
ENGLISH Recording Level Control Pre Record The recording level control lets you select the type of input level control. When PreRecord is on and the PMD660 is in record pause, it 'listens to' the selected audio input(s) and continuously buffers 2 seconds of audio. Then, when record is started, the PMD660 writes the previously buffered 2 seconds of audio to the card & continues to record from there. • At Manual, you control the input level with the REC LEVEL controls.
With Auto Trk(Automatic Track incrementing) on, a new track is begun automatically at specified intervals of recording time. Automatic Track can be set to increment every 1, 5, 10, 15 or 30 minutes, or every 1, 2, 6, 8, 12 or 24 hours. Automatic Track makes finding a particular point in a recording easier. For example, if a new track begins every minute during playback, the Minute Track makes finding a particular passage easier because of the relationship between track numbers and time.
Playback Procedure Track Access 1. Slide the POWER switch to ON. ENGLISH POWER OFF ON 2. Push the PLAY/PAUSE button to begin playback. • TRACK JUMP During playback, push to jump to the previous track. If pushed while playing the first track, it jumps to the last track on the CF card. • TRACK JUMP During playback, push to jump to the next track. If pushed while playing the last track, it jumps to the first track on the CF card. The PLAY indicator will be lit and steady while in playback.
• • During playback, push and hold the button to "rewind" and do a 2X speed audible search in the reverse direction. Release to return to normal forward playback. During playback, push and hold the button to "fast forward" and do a 2X speed audible search in the forward direction. Release to return to normal forward playback. EDL Mark EDL (Edit Decision List) marks can be created during recording manually or automatically. EDL marks help you find specific points in the recording.
• MARKENGLISH From Stop or playback, push and hold the SHIFT button while pushing the Mark- button to tab through the EDL marks on the CF card. To start playback from the displayed EDL Mark, push the PLAY/PAUSE button . Edit Edit menu, accessed from stop by pushing and holding the SHIFT button then pushing the MENU/STORE EDIT button, lets you erase tracks, erase EDL marks and format the CF card. Add an EDL mark automatically The Auto Mark Menu item turns the automatic EDL mark feature Off or On.
TrkErase lets you erase a selected track. After identifying the track number you want to erase. 1. Select the Trk Erase Edit menu choice: While in stop, push and hold the SHIFT button then push the MENU/STORE EDIT button. "Trk Erase" will appear in the display. 2. Push the ENTER button. The Display switches to track number flashing. 3. Push the the or button until the track number you want to erase is flashing. 4. Push the ENTER button. "Executing" will be displayed until Trk Erase is finished.
ENGLISH 3. AllMkErase (How to erase all EDL marks) 4. Format (How to format a CF card) AllMkErase lets you erase all EDL marks on the CF card. Format lets you erase all audio files on the CF card and prepares it for use in the PMD660. If the CF card is formatted other than FAT16 or FAT32 (FAT=file allocation table), please format in your computer. 1. Select the AllMkErase Edit menu choice: While in stop, push and hold the SHIFT button then push the MENU/STORE EDIT button.
The Marantz Professional PMD660 is the first solid state recorder to incorporate new file editing features like Virtual Track and Copy Segment. Designed with the field reporter in mind, they provide a host of quick and easy to use ways of locating and accessing segments of audio that everyone can utilize.
4. When you have reached your desired Out point, push the COPY/USB button. Creating a Virtual Track ENGLISH 1. During playback, push the COPY/USB button when the audio reaches your desired In Point. “SetAs OUT?” is displayed. IN - “SetAs IN?” is displayed. 001 001 STEREO 44.1K I.MIC MP3 Se t As OUT? STEREO 44.1K I.MIC MP3 Se t As I N? LOCK 5. Push the PLAY/PAUSE button to store the Out point. 2. Push the PLAY/PAUSE button to store the In point. “StoreV. Tr?” is displayed.
Using Copy Segment to create a new file 4. When you have reached your desired Out point, push the COPY/USB button. ENGLISH 1. During playback, push the COPY/USB button when the audio reaches your desired In Point. “SetAs OUT?” is displayed. 001 001 IN - “SetAs IN?” is displayed. STEREO 44.1K I.MIC MP3 Se t As OUT? STEREO 44.1K I.MIC MP3 Se t As I N? LOCK 5. Push the PLAY/PAUSE button to store the Out point. 2. Push the PLAY/PAUSE button to store the In point. “StoreV. Tr?” is displayed.
7. Push the PLAY/PAUSE button to start the Copy process. Entering Virtual Playback mode ENGLISH Now that you have created a Virtual Track, to play it back you must put the PMD660 into Virtual Track Playback mode. “Executing” will be shown on the display. 50% 1. From stop mode, push the COPY/USB button to enter Virtual Playback mode. STEREO 44.1K I.MIC MP3 LOCK When the copy procedure is completed, the display will show “Completed” for 1 sec.
Copy SEG? [How to convert a Virtual Track to a new file] Just like regular playback mode, Virtual track has its own EDIT mode. Within this EDIT mode, you have the ability to turn one of your Virtual tracks into a new file, all Virtual Tracks into new files, erase a Virtual Track, and erase all Virtual Tracks. When in Virtual Track EDIT mode, “Copy SEG?” lets you copy a single Virtual Track to a new file. 1.
Copy SEG A? [How to convert all Virtual Tracks to new files] ENGLISH When in Virtual Track EDIT mode, “Copy SEG A?” lets you copy all of your Virtual Tracks to new files. VT Erase? [How to erase a Virtual Track] When in Virtual Track EDIT mode, “VT Erase?” lets you erase a single Virtual Track. After indetifying the track to erase: 1. Select the “Copy SEG A?” Edit menu choice: While in Virtual Track Play mode, push and hold the SHIFT button and then push the MENU/STORE/EDIT button.
AVT Erase? [How to erase all Virtual Tracks] ENGLISH When in Virtual Track EDIT mode, “AVT Erase?” lets you erase all Virtual Tracks from memory. 1. Select the “AVT Erase?” Edit menu choice: While in Virtual Track Play mode, push and hold the SHIFT button and then push the MENU/STORE/EDIT button. “Copy SEG?” will appear in the display. 2. Push the displayed. or button until “AVT Erase?” is 3. Push the ENTER button. The display switches to the “All” blinking in the upper numeric display. 4.
USB mode ENGLISH The PMD660 records directly onto CF cards. Recordings can then be transferred to your desktop or laptop computer by removing the CF card from the PMD660, or by connecting the PMD660, to your computer via the USB port. Audio recorded in the popular MP3 compression format is directly available for intranet or internet file sharing. How to connect via the USB port The CF card in the PMD660 appears as an external drive on a connected computer. 1.
Notes: • If the PMD660 is not connected to the AC adapter, "Need DC IN" is displayed. • The USB connection can only be made active when the PMD660 is off (neither during recording nor playback). CAUTION: • Only copy audio files (tracks) to other volumes. • Do not modify or delete the EDL file. • If the EDL and Virtual Track file is missing or damaged PMD660 will not be able to recognize EDL marks and Virtual Tracks. • Do not remove a CF card during USB mode. Data and the CF card can be damaged.
Additional Functions Battery ENGLISH Battery setup The PMD660 operates on 4 standard AA size Alkaline, or Ni-MH batteries. Setup the "Battery" of the preset menu. (page 53) Battery indicator The Battery symbol appears in most displays to indicate battery life. indicates that the battery is fully charged. indicates that the battery, is half charged. Record or playback time is available. indicates that the battery charge is getting low.
Phantom Power The key lock secures the PMD660 in the state it is in during Record, Playback or Stop. Push and hold the SHIFT button while pushing the DISPLAY/ LOCK button to turn KEY LOCK on. All buttons and functions will cease to operate with the exception of the LIGHT button. Switch Phantom to ON to provide +48V of power for a condenser microphone(s). ENGLISH Key lock ON: +48V is supplied to power condenser microphone(s). OFF: No microphone power is supplied.
Display Push the DISPLAY / LOCK button to alternate information displays. ENGLISH Displays are slightly different in Stop, Record and Play. • During Stop: • Remaining record time for the CF card (Default display) ↓ • Total EDL marks on CF card.
Presets lets you set or change recording and playback parameters, such as changing inputs and setting the Date and Time. Three menu selectable Presets make it easy to switch between your commonly used input, recording format and other menu selections. General Menu procedure 1. With the PMD660 at Stop, Push the MENU/STORE EDIT button. 2. Push the or button to choose the Preset number. 3. When displayed, push the ENTER button to select that Preset number choice. 4. Push the display.
Table of Preset defaults (USA) Display ENGLISH 1. Input 2. Output 3. Date/Time 4. Rec Format 5. 6. 7. 8. RecChannel PreRecord Manual Trk Auto Trk 9. Auto Mark 10. Silent Skip 11. LevelCont. 12. Meter Mode 13. Mic Atten. 14. AutoPowoff 15. Battery 16. Beep 17. Machine ID 18. Default 19. Version Application: 42 Selection range INT MIC/ MIC/ LINE LINE, SP/HP 2004 - 2099 Jan - Dec 1 - 31 AM/PM 00:00 - 11:59 MP3-44.1K/ MP3-48K/ PCM-44.
Display 1. 2. 3. Input Output Data/Time 4. RecFormat 5. 6. 7. 8. RecChannel PreRecord Manual Trk Auto Trk 9. Auto Mark 10. Silent Skip 11. LevelCont. 12. Meter Mode 13. Mic Atten. 14. AutoPowoff 15. Battery 16. Beep 17. Machine ID 18. Default 19. Version Application: Selection range INT MIC/ MIC/ LINE LINE, SP/HP 2004 - 2099 Jan - Dec 1 - 31 00:00 - 23:59 MP3-44.1K/ MP3-48K/ PCM-44.
1. Input (How to select input(s) for recording) Audio input(s) for recording are selected using the Input Menu. 2. Output (How to select output for playback) Audio output for playback is selected using the Output Menu. ENGLISH 1. From stop, push the MENU/STORE EDIT button. 2. Push the or button to select Preset 1, 2 or 3. 3. Push the ENTER button to accept the selected Preset. 1. From stop, push the MENU/STORE EDIT button. 2. Push the or button to select Preset 1, 2 or 3. 3.
1. From stop, push the MENU/STORE EDIT button. 2. Push the or button to select Preset 1, 2 or 3. 3. Push the ENTER button to accept the selected Preset. 4. Push the or button so Date/Time is displayed. 5. Push the ENTER button while Date/Time is displayed. The Date and time information will be displayed with the month flashing. (Europe : the day flashing) 6. Push the or button until the current month is displayed. 7. Push the ENTER button to confirm the month. The day will be flashing.
ENGLISH 4. Rec Format (How to set or change the Rec Format parameters) The PMD660 can record in several compression algorithms. See explanation and chart below. • First, determine the input connection you want to record from; INT MIC, MIC, or LINE. • Second, set the Preset Menu Input choice to correspond with the connection. RecChannel Rec Format in menu in menu Stereo PCM-44.1K PCM-48K MP3-44.1K MP3-48K Mono PCM-44.1K PCM-48K MP3-44.1K MP3-48K bit rate file extensions 1412k 1536k 128k 128k 705.
1. From stop, push the MENU/STORE EDIT button. 2. Push the or button to select Preset1, 2 or 3. 3. Push the ENTER button to accept the selected Preset. 4. Push the or button so PreRecord is displayed. 5. Push the ENTER button while PreRecord is displayed. The PreRecord choice (On or Off) is flashing. 6. Push the or button to tab through the PreRecord choices. 7. When correct, push the ENTER button. Display returns to PreRecord. 8. Push the or button to select other Menu choices for editing.
ENGLISH 8. Auto Trk With Auto Trk (Automatic Track incrementing) on, a new track begins automatically at specified intervals of recording time. • Automatic Tracks are silent. Playback across an Automatic Track does not produce any sound. • Automatic Track can be set to increment every 1, 5, 10, 15 or 30 minutes, or every 1, 2, 6, 8, 12 or 24 hours. • Automatic Track makes finding a particular point in a recording easier.
1. From stop, push the MENU/STORE EDIT button. 2. Push the or button to select Preset1, 2 or 3. 3. Push the ENTER button to accept the selected Preset. • If Auto Mark is on and the machine is in record - pause, when recording is resumed a mark will be added. • If Auto Mark is on and the PMD660 is recording audio below the sound threshold for more than three seconds, audio that crosses the threshold will cause a mark to be added. 4. Push the or button so Auto Mark is displayed. 5.
ENGLISH 10. Silent Skip Silent Skip automatically pauses recording when there is a period of silence and resumes recording when sound resumes. This feature is often referred to as voice activated recording. Silent Skip looks for sound below a preset level for three seconds time. When that occurs, the PMD660 switches to record pause. When a signal above the preset level is input, recording resumes. The Silent Skip Menu setting permits : • Turning Silent Skip On or Off.
1. From stop, push the MENU/STORE EDIT button. 2. Push the or button to select Preset 1, 2 or 3. 3. Push the ENTER button to accept the selected Preset. • At Manual, you control the input level with the REC LEVEL controls. • At ALC, the PMD660 automatically responds to changes in input level. (ALC: Automatic Level Control = Automatic Gain Control) 4. Push the or button so LevelCont is displayed. 5. Push the ENTER button while LevelCont is displayed. The LevelCont choice (Manual or ALC) is flashing. 6.
ENGLISH 12. Meter Mode The Meter Mode lets you select the type of level meters. • At Normal, all the level meters are displayed. • At Peak Only, the level meter(s) displays only a peak level. 1. From stop, push the MENU/STORE EDIT button. 2. Push the or button to select Preset 1, 2 or 3. 3. Push the ENTER button to accept the selected Preset. 4. Push the or button so Meter Mode is displayed. 5. Push the ENTER button while Meter Mode is displayed. The Meter Mode choice (Normal or Peak only) is flashing. 6.
1. From stop, push the MENU/STORE EDIT button. 2. Push the or button to select Preset 1, 2 or 3. 3. Push the ENTER button to accept the selected Preset. 4. Push the or button so AutoPowOff is displayed. 5. Push the ENTER button while AutoPowOff is displayed. The AutoPowOff choice (On or Off) is flashing. 6. Push the or button to tab through the AutoPowOff choices. 7. When correct, push the ENTER button. Display returns to AutoPowOff. 8. Push the or button to select other Menu choices for editing.
ENGLISH 16. Beep When battery charge is depleted and Beep is set to On, the PMD660 will beep. If the PMD660 is not used for 15 minutes during stop or play - pause, power can be automatically shut off to conserve battery life. (See AutoPowOff page 53.) If AutoPowOff and Beep are both set to On, the PMD660 will beep to alert you that the power is shutting off. 1. From stop, push the MENU/STORE EDIT button. 2. Push the or button to select Preset 1, 2 or 3. 3.
Note: US defaults are used for illustration. See page 42, 43 for a table of menu defaults. Defaults are listed for each menu item. 1. From stop, push the MENU/EDIT button. 2. Push the or button to select Preset 1, 2 or 3. 3. Push the ENTER button to accept the selected Preset. 4. Push the or button until Default is displayed. 5. Push the ENTER button while Default is displayed. The OK? is flashing. 6. Push the ENTER button. Display returns to stop mode.
ENGLISH The PMD660 will not record. • Check that the maximum of 999 tracks have not been recorded. • Check that the PMD660 acknowledges the CF card. No signal from microphone input. • Check input selection. • Check REC level control settings. • Check if microphone(s) require(s) Phantom power. There is excessive noise on the PMD660. • Check cable connections and/or replace cable. • Check for proper gain levels. Playback on a PC results in poor sound. • Check quality of PC sound card and program.
Error Message Description ENGLISH Display CF Card No Card No CF card inserted, or card is not detected. Unformat CF card is formatted other than FAT16 or FAT32. Full Card Remaining capacity of CF card is less than a few kbytes. Full 999 The number of tracks on the CF card has reached the 999 maximum. Full Mark The number of EDL marks on the card has reached the 255 maximum. No Track Track file is not detected. VBR VBR file is forwarded or rewinded.
Specifications ENGLISH Digital audio system System .............................................. Solid State Recorder Usable media ........................................ CF memory cards Microdrive Recording and media methods .mp3 .................................. MPEG1 Layer III compression PCM ...................................................... 16 bit linear PCM Recording bit rate MP3 mono ............................................................ 64 kbps MP3 stereo ..............................
LIMITED WARRANTY - USA Optional accessories** (See www.d-mpro.com for description and/or ordering information) Wired remote ....................................................RC600PMD 1. Damage, deterioration, malfunction or failure to meet performance specifications resulting from: a) Accidents, acts of nature, misuse, abuse, neglect or unauthorized product modification. b) Improper installation, removal or maintenance, or failure to follow supplied instructions.
Non-transferable warranty This Warranty may be enforced only by the original purchaser. ENGLISH Service Information 1. If your unit needs service in the USA, contact our service referral at the appropriate telephone number indicated below. We will advise you of the name and location of one or more authorized service centers from which service may be obtained. Please do not return the unit directly to us. 2. You must pay any shipping charges if it is necessary to ship the product for service.
Marantz is a registered trademark.