R Model CD110 User Guide CD Player CLASS 1 LASER PRODUCT KLASSE 1 LASER PRODUKT I.H.T.
CAUTION RISK OF ELECTRIC SHOCK DO NOT OPEN CAUTION: TO REDUCE THE RISK OF ELECTRIC SHOCK, DO NOT REMOVE COVER (OR BACK) NO USER-SERVICEABLE PARTS INSIDE REFER SERVICING TO QUALIFIED SERVICE PERSONNEL The lightning flash with arrowhead symbol, within an equilateral triangle, is intended to alert the user to the presence of uninsulated “dangerous voltage” within the product’s enclosure that may be of sufficient magnitude to constitute a risk of electric shock to persons.
SAFETY INSTRUCTIONS READ BEFORE OPERATING EQUIPMENT This product was designed and manufactured to meet strict quality and safety standards. There are, however, some installation and operation precautions which you should be particularly aware of. 12. Grounding or Polarization — The precautions that should be taken so that the grounding or polarization means of an appliance is not defeated. 1. Read Instructions — All the safety and operating instructions should be read before the appliance is operated. 2.
FIGURE 1 EXAMPLE OF ANTENNA GROUNDING ACCORDING TO NATIONAL ELECTRICAL CODE INSTRUCYIONS CONTAINED IN ARTICLE 810 -"RADIO AND TELEVISION EQUIPMENT" ANTENNA LEAD IN WIRE GROUND CLAMP ANTENNA DISCHARGE UNIT (NEC SECTION 810-20) ELECTRIC SERVICE EQUIPMENT GROUNDING CONDUCTORS (NEC SECTION 810-21) GROUND CLAMPS POWER SERVICE GROUNDING ELECTRODE SYSTEM (NEC ART 250, PART H) NEC - NATIONAL ELECTRICAL CODE NOTE TO CATV SYSTEM INSTALLER: This reminder is provided to call the CATV (Cable-TV) system installer's
MAIN UNIT (FRONT - CLOSED) zx STANDBY vb 7 6 OPEN REMOTE CONTROL UNIT CD110 e r u o !1 !3 !6 AMS SCROLL DISPLAY 1 2 3 4 5 6 7 8 9 REPEAT RANDOM 0 CD TEXT TIMER CANCEL PROG. q w t y i !0 !2 !5 !4 MAIN UNIT (FRONT - OPENED) c STANDBY 7 6 REPEAT DISPLAY Ú1 Ú0 . , mn REMOTE CONTROLLER RC110CD MAIN UNIT (REAR) ANALOG OUT REMOTE CONTROL LEFT COAX.—DIGITAL OUT — OPT. IN RIGHT OUT REMOTE EXT. INT.
ABOUT THIS USER GUIDE ENGLISH Refer to the figures on page iv of this user guide. The numbers on the figures correspond to those in the text. All references to the connections and controls that are printed in BOLD type are as they appear on the unit. PRECAUTIONS The following precautions should be taken when operating the equipment. GENERAL PRECAUTIONS When installing the equipment ensure that: – the ventilation holes are not covered. – air is allowed to circulate freely around the equipment.
ENGLISH COMPACT DISCS The glossy side shining like a rainbow is the front side of the disc, and the side on which the label is printed is the back. Unlike conventional turntables for playing analog discs, the CD110 Compact Disc Player reads the information recorded on the disc from underneath without contacting it using a beam of laser light. Therefore, the performance of a compact disc will not degrade like conventional analog records. Handle discs carefully so as not to damage or scratch the front side.
!1 4, ¢ buttons q 4 : Press to play from the start of the track now playing. When they are pressed again within 1 second after it was pressed the first time, play starts from the track before. (Standby) button Press to turn the unit's power on or set it to the standby mode. (Operation is not possible if the unit is connected to the SR110, the SR110's rear switch is set to SYSTEM and the CD110's REMOTE CONTROL SELECTOR EXT/INT switch is at EXT.
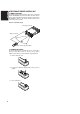
ENGLISH OPERATION OF REMOTE CONTROL UNIT 1. REMOTE CONTROL The distance between the transmitter of the remote control unit and the IR SENSOR of the CD110 should be less than about 5 meters. If the transmitter is pointed to a direction other than the IR SENSOR or if there is an obstacle between them, remote control may not be possible. Remote-controllable range CD player (CD110) Approx. 5 meters Remote control unit (RC110CD) 2.
FRONT PANEL A ANALOG OUT jacks z These are the output jacks for the analog audio signals. Connect them to the CD or AUX jacks, etc. on the amplifier using the supplied analog connecting cord. Remember that the white jack is for the LEFT channel and the red jack is for the RIGHT channel, and connect the jacks correctly. Press to switch the power ON, and press again to switch it OFF. * Never connect these jacks to the PHONO jacks of the amplifier.
ENGLISH CONNECTIONS When this unit is to be used on its own, set the REMOTE CONTROL SELECTOR to INT, and when connecting the unit to Marantz audio components equipped with a D-BUS compatible remote sensor window using the remote control cable for use as part of a system, set the REMOTE CONTROL SELECTOR to EXT. * Remote control operations cannot be performed if the REMOTE CONTROL SELECTOR is set to EXT when this unit is to be used on its own. ANALOG OUT REMOTE CONTROL LEFT COAX.—DIGITAL OUT — OPT.
A new type of music CD produced by recording the album name, track names and other text information as well as music on a conventional CD is called CD-TEXT. The text information is recorded on parts which were not used by conventional music CDs. For this reason, these CDs can be still played back on existing CD players as in the past whereas if a CD-TEXT compatible player such as this unit is used instead, their text information can be viewed as well.
TO TEMPORARILY STOP PLAY ENGLISH CD PLAY 1. Press the button q/z to switch on the power. * The CD110's power will also be switched on if the SR110 is connected to the REMOTE CONTROL jack and the SR110's power is on. 2. Press the OPEN button b to open the panel. Press the 6 button v on the main unit or the 8 button ⁄4 on the remote control unit. The pause indicator (8) lights, and the disc play is temporarily stopped where the button was pressed. TRACK TRACK TIME CD This lights.
REPEAT PLAY DIRECT SEARCH (SPECIFYING THE NUMBER OF A DESIRED TRACK AND PLAYING IT) 1-TRACK REPEAT (REPEATED PLAYBACK OF ONE TRACK ONLY) 1. Specify the track number using the numeric buttons (0 to 9). Track 3 : Press numeric button "3." Track 12 : Press numeric button "1" and then numeric button "2" within two seconds. * This operation does not work with MP3 discs. 2. Press the 6 button v on the main unit or the 3 button !0 on the remote control unit.
ENGLISH RANDOM PLAY AMS PLAY When the RANDOM button u is pressed during play or stop, the unit automatically rearranges the sequence of the tracks and plays all the tracks in the resulting random order. This lights. When the AMS button r is pressed with a regular CD in the stop mode, the "SCAN" indicator lights, and the first ten seconds of each track on the disc starting from the first track are played in succession.
LISTENING TO FAVORITE TRACKS IN A FAVORITE ORDER Press the PROG. button !5 during programming. Each time this button is pressed, the tracks will be displayed one after the other in the sequence in which they were programmed. This function cannot be used with MP3 discs. – Random play cannot be used with program play. – AMS cannot be used with program play. 1. When the PROG. button !5 is pressed in the stop mode, the "PROG" indicator flashes, and the program mode is established.
ENGLISH USING THE TIMER FUNCTIONS 7. This unit enables a time to be set and for a disc to be played at this setting. The clock must always be set for the timer functions to be valid. * These functions work only when the unit is used on its own. The SR110's timer functions are used when the unit is operating as part of a system with the SR110. 1. Press the TIMER button i on the remote control unit for at least 3 seconds. "12/24" now appears on the display, and "12" starts flashing. This flashes. 2.
A CD can be played at a specific time by setting the playback time. The ON time and OFF time are set for timer playback. 1. Next, the playback OFF time is set. Repeat steps 2 through 5 to set the hour and minute. Upon completion of the settings, the timer setting mode is cleared automatically. Press the TIMER button i on the remote control unit once. On the display, "On Time" appears first followed by the time, and the hour flashes. (Playback ON hour setting) ENGLISH 6.
ENGLISH CONCERNING MP3 SELECTING ALBUMS This unit is capable of playing MP3-CDs and CDR or CD-RW discs with MP3 files created by the user. For playing CDR or CD-RW discs with MP3 files, the ".mp3" extension is used to save the data created by the user in files. Other extensions such as ".doc," ".txt" and ".pdf" cannot be used. This unit is not capable of digitally recording MP3 files. 1.
ENGLISH When there are multiple sessions (Figure showing what is displayed by Windows Explorer) "Dir" is displayed when using non-English characters. CD-ROM drive Album 01 Skip aaaa03.mp3 aaaa04.mp3 aaaa05.mp3 aaaa06.mp3 yyyy.jpg zzzz.doc "File" is displayed when using non-English characters. Album 02 Album 05 bbbb07.mp3 bbbb08.mp3 Session 1 eeee13.mp3 eeee14.mp3 Album 03 Album 06 cccc09.mp3 cccc10.mp3 ffff15.mp3 ffff16.mp3 Skip Album 07 wwww.wav xxxx.wav Album 10 gggg17.mp3 hhhh22.
ENGLISH TROUBLESHOOTING If you believe that a malfunction has occurred, first check the points listed below. The problem may have been caused by a simple operational error or a connection problem. If the problem is not solved even after carrying out the following checks, consult your dealer or nearest Marantz sales office or service center. OPERATING PRECAUTIONS In the winter you may notice that condensation forms on the window of a well-heated room.
TECHNICAL SPECIFICATIONS AUDIO CHARACTERISTICS Channels ................................................................................................................................................ 2 channels Frequency range .................................................................................................................................. 20Hz-20kHz Dynamic range ................................................................................................................................
COUNTRY ALGERIE ARMENIA AUSTRALIA AUSTRIA BAHREIN BANGLADESH BELGIUM BULGARIA CANADA CHINA CYPRUS CZECH REPUBLIC DENMARK DUBAI EGYPT ESTONIA F.Y.R.O.M. FINLAND FRANCE GERMANY GREECE HEADQUARTERS EUROPE: HONG KONG HUNGARY ICELAND INDIA IRAN IRELAND ISRAEL ITALY IVORY COAST JAPAN KOREA KUWAIT LATVIA LEBANON LITHUANIA MALAYSIA MALTA MAURITIUS MILITARY MARKET EUROPE NETHERLANDS NEW ZEALAND NORWAY OMAN POLAND PORTUGAL PROFESSIONAL EUROPE PROFESSIONAL U.S.A.
R Model SR110 User Guide Receiver
CAUTION RISK OF ELECTRIC SHOCK DO NOT OPEN CAUTION: TO REDUCE THE RISK OF ELECTRIC SHOCK, DO NOT REMOVE COVER (OR BACK) NO USER-SERVICEABLE PARTS INSIDE REFER SERVICING TO QUALIFIED SERVICE PERSONNEL The lightning flash with arrowhead symbol, within an equilateral triangle, is intended to alert the user to the presence of uninsulated “dangerous voltage” within the product’s enclosure that may be of suffi-cient magnitude to constitute a risk of electric shock to persons.
IMPORTANT SAFETY INSTRUCTIONS READ BEFORE OPERATING EQUIPMENT This product was designed and manufactured to meet strict quality and safety standards. There are, however, some installation and operation precautions which you should be particularly aware of. 1. Read Instructions - All the safety and operating instructions should be read before the appliance is operated. 2. Retain Instructions-The safety and operating instructions should be retained for future reference. 3.
18. Object and Liquid Entry-Never push objects of any kind into this video product through openings as they may touch dangerous voltage points or short-out parts that could result in a fire or electric shock. Never spill liquid of any kind on the video product. 19. Servicing-Do not attempt to service this video product yourself as opening or removing covers may expose you to dangerous voltage or other hazards. Refer all servicing to qualified service personnel. 20.
1 2 STANDBY AUX FM/AM 3 DISPLAY MUTE 4 5 OPEN 1 CD CDR MD SR110 2 6 3 5 F/P RANDOM 7 NEWS/TA VOLUME REPEAT 7 4 6 STANDBY 8 9 10 11 12 13 14 DISPLAY MUTE 8 10 VOLUME AMP BAND + 9 11 12 13 MUTE 16 OPEN CDR DISPLAY WOW ENTER TIMER 14 WOW TIMER PHONES 15 SLEEP MEMO TUNER 17 19 18 20 15 16 17 SYSTEM REMOTE CONTROLLER RC110SR MODEL NO.
FEATURES This section must be read before any connection is made to the mains supply. Easy operation with remote control bus in SYSTEM mode operation WARNINGS High power output of the discrete configuration possesses a high level of reliability. ENGLISH FOREWORD 30-Station random preset tuner Do not expose the equipment to rain or moisture. Do not remove the cover from the equipment. Do not push anything inside the equipment through the ventilation holes. Do not handle the mains lead with wet hands.
ENGLISH CONTROL BUTTON ON THE REMOTE CONTROL UNIT q Power switch Press this switch to turn the power of the unit ON. If components of Marantz AV system are connected through the REMOTE CONTROL bus, this will turn these components ON. Press this switch again to turn the unit OFF, and the unit enters standby mode. w Function buttons There are FM/AM, CD, CD-R, MD and AUX buttons. These buttons are used to select the source to be played or recorded.
ENGLISH OPERATION OF REMOTE CONTROL UNIT 1. REMOTE CONTROL The distance between the transmitter of the remote control unit and the IR SENSOR of the SR110 should be less than about 5 meters. If the transmitter is pointed to a direction other than the IR SENSOR or if there is an obstacle between them, remote control may not be possible. A pp ro x 5 m et er s Remote-controllable range ° 0 6 2.
ENGLISH CONNECTORS AND CONTROLS ON THE MAIN UNIT A Terminal for FM antenna, 75 ohms For connecting an external FM antenna with a circular plug, or for connecting a cable network. Terminals for AM antenna and Grounding To connect the supplied AM loop antenna, use the terminals marked “AM” and “GND”. In areas where the AM loop antenna gives unsatisfactory results, it is recommended that the receiver be connected to an outdoor antenna. Use the terminal marked ‘AM’ for this.
⁄5 PHONES jack The JOG control can be used in the TUNER, AMP or TIMER modes. Press to change the mode of JOG control to AMP mode. 5 seconds after the previous JOG operation is finished, the mode of JOG control will return to AMP mode automatically. You can also use this button to return to AMP mode immediately. The function of JOG control in AMP mode is changed as follows (except the volume adjust mode): SOURCE select mode: To select input mode.
ENGLISH CONNECTIONS SYSTEM OPERATION SYSTEM CONNECTION FEATURES OF SYSTEM CONNECTION Synchronized power ON/OFF By switching the power switch q/z, you can turn the CD player, CD Recorder and MD deck connected through the REMOTE CONTROL bus connection ON or OFF. You cannot turn on and off by pressing the power switch of connected components. Auto source selection When the CD in the CD110 starts playing by pressing the play button on the CD110, the SR110 receiver will change source automatically.
ENGLISH AM LOOP ANTENNA FM FEEDER ANTENNA FM EXTERNAL ANTENNA SPEAKER SYSTEM (L) F-type (for U version) / IEC type (for N version) converter plug (attached) When using the FM antenna attach to this apparatus (R) MODEL NO. SR110 ANTENNA FM (75Ω) CD GND AUX IN AM CDR OUT IN MD OUT SPEAKER SYSTEM REMOTE CONTROL LEFT IN SELECTOR SYSTEM INT. OUT RIGHT RIGHT ANALOG OUT REMOTE CONTROL LEFT COAX.– DIGITAL OUT –OPT. LEFT MODEL NO. CD110 IN RIGHT OUT REMOTE EXT. INT.
ENGLISH BASIC OPERATIONS NORMAL PLAY 1. 2. Press the power switch q/z to turn the power ON. Press the optimum function button w or turn JOG control m in the SOURCE select mode to select the source to be played. Please refer to the next table. Function button control on the remote FM/AM CD CDR MD AUX 3. FM or AM CD player (CD110) CD recorder MD deck AUX (TV game, etc.) Start playing the source component. Adjust the listening volume with the VOLUME control ⁄4 or VOLUME buttons yu.
PRESET MEMORY OPERATION TO LISTEN TO THE TUNER The SR110 receiver can store up to 30 stations selected in the FM and AM bands. The preset memory function allows frequency, receiving mode (STEREO or MONO) and also station name to be stored in the memory.
5. ENGLISH When up to 30 stations have been preset, the auto preset memory function automatically stops. To stop in mid-operation, press the MEMO button ⁄2 or the “0” button e on the remote control. Note: - If you operate the auto preset memory again, new received frequency is stored into the preset memory 01 to 30. The previous preset memories are replaced to new one. - Preset Memory is not erased. Preset memory can be replaced only.
PROGRAMME TIMER SETTING To operate the timer program, you must set the present time. The clock time can be set 12-hour or 24-hour system. The following shows as an example how to set the time as 2:30 PM. The clock displays “0:00” at initial Operation using the main unit You can play marantz CD player CD110, when it is connected with remote control bus correctly.
6. Select a function (Play mode) 9. ENGLISH 10. TIMER TIMER 1 Turn the JOG control m to select the source (TUNER or CD) to be played. 2 Press the TIMER button ⁄0. 3 When you select “TUNER”, turn the JOG control m to select a preset number to be received. When you select “CD”, turn the JOG control m to select a track number to be played. 4 Press the TIMER button ⁄0. Note: If you select a track number which is not on the CD, the play mode will start track number 1 when the timer activates. 7.
1. Press the power switch q/z to turn the power of the unit ON. TIMER 2. 3. 4. ENGLISH CANCEL TIMER SETTING Press the TIMER button ⁄0 on the front panel until “Timer ON/OFF” is displayed. Turn the JOG control m to select “OFF”. Press the JOG button m. Important - “TIMER” indicator is extinguished when TIMER button ⁄0 is pressed for 3 seconds or more in timer playing or recording mode. - Never set “Once” or “Everyday” in timer playing or recording mode.
ENGLISH TROUBLE SHOOTING Should faults occur, in many cases it is not necessary to consult your dealer or a Marantz technical service department. On the basis of the following checks you will be able to rectify a number of faults yourself without difficulty. If the fault cannot be remedied after the following checks, please consult your dealer or nearest Marantz service agent. Sound comes from only one side. - Check the connections of the loudspeaker which is not working.
TECHNICAL SPECIFICATIONS FM TUNER SECTION Frequency Range ......................................................................................................................... 87.5 - 108.0 MHz Usable Sensitivity ........................................................................................................................................... 0 dBµ Signal to Noise Ratio ...........................................................................................................
COUNTRY ALGERIE ARMENIA AUSTRALIA AUSTRIA BAHREIN BANGLADESH BELGIUM BULGARIA CANADA CHINA CYPRUS CZECH REPUBLIC DENMARK DUBAI EGYPT ESTONIA F.Y.R.O.M. FINLAND FRANCE GERMANY GREECE HEADQUARTERS EUROPE: HONG KONG HUNGARY ICELAND INDIA IRAN IRELAND ISRAEL ITALY IVORY COAST JAPAN KOREA KUWAIT LATVIA LEBANON LITHUANIA MALAYSIA MALTA MAURITIUS MILITARY MARKET EUROPE NETHERLANDS NEW ZEALAND NORWAY OMAN POLAND PORTUGAL PROFESSIONAL EUROPE PROFESSIONAL U.S.A.