Model CDR300 User Guide CD Recorder R CLASS 1 LASER PRODUCT KLASSE 1 LASER PRODUKT I.H.T.
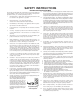
CAUTION RISK OF ELECTRIC SHOCK DO NOT OPEN CAUTION: TO REDUCE THE RISK OF ELECTRIC SHOCK, DO NOT REMOVE COVER (OR BACK) NO USER-SERVICEABLE PARTS INSIDE REFER SERVICING TO QUALIFIED SERVICE PERSONNEL The lightning flash with arrowhead symbol, within an equilateral triangle, is intended to alert the user to the presence of uninsulated "dangerous voltage" within the product's enclosure that may be of sufficient magnitude to constitute a risk of electric shock to persons.
SAFETY INSTRUCTIONS READBEFOREOPERATINGEQUIPMENT This product was designed and manufactured to meet strict quality and safety standards. There are, however some installation and operation precautions which you should be particularly aware of. 1. Read Instructions – All the safety and operating instructions should be read before the appliance is operated. 2. Retain Instructions – The safety and operating instructions should be retained for future reference. 3.
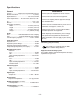
Specifications WARNINGS General System ................. Compact Disc Digital Audio (CD-DA) Number of channels ....................................... 2 (stereo) Applicable discs ............................... CD, CD-R, CD-RW Power requirements ......AC100V-240V, 50/60 Hz, 21W Do not expose the equipment to rain or moisture. Do not remove the cover from the equipment. Do not insert anything into the equipment through the ventilation holes. DC .............................................................
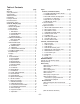
Table of Contents Topic page Warnings .............................................................. 2 Safety Instructions ................................................ 3 Specifications ........................................................ 4 Table of Contents .................................................. 5 Introduction .......................................................... 6 Package contents ................................................. 7 Remote batteries .................................
Table of Contents continued Topic page How to copy an existing CD (basics) ............ 22 Select record mode .................................. 23 RECORD .................................................. 23 MINUTE TRACK ....................................... 23 SYNC RECORD ....................................... 23 SYNC REC+FINAL ................................... 23 Recording tips .......................................... 23 Record Adjustments AUTO TRACK and AUTO STOP defaults ..... 23 AUTO TRACK ....
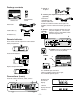
Package contents 1 Plug in to AC power BASS 1ABC 2 DEF 4 JKL 5 MNO 6 PQR TEXT 7 STU 8 VW 9 XYZ 3 GHI SINGLE DISPLAY 0 SPACE PROG TREBLE MID AMS TEXT PHANTOM PROG DISP REC MODE SINGLE REPEAT REPEAT MENU/STORE AB A-B CAN/DEL ENTER MEN/STO 2 Connect your amplifier and speaker system TR INC CANCEL/DELETE REC CD RECORDER CDR300 PROFESSIONAL SELECT REMOTE CONTROLLER ERASE RC300CDR FINALIZE (optional) Connect the supplied Right and Left RCA audio cable to LINE OUT and then c
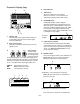
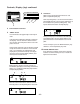
Controls, Display (top) 1 4 Control buttons 2 1 TEXT button Activates scrolling text in the display. When a CD with text is first read the text is automatically displayed and scrolls across. BASS TREBLE MID TEXT PHANTOM PROG DISP REC MODE SINGLE 2 PHANTOM button REPEAT MENU/STORE A-B PHANTOM provides a power supply for condenser microphone(s) plugged into the XLR MIC/LINE jack(s). Phantom power is only available when the MIC/LINE/INT switch is set to MIC.
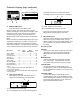
Controls, Display (top) continued 5 BASS TEXT PHANTOM PROG DISP REC MODE SINGLE TEXT PHANTOM PROG DISP REC MODE SINGLE Push DISP and release a second time and the remaining play time for the entire CD is displayed. REPEAT MENU/STORE TREBLE MID REPEAT MENU/STORE A-B CANCEL/DELETE CD RECORDER CDR300 A-B c CANCEL/DELETE PROFESSIONAL SELECT ERASE FINALIZE d REC POWER STANDBY PUSH ENTER 4 6 a 7 CD c TOTAL TRACK is lit and steady. d The countdown time is for the entire CD.
Controls, Display (top) continued BASS TEXT PHANTOM PROG DISP REC MODE SINGLE TEXT PHANTOM PROG DISP REC MODE SINGLE 9 A-B button REPEAT MENU/STORE While a CD is playing push and release to start point A to point B repeat play. TREBLE MID REPEAT MENU/STORE A-B A-B CANCEL/DELETE CANCEL/DELETE CD RECORDER CDR300 PROFESSIONAL SELECT ERASE FINALIZE REC POWER Point A (starting point) is set when the A-B button is pushed and released.
Controls, Display (top) continued 5 PROG indicator Lit during programming mode (selecting track playback sequence). PROG BASS TREBLE MID TEXT PHANTOM PROG DISP REC MODE SINGLE REPEAT 6 REPEAT indicator Lit during a repeat operation. REPEAT MENU/STORE A-B CANCEL/DELETE CD RECORDER CDR300 PROFESSIONAL SELECT ERASE FINALIZE REC POWER STANDBY PUSH ENTER 5 6 REPEAT 1 7 When the 1 indicator is also lit only the currently playing track is repeated.
Controls, Display (top) continued 1 2 BASS TEXT PHANTOM PROG REC MODE SINGLE ERASE 4 TREBLE MID DISP 3 9 REC/PLAY controls ERASE REPEAT MENU/STORE A-B FINALIZE CANCEL/DELETE 1 ERASE button light Push and release to enter ERASE mode. See How to erase. CD RECORDER CDR300 PROFESSIONAL SELECT ERASE FINALIZE REC REC POWER STANDBY FINALIZE PUSH ENTER 7 8 5 9 6 Push and release to enter FINALIZE mode. See How to finalize.
Controls, Connections (front) 1 2 INPUT ANALOG MIC/LINE PHONE/SPEAKER PHONE SELECTOR LEVEL LINE OUT MIC MIX OUT AUX LINE L INT 1 Left XLR or 1/4" input 3 L/R REC LEVEL DIGITAL MANUAL ALC LIMITER MIC/LINE ATT ON OFF SPEAKER OFF ON jack Plug in an instrument or other line level audio device here to provide audio to the left stereo channel.
Controls, Connections (front) continued 4 INPUT ANALOG MIC/LINE PHONE/SPEAKER PHONE SELECTOR LEVEL LINE OUT MIX OUT AUX MIC LINE L INT L/R L+R DIGITAL REC LEVEL MANUAL ALC LIMITER 5 6 MIC/LINE ATT OFF ON SPEAKER OFF ON 7 SPEAKER OFF 7 SPEAKER OFF/ON switch ON Turns the built-in speaker OFF or ON. 8 OPEN/CLOSE R MIC/LINE PUSH PHONES OPEN/CLOSE PUSH LINE OUT Recordable ReWritable LEFT 9 10 INPUT ANALOG MIC/LINE DIGITAL CD PLAY / RECORD Push and release to OPEN the CDR drive.
Controls, Connections (rear) 1 2 3 4 5 6 7 8 DIGITAL MIX OUT LINE OUT AUX IN DIGITAL Plug RCA coaxial cables in here to connect to the input and/or output of an external digital unit. Use IN for recording onto the CDR drive from an external digital audio source. Use OUT for going to an external digital device. REMOTE RC-5 EXT. INT.
Controls, Connections (rear) continued Push and release the SELECT control. 9 10 MIX OUT LINE OUT AUX IN DIGITAL Turn the SELECT control to choose between Lead Acid and NiCd/NiMH. L REMOTE RC-5 dB-50 EXT. INT. TOTAL TRACK R R IN IN L L OUT OUT -22 -16 -12 -8 -4 0 -30 -22 -16 -12 -8 -4 0 CD DC IN FOOT PEDAL -30 R POWER ON OFF L dB-50 TOTAL TRACK R CD DC IN When correct push and release MENU/STORE.
How to Play How to Play a CD (basics) How to play 1 Connect and turn on the CDR300, see Connections ERASE (basic) on page 7.
How to play continued TEXT PHANTOM PROG DISP REC MODE SINGLE How to select tracks You can select tracks during Stop, Play or Pause. Turn the SELECT control (5) to SELECT choose the track. During play wait about a second or push and release the SELECT control to switch to the beginning of that track. During Stop or Pause push Play/Pause to begin playing the selected track.
a How to play continued Push and release Play/Pause. a b b PROG TOTAL TRACK c L dB-50 -30 -22 -16 -12 -8 -4 0 c d TRACK R CD TEXT a b c d e Example display: a Play symbol flashing indicates track is playing. b Example track #3 is playing c Flashing "TRACK" indicates single track play. When the track is completed the CDR300 remains in Single track, paused at the beginning of the next track. a b desired. Example display shows track 3 selected.
How to play continued 3 Push Play/ Pause (a) to play the program. a Example display shown. b PROG L dB-50 TRACK -30 -22 -16 -12 -8 -4 0 R CD Pause, Stop: While playing the program: a Push Play/Pause to pause, push again to resume b play from that point in the program. Push Stop to stop. Push Play/Pause to resume play from the beginning of the program. After programming tracks Single Track play can be selected. See How to play a Single Track.
How to Record 10 Turn the SELECT control so RECORD is dis- How to record your voice or instrument (basics) played. L dB-50 -30 -22 -16 -12 -8 -4 0 TRACK R CD-RW BASS TEXT PHANTOM PROG DISP REC MODE SINGLE Then push and release the SELECT control to accept the RECORD recording mode.
How to Record SCMS (Serial Copy Management System) The SCMS copy management system is designed to prevent consumer recorders from making unlimited digital copies of a digital source. Most consumer CD recorders will not make a digital copy when SCMS is present in the digital source, while a professional CD recorder (CDR300) will act differently. If the digital source being recorded on the CDR300 contains no SCMS information then the copy will also not include SCMS.
How to Record continued Recording tips Select record mode • Be sure to set the LINE MIC INT, INPUT ANALOG/ DIGITAL, MIC/LINE ATT, and SPEAKER switches to the appropriate setting before entering a REC mode. The record mode (REC mode) sets the CDR300 to expect and accept certain inputs, outputs, and other conditions such as the settings of AUTO TRACK and AUTO STOP, and the easy availability of some adjustments such as REC LEVEL. • Consider using a CD-RW (re-writable) disc.
How to Record continued AUTO STOP AUTO TRACK When recording with AUTO TRACK ON the CDR300 will automatically increment tracks. If AUTO TRACK is ON and the source of recording is a digital source that has tracks, such as a CD player connected to the AUX IN jacks or a source input via the DIGITAL IN jack (CD/MD), those tracks will be included in your recording. This source data is usually found only in an SPDIF format digital connection.
How to Record continued Record adjustments continued How to adjust the MIC EQUALIZER How to adjust REC BALANCE With the CDR300 in Stop, Play/Pause, REC or REC Pause mode. BASS PHANTOM PROG DISP REC MODE SINGLE 2 TREBLE MID TEXT The REC BALANCE menu item lets you adjust the right left stereo balance for recording. You can adjust REC BALANCE during a recording session by pausing the recording session.
How to select filters (FILTER SELECT) The FILTER SELECT menu item lets you turn high pass or band pass filters on the right or left MIC/LINE inputs on or off. L Example display.
How to Erase How to Erase the entire disc You can only erase CD-RW discs. 1 Push Stop. The CD-RW display shows the number of tracks and their total playing time (example shown). L dB-50 You can erase one or more tracks from the end of the CR-RW disc, or you can erase the entire disc. If finalized, erasing a track or the disc automatically unfinalizes the disc. 2 Push ERASE twice. After the first push ERASE TRACK is displayed.
How to Finalize Then PUSH REC KEY is displayed. Finalizing is writing the TOC (table of contents) on a disc so a CD player can recognize the number of tracks, the total time for each track, and their location on the disc. A recorded disc must be finalized to playback on a standard CD player. Once finalized a CD-R disc can be played on CD players that support CD-R playback. CD-RW discs can only be played on CD players that support CD-RW playback.
About the Remote The supplied infrared remote control permits most functions of the CDR300 to be controlled remotely. See Remote batteries for installing or changing remote batteries. 1ABC 2 DEF 3 GHI 4 JKL 5 MNO 6 PQR TEXT 7 STU 8 VW 9 XYZ SINGLE DISPLAY 0 SPACE 4 5 6 PROG 7 AMS REMOTE MIX OUT EXT. INT. R L LINE OUT AUX IN DIGITAL REMOTE RC-5 REPEAT EXT. INT. R IN IN L OUT OUT AB FOOT PEDAL CAN/DEL ENTER 4 = PROG button. See page ............. 8.
About the Remote continued 21 15 16 1ABC 2 DEF 3 GHI 4 JKL 5 MNO 6 PQR TEXT 7 STU 8 VW 9 XYZ SINGLE DISPLAY 0 SPACE AB 18 19 15 22 AMS REPEAT CAN/DEL ENTER MEN/STO 21 TR INC REC 22 REMOTE CONTROLLER RC300CDR AMS (Automatic Search) button. Remote only. Push and release to play the first 10 seconds of each track. AMS is displayed in the time display while searching. Push Pause to pause the automatic search. Push Play to switch from AMS to Play.
About CD discs tant. Higher recording speeds are less critical in terms of recording quality. The CDR300 can play CD, CD-R, or CD-RW discs and can record on CD-R or CD-RW discs. CD-R (record once) CD-R discs are only able to be recorded onto a single time but will playback in most CD players. CD-R discs can be recognized by the following logos: Recordable Consumer CD Recorders can only record on CD-R Audio discs and those discs are optimized for single speed automatically.
Recording CD text tape or rental CD label with paste protruding from the edge or when a disc has a trace of such a sticky object, do not attempt to play the disc. The disc may be impossible to take out, or another malfunction may result. • Write only on the printed side of a CD-R or CD-RW disc, and only with a soft felttipped pen. • Do not attempt to record a disc with a special shape. • Do not attempt to play a disc with a special shape such as an octagonal or heart shaped disc.
TEXT EDIT continued The SELECT control presents the following characters in order: L dB-50 TOTAL TRACK -30 -22 -16 -12 -8 -4 0 R CD-R CD-RW After the final character is entered, push and release MENU/STORE. Note: All CD text entries are in short term memory until the CD is finalized. You can play, pause and stop, but if you turn off power, or open the CDR drive your editing will be lost.
RC-5 remote control codes How to erase CD text The TEXT ERASE menu item lets you delete CD text that has been entered. CD-R code L dB-50 TOTAL TRACK -30 -22 -16 -12 -8 -4 0 R CD-R CD-RW 3 Push and release the SELECT control to confirm the selection. ALL TEXT is displayed. L dB-50 TOTAL TRACK -30 -22 -16 -12 -8 -4 0 R CD-R CD-RW When ALL TEXT is displayed, turn the SELECT control to select erasing only the CD title or a track title.
Troubleshooting Warning! Under no circumstances should you try to repair the unit yourself. That will cause a safety hazard and void the warranty. Play will not start • Check that the disc is inserted correctly. • Check that the disc is not defective (try another disc.) Remote control does not work • Check that the REMOTE EXT./INT. switch is at INT. • Point the infrared remote at the remote sensor. • Check/replace batteries.
Limited Warranty: Your Marantz Professional product is warranted against manufacturer defects in material and workmanship for a period of one year parts and labor. Except as specified below this warranty covers defects in material and workmanship. The following are not covered under warranty: 1. a) b) c) d) e) f) 2. Damage, deterioration, malfunction or failure to meet performance specifications resulting from: Accidents, acts of nature, misuse, abuse, neglect or unauthorized product modification.