Model CDR310 User Guide CD Recorder CLASS 1 LASER PRODUCT LUOKAN 1 LASERLAITE KLASS 1 LASERAPPARAT
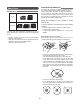
CAUTION RISK OF ELECTRIC SHOCK DO NOT OPEN CAUTION: TO REDUCE THE RISK OF ELECTRIC SHOCK, DO NOT REMOVE COVER (OR BACK). NO USER-SERVICEABLE PARTS INSIDE. REFER SERVICING TO QUALIFIED SERVICE PERSONNEL. The lightning flash with arrowhead symbol within an equilateral triangle is intended to alert the user to the presence of uninsulated "dangerous voltage" within the product's enclosure that may be of sufficient magnitude to constitute a risk of electric shock to persons.
IMPORTANT SAFETY INSTRUCTIONS READ BEFORE OPERATING EQUIPMENT This product was designed and manufactured to meet strict quality and safety standards. There are, however, some installation and operation precautions which you should be particularly aware of. 1. Read these instructions. 2. Keep these instructions. 3. Heed all warnings. 4. Follow all instructions. 5. Do not use this apparatus near water. 6. Clean only with dry cloth. 7. Do not block any ventilation openings.
CE marking (only EU version) English This product is in conformity with the EMC directive and low-voltage directive. Français Cet appareil est conforme á la directive EMC et á la de directive sur les basses tensions. Deutsch Dieses Gerät entspricht den EMC-Richtlinien und den Richtlinien für Niederspannungsgeräte. Nederlands Dit apparaat voldoet aan de EMC-richtlijnene en de richtlijnen voor apparatuur met laag voltage.
Table of Contents Package contents ......................... 3 Introduction .................................. 4 3. AllMkErase (How to erase all EDL marks) 28 4. Format (How to format a CF card) ...... 28 Features .................................................... 4 Virtual Track and Copy Segment 29 Preparation ................................... 6 Virtual Track .............................................. 29 Copy Segment ......................................... 29 Virtual Track Edit Mode ........
Introduction Thank you for purchasing this CDR310 CD Recorder. Before using the CD recorder, make sure that you read through this instruction manual carefully to fully understand the device’s functions and how to operate them. We hope that you will continue to enjoy using the recorder for a very long time. After reading this manual, please keep it in a safe, easy to reach place for future reference.
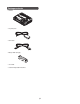
Package contents • CDR310 • AC power pack • Power cord • Battery holder (AA type) • User Guide • Customer Registration Document 3
Quick Start Guide Before using the CDR310, please read through the following section which explains the basic flow of operation. 1. Setup the power supply (☞ P.XX) • Use either the provided AC adaptor or batteries. • You can use any one of the 3 types of batteries: Alkaline, optional Nickel-Cadmium, or optional NickelMetal Hydride. • Please make sure batteries are fully charged. POWER OFF ON 2. Connect an external microphone and turn the power ON. (☞ P.
ADDITIONAL INFORMATION About Discs The glossy side shining like a rainbow is the front side of the disc, and the side on which the label is printed is the back. Unlike conventional turntables for playing analog discs, the unit reads the information recorded on the disc from underneath without contacting it using a beam of laser light. Therefore, the performance of a compact disc will not degrade like conventional analog records.
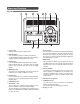
Names and Functions Top side 1 2 3 4 9 10 5 q Power switch 6 7 8 • Track selection You can select the track you wish to play back by rotating the JOG while playback is paused, stopped, or during playback. After selecting the track that you wish to play back, press the JOG or PLAY/PAUSE button to play back the selected track. (☞ P.XX) Slide this switch to switch the power on/off. w DISPLAY button Press this button to switch the contents of the display.
12 13 !5 PLAY/PAUSE button 14 Press this button when the recorder is stopped to start playback. Press this button during playback to pause playback. Also, if this button is pressed when playback is paused, playback restarts. !6 STOP button 20 Press this button during recording to stop the recording and save the recorded track (file). Press this button during playback to stop playback.
Front side 1 2 3 4 6 z CD slot 5 b Headphone (PHONES) jack Insert the stereo headphones plug here. x EJECT button n LEVEL volume Press this button to eject the CD that is inside the CD slot. Turn this knob to adjust the internal speaker volume or volume output from the headphone jack. c KEYLOCK switch Set this switch ON to set to the key-lock status. All of the operating buttons and switches are locked, except for the LIGHT button.
Right side A C B D E F G A MIC IN jacks (L/R) (XLR balanced input) Insert an external microphone plug. For monaural recording, plug into either the L side or R side jack. E LINE IN jacks (L/R) Insert RCA audio cable plugs connected to an external audio device into these jacks to input the signals output from the external device into the recorder. B DC IN jack Insert the provided AC adaptor plug. The power supply is DC15V, 2.3A.
Display a s d f g ¡2 hj ¡3 ¡4 REC TIME TRACK REMAIN TIME TOTAL TRACK TIME ¡6 ¡7 Lights when “Auto TRK” is set to ON in the preset menu. The following types of details are displayed in the upper character display section. TRACK TIME ¡5 ¡1 ¡0 A.TRACK icon s TOTAL/TRACK/TIME/REC/REMAIN icon TIME ¡0 Lights when “ManualTR” is set to ON in the preset menu. Displays the remaining time, etc. REC REMAIN TIME l l M.TRACK icon a Upper character display section Lit display k ¡1 S.
Using batteries Preparations Before Use If you wish to run the recorder on battery power, follow the procedure below to install batteries into the provided battery holder, and insert the holder into the recorder. The following types of battery can be used.
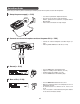
3 Installing an optional Ni-Cd or Ni-MH battery Insert the battery holder into the battery case of the recorder correctly as shown in the diagram below, while paying attention to the polarity displays (+: plus, and -: minus) on the case. Optional battery A AA A Battery holder tab A A AA A AA tab A AA A AA ribbon ribbon 4 Install the battery with tab as shown and over the ribbon for easy battery removal.
Battery type settings Basic Operations Power on/off Set the battery type for the recorder to match the type of batteries you are using. 1 < Default value > Alkaline Slide the power switch to the ON side to switch the power ON. Notes 1 While the recorder is stopped, press the MENU/STORE button. 2 Turn the JOG to select “Batt Type” and press the JOG. 3 Turn the JOG to select the type of battery, and press the JOG.
Battery remaining indicator The recorder operates using commercially available AA size alkaline batteries, the optional Nickel-Cadmium battery, or the optional Nickel-Metal Hydride battery. During operation, the battery remaining indicator is as follows. Remaining indicator Display explanation No display Nothing is displayed when the AC adaptor is being used. The adaptor power supply is valid. There is still ample battery power remaining. The amount of battery power remaining has decreased to approx.
Setting the clock 5 Turn the JOG to select [Year (2006 to 2099)], and press the JOG. 6 Turn the JOG to select [Time], and press the JOG. For 24 hour display : 0 ~ 23 For 12 hour display : 0am ~ 11pm 7 Turn the JOG to select [Minute (00 to 59)], and press the JOG. 8 Press the MENU/STORE button to register the settings. Set the current time (year, month, date, hour, minute). Notes The setting order is different depending on the “DateForm” settings in the menu. Check the “Date form settings” setting.
Date form settings Time form settings There are 3 types of date form. You can set the form to your own preference. There are 2 types of time form. You can set the form to your own preference.
Menu Settings The recorder uses 8 menus to set the various functions. There is a menu for basic settings such as time (display method), alarm, automatic power off, and battery type, and a menu for formatting the internal HD. These menus are displayed by pressing the MENU/STORE button once to enter the menu mode. You can also perform detailed settings for the recording and playback conditions, and register up to 3 of these settings in the preset menu.
Preset menu You can register up to 3 detailed setting on the recorder for such settings as recording input, recording conditions, recording format, playback mode, remote control, etc. There are 17 setting items in the preset menu, and 3 presets can be set with the desired conditions. The contents of the preset menu are explained below. Preset1 : High quality PCM recording Preset2 : Meeting recording (monaural) Preset3 : MP3 music recording Preset menu Input (☞ P.
4 Menu operation The recorder uses menus to set various functions. ( ☞ P.XX) You can alter the basic settings and use a wide range of recording and playback functions by changing the menu settings. The basic menu operations are explained in this section. 1 Second level While the recorder is stopped, press the MENU/STORE button to enter the menu mode.
2 Recording to the HD Schematics Press the REC PAUSE button to pause recording. • The recording mark flashes in the display while recording is paused. REC PAUSE MIC IN L R LINE R IN L • Press the REC button when recording is paused to start recording again. DIGITAL IN 3 Basic operations for recording 1 Press the STOP button to stop recording. • The recorded track (file) information is saved to the HD. • Press the PLAY button after this to play back the recorded track from the start.
Erasing recordings Formatting the HD You can erase data (tracks) recorded to the HD after stopping recording. Formats all of the tracks recorded onto the HD. 1 2 Notes After stopping recording, press the UNDO button to switch to the erase mode of the recorded track. • “REC UNDO?” is displayed for 3 seconds. If the HD is formatted, all contents of the HD are erased. Before formatting, re-check the contents of the HD. Press the UNDO button again while “REC UNDO?” is being displayed.
Detailed Settings for HD Recording 5 Turn the JOG to select the type of input source (“MIC”, “Line”, “Int.Mic”, “Dig-In”), and press the JOG. 6 Press the MENU/STORE button to register the settings. Input source settings Set the input source (internal microphone, external microphone, line input, digital input) for recording. < Default value > Preset1 : MIC Preset2 : MIC Preset3 : MIC Notes If digital input is set, only the sampling frequency 44.1KHz is available.
Recording format settings Set the recording format (compression format and channel) for recording. < Default value > Preset1 : Stereo/CD-DA Preset2 : Mono/MP3 Preset3 : Stereo/MP3 Notes The recording format can only be changed when there are no tracks saved on the HD. There is only one HD recording format on the recorder. This cannot be changed if tracks are already recorded in a certain format. To change the recording format, either burn the data to a CD-R, or format the HD.
Set the recording format (compression format and channel) using the procedure shown below. 1 While the recorder is stopped, press the MENU/STORE button. 2 Turn the JOG to select “Preset” and press the JOG. 3 Turn the JOG to select the preset number that you wish to set, and press the JOG. 4 Turn the JOG to select “RecFormat” and press the JOG. 5 Turn the JOG to select the compression format (“MP3”, “CD-DA”, “WAVE”, “AIFF”), and press the JOG.
Recording level control settings 4 Turn the JOG to select “RecLevel” and press the JOG. 5 Turn the JOG to select the operating method of the recording level (“ALC”, “Manual”) and press the JOG. 6 Press the MENU/STORE button to register the settings. Set the recording level control and operating method (ALC, Manual) for recording.
[Operations when manual control is set] When the recording level control or operating method is set to Manual, use the JOG as shown below to set the recording level. • Recording level settings Turn the JOG while recording is paused or during recording, and the manual level control screen is displayed. Turn the JOG to set the level.
4 Microphone attenuator Set the attenuator function for external microphone input and internal microphone input. For external microphone input, set this function when using microphones directly that have different sensitivity levels. The attenuator function for the external microphone can be set for the L/R sides respectively. For internal microphone input, set this function when the sensitivity is too high.
Phantom power settings The recorder has DC+48V (P48) phantom power, and the phantom power can be set On/Off. Set to On when a condenser microphone that requires the external power source is used. When set to On, the “PHANTOM” icon lights in the display. For details, please refer to the instruction manual that came with your microphone. Phantom power consumes battery power.
Prerecord Set the PreRecord function. When the PreRecord function is set to On, sounds from the input source are always saved only for a set period of time (1 to 10 seconds) in modes other than CD playback mode, Make CD mode, during playback, or during playback pause. When the recording is restarted, the audio data temporarily saved in the recorder is written to the HD, then recording continues from there.
Background recording 3 Turn the JOG to select the preset number that you wish to set, and press the JOG. 4 Turn the JOG to select “BkGrndRec” and press the JOG. 5 Turn the JOG to select function On/Off, and press the JOG. 6 Press the MENU/STORE button to register the settings. Set background recording. When background recording is set to On, recording is continued inside the recorder while recording is paused.
Silent skip 3 Turn the JOG to select the preset number that you wish to set, and press the JOG. 4 Turn the JOG to select “SilentSkp” and press the JOG. 5 Turn the JOG, and select “On” to set silent skip, “T/ON” to set silent skip/track increment, or “Off” if you do not wish to set either. After making your selection, press the JOG. Set the silent skip function. • Silent skip The silent skip function automatically pauses the recording if there is a period of no signal during recording.
7 If you activate this function, turn the JOG to select the no signal status judgment time (1 to 5 seconds) and press the JOG. 8 Press the MENU/STORE button to register the settings. Manual track 3 Turn the JOG to select the preset number that you wish to set, and press the JOG. 4 Turn the JOG to select “ManTrack” and press the JOG. 5 Turn the JOG to select function On/Off, and press the JOG. 6 Press the MENU/STORE button to register the settings. Set the manual track.
Auto track 3 Turn the JOG to select the preset number that you wish to set, and press the JOG. 4 Turn the JOG to select “Auto TRK” and press the JOG. 5 Turn the JOG to select function On/Off, and press the JOG. 6 When this function is activated, turn the JOG to select the auto track time (every 1, 5, 10, 15, 30 minutes, or every 1, 2, 6, 12, 24 hours, or every 640Mbyte, 700Mbyte), and press the JOG. 7 Press the MENU/STORE button to register the settings. Set auto track.
4 CD Burning You can easily burn all of the data recorded on the HD onto a CD-R with this recorder. You cannot specify particular data on the HD for burning onto a CD-R. After burning onto the CD-R, all of the data is erased from the HD. When CD burning is completed, the CD-R disc is automatically ejected from the CD slot. If all of the HD data did not fit onto 1 CD-R disc, “Insert CD” message is displayed.
6 To burn the data again onto a different CD-R disc, turn the JOG to select “Yes”, and press the JOG. If you have finished burning to CD-R, select “No” and press the JOG. • If you selected “Yes”, CD creation starts again. • If you selected “No”, all of the HD data is erased. After all of the HD data is erased, “HD Clear” is displayed for 3 seconds, after which the display returns to the default display.
CD Split 1 While the recorder is stopped, press the MENU/STORE button. 2 Turn the JOG to select “Preset” and press the JOG. 3 Turn the JOG to select the preset number that you wish to set, and press the JOG. 4 Turn the JOG to select “CD Split” and press the JOG. 5 Turn the JOG to select function On/Off, and press the JOG. 6 Press the MENU/STORE button to register the settings.
Basic operations for playback Playing Back HD Data Schematics L LINE OUT R DIGITAL OUT 37 1 Press the PLAY/PAUSE button while the recorder is stopped to play back. • The following information is displayed during playback. 2 During playback, press the PLAY/PAUSE button to pause playback. 3 Press the STOP button to stop playback. • This display shows the stopped status of playback. If you press the PLAY/PAUSE button again, the stopped track starts playback again from the beginning of the track.
Track access [Fast reverse] You can select the track that you wish to play back while the recorder is stopped, during playback, or while playback is paused. 1 1 Turn the JOG to display track selection while the recorder is stopped, during playback, or while playback is paused. 2 Select the track that you wish to play back, and press either the JOG or the PLAY/PAUSE button to play back the track.
Playback mode settings 5 Turn the JOG to select the playback mode and press the JOG. 6 Press the MENU/STORE button to register the settings. You can select the playback mode from the following 4 modes. Mode Mode explanation Normal Play back the tracks in numerical order, and playback stops when the final track playback is completed. Repeat All Repeat Track Single Repeat playback of all tracks. Repeat playback of selected tracks only.
Playing Back CDs Schematics L LINE OUT R 2 Insert a CD into the recorder’s CD slot. 3 Press the PLAY/PAUSE button while the recorder is stopped to restart playback. • The following information is displayed during playback. 4 Press the PLAY/PAUSE button to pause playback. 5 Press the STOP button to stop playback. • This display shows the stopped status of playback. If you press the PLAY/PAUSE button again, the stopped track starts playback again from the beginning of the track.
Beep sound (alarm) setting Other Functions If there are no operations performed for the set amount of time for auto power off while the recorder is stopped or playback is paused, the beep sound can be heard. The beep sound can be heard through the speakers or headphones. The beep sound that occurs when the remaining battery power is low can be heard through the headphones even if the recorder volume is set to minimum.
[When CD is stopped] Switching the display mode Depending on the status of the recorder, you can switch the information in the display by pressing the DISPLAY button.
[When in HD/CD playback or playback paused status] The following display screens are for HD playback. The following display screens are for CD playback.
Stop Monitor settings 5 Turn the JOG to select function On/Off, and press the JOG. 6 Press the MENU/STORE button to register the settings. This function constantly monitors the input signal from the selected input source while the recorder is stopped. When the Stop Monitor function is set to On, the level and level margin of the currently connected input signal is displayed in the display. Furthermore, audio is output to the line out jack, speakers, or headphones.
Various remote functions 4 Turn the JOG to select “Remote” and press the JOG. 5 Turn the JOG to select the switch contact operating mode, and press the JOG. 6 Press the MENU/STORE button to register the settings. 1. Using a contact remote (contact closure) and setting the operating mode Set the operating mode for the switch contact connected to the REMOTE1 jack. There are the following 3 operating modes for when the switch contact is opened and closed.
(Peak indicator) Lights orange when the source level becomes the same level as [OVER] on the level meter during recording or recording pause. Initialization of preset settings Returns the settings of the selected preset number to default. 1 While the recorder is stopped, press the MENU/STORE button. 2 Turn the JOG to select “Preset” and press the JOG. 3 Turn the JOG to select the preset number that you wish to set, and press the JOG. 4 Turn the JOG to select “Default” and press the JOG.
There is no signal from the microphone input. • Check the input source settings. (☞ P.XX) • Check the recording level settings. (☞ P.XX) • Check if the microphone requires Phantom power. (☞ P.XX) Troubleshooting If you think a malfunction has occurred, there may be no need to contact the dealer or the repair service counter. Please check the following points. You can easily solve many problems without needing to ask for professional help.
Error Messages Display Error messages There is no space remaining on the HD. Full_999 The track number on the HD has reached the maximum number, track 999. No Track No track files detected. No Disc No disc in the CD slot. Blank Disc No files detected on the CD. Unlocked Cannot synchronize the signal because the sampling frequency of the digital input signal is not 44.1kHz. Write_Err Write to the HD or CD-R failed. Read_Err Read from the HD or CD-R failed.
Output Specifications LINE OUT L/R Type ............................................................... RCA terminal Standard level ................................... 2 Vrms max./2 kohms DIGITAL OUT Type ............................................................... RCA terminal Output impedance ................................................. 75 ohms Standard input/output level ..................................... 0.5Vp-p Sampling frequency .............................................. 44.
Exclusion of Damages (Americas only) Liability for any defective product is limited to repair or replacement of the product at manufacturer’s option. Manufacturer shall not be liable for damage to other products caused by any defects in Marantz products, damages based on inconvenience or loss of use of the product, or any other damages, whether incidental, consequential, or otherwise.
D&M Holdings Inc.