Model CDR632 User Guide CD Recorder CLASS 1 LASER PRODUCT LUOKAN 1 LASERLAITE KLASS 1 LASERAPPARAT
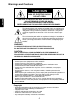
Warnings and Cautions CAUTION RISK OF ELECTRIC SHOCK DO NOT OPEN ENGLISH CAUTION: TO REDUCE THE RISK OF ELECTRIC SHOCK, DO NOT REMOVE COVER (OR BACK). NO USER-SERVICEABLE PARTS INSIDE. REFER SERVICING TO QUALIFIED SERVICE PERSONNEL. The lightning flash with arrowhead symbol within an equilateral triangle is intended to alert the user to the presence of uninsulated "dangerous voltage" within the product's enclosure. It may be of sufficient magnitude to constitute a risk of electric shock to persons.
Important Safety Instructions 14. Refer all servicing to qualified service personnel. Servicing is required when the apparatus has been damaged in any way, such as power-supply cord or plug is damaged, liquid has been spilled or objects have fallen into the apparatus, the apparatus has been exposed to rain or moisture, does not operate normally, or has been dropped. • The apparatus should be located close enough to the AC outlet so that you can easily grasp the power cord plug at any time.
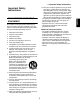
— Important Safety Instructions NOTE TO CATV SYSTEM INSTALLER: Rack-mounting the Unit Use the supplied rack-mounting kit to mount the unit in a standard 19-inch rack, as shown below. Remove the feet of the unit before mounting.
Entering names .............................................. 34 Naming a disc ................................................... 34 Naming a track .................................................. 35 Messages....................................................... 36 Error messages .................................................. 36 Messages during operation ............................... 36 Troubleshooting ............................................. 37 Specifications ................................
1 – Introduction—About discs • Do not attach a piece of paper or sticker on the label side of disc. When a disc has a piece of plastic tape or rental CD label with paste protruded from the edge or when a disc has a trace of such a sticky object, do not attempt to play the disc. If such a disc is played on the CD recorder, impossibility of taking out the disc or other malfunction may result. About discs CD-R ENGLISH CD-RW • Do not use a disc with a special shape.
Caution regarding batteries Incorrect use of batteries may cause leakage or bursting. Please carefully read and observe the following cautions. • Be sure to insert the batteries in the correct orientation as indicated by the “+” and “–” markings on the battery case. • Do not mix new batteries with old batteries, or batteries of differing types. • Never attempt to recharge batteries. • Remove the batteries if you won’t be using the remote control unit for an extended period (more than one month).
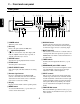
2 – Front and rear panel Front panel 1 2 3 4 56 7 8 9 0A ENGLISH B C D 1 POWER switch G H I J K L 0 DISPLAY button Turns the power on/off. Switches the time mode shown on the display. When entering text, this button switches the type of characters (upper or lower case) being input. 2 Disc tray Insert a disc (CD, CD-R, CD-RW) here. 3 E F A MULTI JOG dial (Open/Close) button Opens or closes the disc tray.
2 – Front and rear panel—Rear panel F ERASE/DEL button J When using a CD-RW disc, this button lets you erase a track or the disc. When entering text, this button deletes the character at the cursor location. (stop) button Stops recording or playback. H (play) button Starts recording or playback. I K SYNC REC/< button Switches the Sync Record function (→ p.27). When entering text, this button moves the cursor location toward the left. L FADER/> button Applies a fade-in/fade-out during recording (→ p.
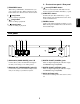
2 – Front and rear panel—RC632CDR (remote control unit) RC632CDR (remote control unit) ENGLISH 1 2 3 7 6 A 0 D C G I L 4 5 8 9 B E F H J K 1 OPEN/CLOSE button 7 ENTER button Performs the same function as the front panel Open/Close button (3). Performs the same function as when the front panel MULTI JOG dial (A) is pressed. 2 0–9 buttons 8 DIR button Use these buttons to enter track numbers or to make program playback settings. Switches MP3 file directory playback (→ p.23) on/off.
2 – Front and rear panel—Audio signal connections D ERASE button Audio signal connections Performs the same function as the front panel ERASE/DEL button (F). button Performs the same function as the front panel (record)/TR.INCR. button (J). Only the input jack(s) selected by the front panel INPUT SELECT (6) button will be used. Choose one of the following three sets of input jacks, and make the appropriate connections.
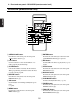
3 – Menu mode operations This section explains the basic procedures in Menu mode, where you can make various settings for the CDR632 and perform various editing operations. Basic operation in Menu mode This section explains how to select items in Menu mode. You can perform these operations either from the front panel or the remote control unit. Menu structure ENGLISH If using the front panel Menu mode is organized as follows. For details on each item, refer to the appropriate page.
3 – Menu mode operations—Basic operation in Menu mode If using the remote control unit ENGLISH 1, 4 3, 4 2 1 Press the MENU button to enter Menu mode. You will switch from normal mode to Menu mode, and the display will show the menu items. 2 Use the SKIP buttons to select a menu item. 3 Press the ENTER button. This will confirm your selection, and you will now be able to edit the menu item. For details on how to operate each menu item, refer to the page given in the “Menu structure” table (→ p.12).
4 – Playback 2 Press the POWER switch to turn on the This section explains how to playback CD/CD-R/CDRW media inserted in the disc tray, and how to playback MP3 format audio files from media such as CD-ROM. power. 3 Press the (Open/Close) button to open the disc tray. 4 Place the disc on the tray with the label facing upward. 5 Press the (Open/Close) button to close the tray. The display will indicate “Close”. When the disc tray has closed completely, the display will change to “TOC Reading.”.
4 – Playback—Selecting a song Specifying a track number Selecting a song Here’s how to select a song when playing a CD that contains more than one track. You can select a song either by moving to the previous or next track (Skip) or by directly specifying a track number. Skipping 2 1 Here’s how to use the 0–9 buttons on the remote control unit to directly specify the track number you want to play. 2 1 Use the 0–9 buttons on the remote control Here’s how to skip to the previous or next track number.
4 – Playback—Track search Direct search Track search Here’s how to search by directly specifying the desired track or time (direct search). ENGLISH During playback (or while paused), you can search to find the portion of the track you want to hear. You can search either in the normal way by fast-forwarding/ rewinding while listening to the audio, or by directly specifying a track or time and moving to that point (direct search).
4 – Playback—Playback modes 2 If you want to specify only the track number, Playback modes or the track number and the minutes, enter the desired digits and press the ENTER button on the remote control unit (or the PLAY or PAUSE button). If you specify only the track number Continue playback (default setting) Tracks will playback consecutively as their number.
4 – Playback—Playback modes 2 The previous display will reappear shortly Single playback after you stop operating the PLAY MODE button. With the exception of Continue playback mode, the playback mode is shown as follows in the left part of the display. ENGLISH Normal playback No indication Single playback [1] is lit Program playback [PROGRAM] is lit red Shuffle playback [SHUFFLE] is lit red In this playback mode only one track will playback. 1 While stopped, set the playback mode to “Single”.
4 – Playback—Switching the time display No indication The elapsed time of the current track is displayed. • You can press the CLEAR button on the remote control unit to delete the most recently programmed track from the program data. [REMAIN] lit The remaining time of the current track is displayed. 4 Press the PLAY button to begin program playback. • In this playback mode, playback is not possible unless at least one track has been programmed.
4 – Playback—Repeat playback A-B repeat playback Repeat playback The region (A-B) you specify within a track will play repeatedly. Here’s how you can repeatedly play all tracks of the currently inserted disc, or repeatedly play a specified region within a track (A-B Repeat Playback). ENGLISH Normal repeat playback All tracks on the disc will play repeatedly.
4 – Playback—Pitch control playback Playing MP3 files The CDR632 has a pitch control playback function that lets you adjust the pitch (and speed) of the playback. PITCH button Here’s how to play a disc that contains MP3 files (an MP3 disc). When playing back an MP3 disc, you can use either of two modes; a mode in which all MP3 files on the disc can be played, or “directory mode” in which only the MP3 files in a specific directory (folder) will be available for playback.
4 – Playback—Playing MP3 files Caution MP3 files converted at a sampling rate other than 44.1 kHz cannot be played correctly. The recommended format is a 44.1 kHz sampling rate and a bit rate of 128 kbps or higher. Note • For a disc on which MP3 files are stored, each MP3 file is handled as a “track”. • Directories that do not contain MP3 files cannot be selected for operations.
4 – Playback—Playing MP3 files Directory playback settings Here’s how to turn directory mode on/off and perform operations in directory mode. Note ENGLISH In the explanation below, we use menu mode to switch directory mode on/off, but you can also do this by pressing the DIR button on the remote control unit. 1 As described in “Basic operation in Menu mode” (→ p.12), access the “DIRECTORY?” menu item and press the MULTI JOG dial. The display will indicate “DIR> XXX” (you can select ON or OFF).
5 – Recording [ANALOG] lit The input signal of ANALOG IN (UNBALANCED) jacks L/R is selected as the recording source. The display will briefly indicate “Analog”. This section explains how to record on CD-R/CD-RW media inserted in the disc tray, and how to use various recording functions. [DIGITAL] and [OPTICAL] lit The input signal of the DIGITAL IN (OPTICAL) jack is selected as the recording source. The display will briefly indicate “Optical”.
5 – Recording—Basic recording operations 2 If the recording source is analog ([ANALOG] Monitoring the input signal lit), use the INPUT controls to adjust the level received from the connected playback unit. Set the level as high as possible without allowing the meters shown in the upper part of the display to reach the clipping point. (record)/TR.INCR. button 1 With no disc inserted, press the (record)/TR.INCR. button on the front panel (or the RECORD button on the remote control unit).
5 – Recording—Switching the time display 6 Press the (record) button to enter record-ready mode. The [REC] and [ ] will light, and the display will indicate “Now OPC.”. Switching the time display Here’s how to switch the time display during recording (or in record-ready mode). Note ENGLISH • “OPC” stands for Optimum Power Control. This is a function that optimizes the power of the laser used to record the disc.
5 – Recording—Fade-in/out Fade-in/out Sync recording Sync recording makes recording begin automatically when the input signal exceeds a specified level (the sync level) and end automatically when silence is detected at the end. 2 FADER button 1, 4 1 As described in “Basic operation in Menu mode” (→ p.12), access the “FADE IN?” menu item and press the ENTER button. The display will indicate “Fade In> XXs” (you can select 1–30). Here you can specify the fade-in time.
5 – Recording—Sync recording 3 Begin playback on input source unit. If the sync level setting is too high, you may lose the first part of a song that begins softly. ENGLISH After playback is begun on input source unit, the CDR632 will start recording automatically when it detects audio signal which is above the sync level adjusted in step 2.
Minute The track number will be updated when the specified length of time has elapsed after recording began. Use the “A_TRK TIME?” menu item to specify this length of time. When A_Trk=Minute, the [A•TRACK] indicator in the display will light. The [A•TRACK] indicator will blink while recording and in record-ready mode. Auto track recording Auto track recording is a function that automatically updates the track number when the specified condition occurs. 1 Select the auto track mode as follows.
5 – Recording—Manually updating the track number Manually updating the track number Rec mute This function makes it easy to record a silent interval. To do so, press the remote control unit REC MUTE button during recording. If you want to update the track number manually, proceed as follows. ENGLISH 1 REC MUTE button 2 1 Take the following steps to enable manual track number updating. 1 As described in “Basic operation in Menu mode” (→ p.
6 – CD-R/CD-RW disc operations button once again. Finalization will begin, and the display will indicate the estimated time remaining until completion as “TOC X:XX”. When finalization is finished, the display will indicate “Complete”. All operating buttons are disabled while finalization is being performed. Be careful that the power is not accidentally turned off while the finalize, un-finalize, refresh, or disc/track erase operations are being executed.
6 – CD-R/CD-RW disc operations—Refreshing Refreshing Erasing a disc ENGLISH In some cases, the CDR632 may be unable to recognize a disc, perhaps because finalization was aborted by a power failure or other reason, or because the disc has been used by a computer. In such cases, refreshing the disc as described below may enable the CDR632 to detect it. 1 This operation erases all tracks that have been recorded on a CD-RW, allowing the disc to be recorded from a blank state.
6 – CD-R/CD-RW disc operations—Erasing a track When the track erasure is finished, the display will indicate “Complete”. Erasing a track This operation erases the specified track and all subsequent tracks from a recorded CD-RW disc. 3–6 ENGLISH 1 2 Caution The contents of the erased track(s) will be lost forever. Use this operation with great caution so that you don’t erase important tracks by mistake. 1 Insert a recorded CD-RW disc into the disc tray.
7 – Entering names To move the cursor Use the SYNC REC/< button or FADER/> button. Pressing the SYNC REC/< button moves the cursor to the left, and pressing the FADER/> button moves the cursor to the right. You can also use the remote control unit SYNC REC or FADER buttons to move the cursor. Caution If you turn off the power without finalizing after entering a name, the TOC will not be written, and the name you entered will be discarded. You must execute the finalize operation to write the TOC.
7 – Entering names—Naming a track Naming a track Here’s how to assign a name to a track recorded on a CD-R/CD-RW disc. ENGLISH 1 2, 3 1 While stopped, access the “TEXT EDIT?” menu item and press the ENTER button. The display will indicate “Text> XXX” (you can choose Disc or a track number 01–99). 2 Press the ENTER button, and use the MULTI JOG dial (or the SKIP buttons on the remote control unit) to select a track number 01–99. 3 Press the ENTER button.
8 – Messages • Can’t Edit! The editing operation cannot be executed due to operational restrictions. Error messages ENGLISH If one of the following messages should appear, press the (stop) button and then deal with the cause of the error. If you are still unable to resolve the problem, please contact service center nearby. • Can’t Rec! Cannot record. Either erase the contents of the disc (for a CD-RW), or use a different recordable disc.
9 – Troubleshooting • Power does not turn on Is the power cable firmly plugged in? • “Disc Error!” appears Could the disc be soiled? Clean or replace the disc. ENGLISH • Can’t playback Could condensation have occurred? If condensation has occurred, remove the disc and leave the unit powered-on for several hours. • No sound Check the connections to your monitor system once again. Also check the volume settings of your amp. • Can’t record • Check the connections once again. • Check the recording level.
10 –Specifications Recordable discs Quantization bit depth Sampling frequency Frequency response S/N Distortion Channel separation Wow and flutter Analog inputs Analog outputs Phones output Digital output Power supply /U1B /N1B Current consumption /U1B /N1B Dimensions Weight 18 W 20W Width 482.6 mm (19.0") Height 98.0 mm (3.9") Depth 307.5 mm (12.1") 4.9 kg (10.8 lbs) Dimensions 482.6mm(19.0") 465.6mm(18.3") 16.5mm(0.6") 284.6mm(11.2") 6.4mm(0.3") 38 88.0mm(3.5") 435.0mm(17.1") 76.2mm(3.
Your Marantz Professional product is warranted against manufacturer defects in material and workmanship for a period of one year parts and labor. Marantz will pay for labor and material expenses for items covered by this limited warranty. Limitation of Implied warranties All implied warranties, including warranties of merchantability and fitness for a particular purpose, are limited in duration to the length of this warranty.
D&M Holdings Inc.