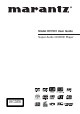
Model DV7001 User Guide Super Audio CD/DVD Player CLASS 1 LASER PRODUCT LUOKAN 1 LASERLAITE KLASS 1 LASERAPPARAT
CONGRATULATIONS ON YOUR PURCHASE OF THIS FINE MARANTZ PRODUCT. MARANTZ is on the leading edge of DVD research for consumer products and this unit incorporates the latest technological developments. WARNING TO REDUCE THE RISK OF FIRE OR ELECTRIC SHOCK, DO NOT EXPOSE THIS APPLIANCE TO RAIN OR MOISTURE. CAUTION We are sure you will be fully satisfied with the DVD player. RISK OF ELECTRIC SHOCK DO NOT OPEN Thank you for your support.
Additional Safety Information! 1) 2) 3) 4) 5) 6) 7) • Read these instructions. Keep these instructions. Heed all warnings. Follow all instructions. Do not use this apparatus near water. Clean only with dry cloth. Do not block any ventilation openings, Install in accordance with the manufacturer’s instructions. 8) Do not install near any heat sources such as radiators, heat registers, stoves or other apparatus (including amplifiers) that produce heat.
FCC NOTE (for U. S. A only): This equipment has been tested and found to comply with the limits for a Class B digital device, pursuant to Part 15 of the FCC rules. These limits are designed to provide reasonable protection against harmful interference in a residential installation. This equipment generates, uses and can radiate radio frequency energy and, if not installed and used in accordance with the instructions, may cause harmful interference to radio communications.
1 Before You Start Features.......................................................................................6 What’s in the box......................................................................7 Putting the batteries in the remote control ........................7 Using the remote control .......................................................7 Discs compatible with this player .........................................8 DVD-Video regions.............................................................
1 Before You Start Features 1 An HDCP-compatible HDMI* terminal is provided for fully digital transmission that ensures the very highest picture and digital sound quality. This unit comes with a High-Definition Multimedia Interface (HDMI) jack; an extended DVI interface for next-generation televisions. This interface allows transfers of uncompressed digital video and digital audio (audio streams such as Dolby Digital and DTS as well as linear PCM) with a single connector. HDMI standard Ver. 1.
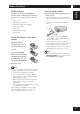
Before You Start 1 Using the remote control Thank you for buying this MARANTZ product. Please confirm that the following accessories are in the box when you open it. Keep in mind the following when using the remote control: • Remote control • AAA/R03 dry cell batteries x2 • Audio/Video cable (yellow/red/white) • Make sure that there are no obstacles between the remote control and the remote sensor on the unit. English What’s in the box • Use within the operating range and angle, as shown.
1 Before You Start Discs compatible with this player Super Audio CD compatibility: Any disc that displays one of the following logos should play in this player. Other formats, including DVD-RAM, DVD-ROM, CD-ROM (except those that contain MP3/ DivX/WMA/JPEG files) and Photo CD will not play. • Logo: • Single layer, dual layer or Hybrid layer • 12cm (5in.) or 8cm (3in.) discs • Digital audio (DSD) Super Audio CDs are divided into tracks.
Before You Start • This player can not play the disc contents protected by Windows Media Digital Right Management (DRM). JPEG compatibility information English DVD-Video regions 1 • While this player is designed to be able to handle image data recorded in JPEG format, no assurances are given that the player will be able to display image data recorded in all JPEG formats.
2 Connecting Up Easy setup Important This easy setup is the minimum set of connections you need to start watching DVD-Video discs. Both sound and picture are fed directly to your TV using the supplied audio/video cables. For other possible connections, see pages 11 and 12. 1 RS-232C terminal/ FLASHER IN Control terminal for use by custom installers. OUT • Before making or changing any rear panel connections, make sure that all components are switched off and unplugged from the wall outlet.
Connecting Up 2 Important This player outputs video in a number of different ways. Choose the one most suitable for your system using the guide below. 1 • Before making or changing any rear panel connections, make sure that all components are switched off and unplugged from the wall outlet. • While a connected component is turned on, do not unplug the power cord of this DVD player from the wall outlet. The speaker may be damaged.
2 Connecting Up Home theater audio connections Important This player outputs multi-channel audio in digital form. Check the manual for your amplifier/receiver to see what equipment it is compatible with (especially which digital formats such as Dolby Digital, DTS, etc. It can decode). 1 • While a connected component is turned on, do not unplug the power cord of this DVD player from the wall outlet. The speaker may be damaged. 2 If your amplifier has 5.1 channel analog inputs, connect them here.
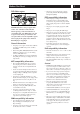
Controls & Displays 3 1 3 2 English Front panel 5 4 SUPER AUDIO CD/DVD PLAYER DV7001 PLAY AUDIO EX. STOP PAUSE HDMI STANDBY POWER SRS TS PRGSVE VOFF GRP GRP THX O OFF TITLE PROG CHP ON/OFF TEXT 1 2 6 1 7 STANDBY indicator • Lights when the unit is in standby. 2 Disc tray 3 3 (PLAY) • Place the disc here. • Begins playing the disc play. 4 7 (STOP) 5 8 (PAUSE) • Stops playing the disc play. • Pauses playing the disc play.
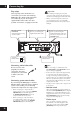
3 Controls & Displays Remote control 5 1 6 7 2 3 4 5 ! @ # 6 % ^ 7 & 8 9 0 8 ¡ 9 10 11 12 13 14 ™ 15 ~ 16 17 18 19 20 1 AUDIO EX – Press to turn AUDIO EX off and on • The sound quality of analog audio output is improved by turning off analog video signal output and the front panel display. 21 • HDMI video output cannot be switched off.
Controls & Displays English Note • HDMI ON is set when the unit is shipped from the factory. • Set HDMI under the DVD Setup Menu to use HDMI functions (see pages 41, 42, 47). • This remote control supports two remote control codes: DVD1 and DVD2. • When the unit is shipped from the factory, the remote control is set to DVD1. • To set the remote control to DVD2, hold down both 7 (STOP) button and 2 number button on the remote control for at least five seconds.
4 Getting Started 3 Load a disc. Load a disc with the label side facing up, using the disc tray guide to align the disc (if you’re loading a double-sided DVD disc, load it with the side you want to play face down). 4 Press 3 (PLAY) to start playback. If you are playing a DVD or Video CD, a menu may appear (see page 17). Note • For one-sided, two-layer discs containing movies, etc., there may be a short image stoppage at the point where the layers change. This is not a malfunction.
4 Getting Started Many DVD discs contain menus. Sometimes these are displayed automatically when you start playback; others only appear when you press MENU or TOP-M. English Navigating DVD disc menus Note • Some DVD-Audio discs feature a “Bonus Group”. To access this group you have to input a password that you can find on the disc’s packaging (see page 36). Button TOP-M What it does Displays the “top menu” of a DVD disc. This varies with the disc.
5 Playing Discs Preview function DVD 1 Video-CD SVCD CD Press SCAN. SVCD VCD SELECT DIGEST TYPE TRACK DIGEST DISC INTERVAL TRACK INTERVAL DVD-Video SELECT DIGEST TYPE TITLE DIGEST CHAPTER DIGEST TITLE INTERVAL CHAPTER INTERVAL DVD-Audio SELECT DIGEST TYPE GROUP DIGEST TRACK DIGEST GROUP INTERVAL TRACK INTERVAL 2 Use the 5/∞ keys to select one of the following options and press ENTER. This option is only available during playback mode.
5 Playing Discs • Press ENTER on the selected thumbnail picture to start playback from there. • To return to the main menu, select MENU on the screen and press ENTER. 3 English • To go to the previous or next page, press 4/¢. To exit the preview menu, select EXIT on the screen and press ENTER. For CD • At stop mode, press SCAN on the remote control. Each track will be played for a few seconds. Note • You can select “Track Interval” only during playback with PBC off.
5 Playing Discs Fast Forward/Fast Reverse DVD Super Audio CD Video-CD MP3 DivX CD WMA The video images on DVD and VCD can be viewed as a Fast Forward and Fast Reverse with no sound. In case of CD, the sound can be listened as a Fast Forward and Fast Reverse with sound. Viewing in Fast Forward/Fast Reversed Press and hold ¢ (NEXT) during play. • Fast Forward is engaged. • During Fast Forward, the speed of play back can be adjusted from x2 speed to x32 speed in 5 steps using ¢ (NEXT).
5 Playing Discs Press 8 (PAUSE). Viewing slow playback English Viewing a Paused Picture With this function, DVDs can be viewed in both forward and reverse direction. Video CD can only be moved in the forward direction. Press ∞ (down) during play. • Slow playback is engaged. • During slow playback, the speed of playback can be adjusted from 1/2 normal playback speed to 1/16 normal playback 1/2 1/4 1/8 1/16 speed in 4 steps using ∞ (down). Press 5 (up) during play.
5 Playing Discs Using the page DVD-Audio Some DVD-Audio discs contain information pages for photo galleries, artist biographies, lyrics, etc. Press the PAGE button on the remote control during Playback. You may select the image you want by moving the cursor button (2/3). Using the Repeat Play DVD-Video CD DVD-Audio Super Audio CD Video-CD MP3 JPEG DivX WMA You can set the player to repeat individual tracks on CDs or Video CDs, chapters or titles on DVD discs, or the whole disc.
5 Playing Discs DVD Super Audio CD Video-CD MP3 1 DivX CD WMA Press A-B once at the start of the section you want to repeat, then again at the end. English Looping a section of a disc Playback immediately jumps back to the start point and plays the loop round and round. • On a DVD disc, the start and end points of the loop must be in the same title/chapter. • On a Video CD/CD disc, the start and end points of the loop must be in the same track. 2 To resume normal playback, press A-B again.
5 Playing Discs Switching Camera Angles DVD-Video Some DVD-Video discs feature scenes shot from two or more angles. Check the disc box for details: it should be marked with a icon if it contains camera-angle scenes. • To switch the camera angle, press ANGLE. Note • Depending on the disc, this feature may not work. Switching the Subtitle Language DVD-Video DivX Many DVD-Video discs or DivX discs have subtitles in one or more languages.
5 Playing Discs Depending on the disc, this feature may not work. Video-CD • English Switching the audio channel On Video CDs you can switch between stereo, just the left channel, just the right channel or Mixed Mono. To switch the audio channel, press AUDIO repeatedly. The current playback channel(s) are indicated onscreen. Switching Super Audio CD Playback layer Super Audio CD • On a hybrid disc (with Super Audio CD and CD layers), the player will always start playing the Super Audio CD layer.
5 Playing Discs Play back Information This DVD system can display the disc playback information (for example, title or chapter number, elapsed playing time, audio/subtitle language) and a number of operations can be done without interrupting disc playback. DVD-Video 1 Video-CD During playback, press DISP. • A list of available disc information appears on the TV.
5 Playing Discs Time Search DVD-Video DVD-Video 1 Press 5/∞ to highlight “Angle”, then press ENTER to access. 2 Use the numeric keypad (0-9) to enter in a valid number. 3 Video-CD 1 Press 5/∞ to highlight “TT Time”/“CH Time”/“Disc Time” or “Track Time”, then press ENTER to access. 2 Use the numeric keypad (0-9) to enter a valid time (e.g. 0:34:27). Press ENTER to confirm. English Angle The playback skips to the chosen time. Playback will go to the selected angle.
5 Playing Discs Group/Track Selection and time search Each time you press DISPLAY, the TV display changes as follows. GROUP 01/05 TRACK 01/15 0:10:00 GROUP 01/05 TRACK --/15 GROUP 01/05 TIME -/--/-- TRACK 01/15 TIME -/--/-- 1 Press 5/∞ to select the Track, Group Time or Track time. 2 Use the numeric keypad (0-9) to enter a valid number. EX: Enter hours, minutes and seconds from left to right. 3 Press ENTER to confirm.
5 Playing Discs Insert a disc. • The disc reading time may exceed 30 seconds due to the complexity of the directory file configuration. • The disc menu appears on the TV. English 1 • Playback will start automatically. If not, press 3 (PLAY). 00:00 001/014 00:00 MP3_files Previous MP3_MUSIC_1 MP3_MUSIC_2 MP3_MUSIC_3 2 If the disc main menu contains various folders, use the 5/∞ keys to select a desired folder and press ENTER to open the folder.
5 Playing Discs 2 Press 4/¢ to display the other pictures on the previous/next page. 3 Use the 2/3/5/∞ keys to highlight one of the pictures and press ENTER to start playback. 4 Press the MENU to return to Picture CD menu. Zoom picture 1 During playback, press ZOOM repeatedly to select a different zoom factor. 2 Use the 2/3/5/∞ keys to pan through the zoomed image. Tip • This feature is not applicable for DivX discs. • Zoom play cannot be used on some discs.
5 Playing Discs You can create a musical slide show if the disc contains both the MP3/WMA music and JPEG picture files. 1 Insert an MP3/WMA disc that contains music and pictures. 2 Select an MP3/WMA track in the menu and press PLAY 3 to start playback. 3 During MP3/WMA music playback, use the 2/3/5/∞ keys to select a picture folder from the disc menu and press PLAY 3.
5 Playing Discs Playing a DivX disc This DVD system supports the playback of DivX movies which you can copy from your computer onto a CD-R/RW, DVD±R/±RW disc (see page 9 for more information). 1 Insert a DivX disc. 2 Press PLAY 3 to start playback. During playback, you can; • If multilingual subtitles are embedded on the DivX disc, you can press SUBTITLE to change the subtitle language while playing. Tip • Subtitle files with the following file name extensions (.srt, .smi, .sub, .ssa, .
5 Playing Discs Before using the player, you should specify the settings to be used in accordance with the conditions under which the player is to be used. Note that once changed, the settings will be saved and remain the same even after the power has been turned off until the settings are changed again. The Setup menu gives you access to all the player’s settings. Press SETUP to display/ leave the menu and the cursor and ENTER buttons on the remote control to navigate and select options.
6 DVD Setup Menu Using the FL menu The FL menu has been designed to set "REMOTE CODE". It can be set during stand by mode. If a Disc had been loaded, press Power button on the Remote Control to stand by mode. Selecting the FL menu 1 Press SET UP for longer than 2 sec. 2 Stand by LED is disappeared and "REMOTE CODE" is displayed in the FL display. REMOTE_CODE • If press ENTER, current status is displayed.
6 DVD Setup Menu GENERAL SETUP OSD LANGUAGE PLAYER MODE DIVX(R) VOD CODE DISC LOCK * DISPLAY DIM PROGRAM * SCREEN SAVER SLEEP AUTO STANDBY AUDIO OUT DIGITAL AUDIO HDMI AUDIO OUT SPEAKER SETUP AUDIO SETUP CD UPSAMPLING AUDIO DRC TV SYSTEM TV ASPECT PROGRESSIVE PICTURE SETTING ADV PICTURE VIDEO SETUP COMPONENT BLACK LEVEL CLOSED CAPTION AUDIO SUBTITLE DISC MENU PARENTAL PREFERENCE PBC MP3/JPEG NAV VR LIST PASSWORD DIVX SUBTITLE DEFAULT Page 36 36 37 37 37 37 38 38 38 ENGLISH ESPANOL FRANCAIS
6 DVD Setup Menu 3 Use the cursor buttons (5/∞) to select the desired item, then press the cursor (3) or ENTER button. GENERAL SETUP PAGE OSD LANGUAGE PLAYER MODE DIVX(R) VOD CODE DISC LOCK DISPLAY DIM PROGRAM SCREEN SAVER SLEEP AUTO STANDBY Note • Press 2 to go back to the previous menu item. Press SETUP to exit the menu. OSD LANGUAGE The language options are different depending on your country or region, and may not match the illustrations shown in the user manual.
6 DVD Setup Menu PROGRAM MARANTZ provides you with the DivX® VOD (Video On Demand) registration code that allows you to rent and purchase videos using the DivX® VOD service. Press 3 to see the registration code and press ENTER to exit. Use the registration code to purchase or rent the videos from the DivX® VOD service at www.divx.com/vod. Follow the instructions and copy the video from your computer onto a CD-R/RW disc for playback on this DVD system.
6 DVD Setup Menu SCREEN SAVER • Default setting: ON The screen saver prevents damage to the TV screen by avoiding exposure to a static image for too long. • ON – Switches to TV screen saver mode when playback has been stopped or paused for more than 15 minutes. • OFF – Turns off the screen saver function. SLEEP • Default setting: OFF This feature automatically sets the DVD player in standby mode after the period you set has elapsed. You can select from 15, 30, 45, and 60 minutes.
6 DVD Setup Menu Use the cursor buttons (5/∞) to select the desired item, then press the cursor (3) or ENTER button. English 3 AUDIO SETUP PAGE AUDIO OUT DIGITAL AUDIO HDMI AUDIO OUT CD UPSAMPLING AUDIO DRC Note • Press 2 to go back to the previous menu item. Press SETUP to exit the menu. AUDIO OUT If you connected this player to your amplifier using the 5.1 channel analog outputs (front, surround, center and subwoofer outs), set this to 5.
6 DVD Setup Menu About source audio output When the source output mode has been switched among 2CH, Virtual Surround and 5.1 CH mode setting using the Audio Out setting, audio output for each source will be as shown in the following table.
6 DVD Setup Menu HDMI AUDIO OUT • Default setting: ALL Set the Digital output according to your optional audio equipment connection. • OFF – Turn off the digital output. • ALL – If you have connected your DIGITAL AUDIO OUT to a multi-channel decoder/ receiver. • PCM ONLY – Only if your receiver is not capable of decoding multi-channel audio. • Default setting: AUTO • AUTO – In this mode, when discs recorded in Dolby Digital, DTS, or MPEG are played, the respective bit stream signal is output.
6 DVD Setup Menu HDMI Audio Output HDMI Setting (Audio) Auto formats Auto* DVD 1 Multi PCM*2 2 ch PCM Off Dolby Digital Dolby Digital Multi channel PCM 2 Channel DOWNMIX Not Output Linear PCM Multi channel PCM Multi channel PCM 2 Channel DOWNMIX Not Output DTS DTS Multi channel PCM 2 Channel DOWNMIX DVD-Audio Multi channel PCM Multi channel PCM 4 Left/Right CD/MP3/Super Audio CD* DTS CD 2 Channel DOWNMIX* Not Output 3 DTS Not Output Multi channel PCM Video CD Not Output 2
6 DVD Setup Menu AUDIO DRC Delay time settings in relation to the listening position/distance for individual speakers (1.0 MS to 9.0 MS). • Default setting: OFF This mode optimizes playback of sound at low volume. High volume outputs will be softened and low volume outputs will be enhanced to an audible level. This feature is only applicable for DVD video discs with Dolby Digital mode. • ON – Turns on AUDIO DRC mode. • OFF – Turns off AUDIO DRC mode.
6 DVD Setup Menu Setting up the VIDEO SETUP page 1 Press the SETUP button. 2 Select VIDEO SETUP PAGE using the cursor buttons (2/3), then press the ENTER button. 3 Use the cursor buttons (5/∞) to select the desired item, then press the cursor (3) or ENTER button. VIDEO SETUP PAGE TV SYSTEM TV ASPECT PROGRESSIVE PICTURE SETTING HDMI SETUP COMPONENT BLACK LEVEL CLOSED CAPTION Note • Press 2 to go back to the previous menu item. Press SETUP to exit the menu.
6 DVD Setup Menu OK • 16:9 WIDE – Select this if you have a wide-screen TV. English CHANGING PAL TO NTSC 1.ENSURE THAT YOUR TV SYSTEM SUPPORTS NTSC STANDARD. 2.IF THERE IS A DISTORTED PICTURE DISPLAYED ON THE TV.WAIT IS SECONDS FOR AUTO RECOVER CANCEL Select one of the options and press ENTER to confirm. Video output format when progressive is "ON".
6 DVD Setup Menu ! Press 2 to highlight OK in the menu and press ENTER to confirm. The set-up is complete now and you can start to enjoy the high quality picture. ADV PICTURE • OFF – Disables the progressive scan mode. This player allows you to fine-tune the following video parameters. We recommend setting the aspect ratio on your TV if the function is available. To deactivate Progressive manually: DCDi ~ Press OPEN CLOSE 0 to open the disc tray without HDMI connected.
DVD Setup Menu • Default setting: AUTO Selects a suitable video resolution depending on the capability of the connected TV/device to enhance the HDMI video output.
6 DVD Setup Menu Setup Examples Disc Format Video S-Video YCbCr TV Aspect PSCAN FORMAT YCbCr (Progressive:ON) (Progressive:OFF) HDMI output Sink EDID 4:3 16:9 OFF 16:9 Wide 16:9 SQUEEZE SUPERWIDE 16:9 4:3 LB Dont' care 4:3 PS*1 Dont' care 4:3 PS*2 Dont' care OFF 16:9 Wide 4:3 16:9 SQUEEZE SUPERWIDE 4:3 LB Dont' care 4:3 PS Dont' care *1: When actual video output is Pan-scan. ("TV Aspect" is 4:3panscan and disc permits Pan-scan.) *2: When actual video output is Letterbox.
6 DVD Setup Menu BLACK LEVEL Produces more dynamic picture by increasing the picture contrast and the color intensity. This function is available only for progressive scan output. • Default setting: 7.5 IRE (USA model) 0 IRE (European model) If you set the TV type to NTSC, set the Black level shift to 7.5 IRE. This will improve the color contrast during playback. The black level setting has no effect if the TV type is set to PAL. • 7.5 IRE – Select this to enhance the black level.
6 DVD Setup Menu Setting up the PREFERENCE page 1 Press 7 (STOP) twice to stop playback (if any), then press SETUP. 2 Select PREFERENCE PAGE using the cursor buttons (2/3), then press the ENTER button. 3 Use the cursor buttons (5/∞) to select the desired item, then press the cursor (3) or ENTER button. PREFERENCE PAGE AUDIO SUBTITLE DISC MENU PARENTAL PBC MP3/JPEG NAV VR LIST PASSWORD DIVX SUBTITLE DEFAULT Note • Press 2 to go back to the previous menu item. Press SETUP to exit the menu.
6 DVD Setup Menu PBC Selects the preferred disc menu language for DVD playback. • Default setting: ENGLISH Use the 5/∞ keys to select a language and press ENTER to confirm. • Default setting: ON The Play Back Control feature is applicable for VCD/SVCD only. It allows you to play Video CDs (2.0) interactively, following the menu on the display. • ON – The index menu (if available) will appear on the TV when you load a VCD/ SVCD.
6 DVD Setup Menu Previewing VR format 1 During playback, press SCAN. 2 Press 5/∞ to highlight either TITLE DIGEST or TITLE INTERVAL. PASSWORD The password is used for both Parental Control and Disc Lock. Enter your six-digit password to play a locked disc or when prompted for a password. The default password is “111111”. To change the password: SELECT DIGEST TYPE TITLE DIGEST TITLE INTERVAL 3 Press ENTER to select the function.
DVD Setup Menu This feature enables you to reset all the setup menu options and your personal settings to the factory defaults, except your password for Parental Control and Disc Lock. Press ENTER to confirm the default reset.
7 Additional Information Language Codes This page is used to select other languages. This does not affect the options in AUDIO, SUBTITLE or DISC MENU.
Additional Information 7 Discs to avoid When holding discs of any type, take care not to leave fingerprints, dirt or scratches on the disc surface. Hold the disc by its edge or by the center hole and edge. Discs spin at high speed inside the player. If you can see that a disc is cracked, chipped, warped, or otherwise damaged, don't risk using it in your player. You could end up damaging the unit. Damaged or dirty discs can affect playback performance.
7 Additional Information Hints on installation Moving the player We want you to enjoy using this unit for years to come, so please bear in mind the following points when choosing a suitable location for it: If you need to move the player, first press the POWER ON/OFF button on the front panel to turn the player off, then unplug the power cord. Never lift or move the unit during playback: discs rotate at high speed and may be damaged. Do... ✓ Use in a well-ventilated room.
Additional Information Incorrect operation is often mistaken for trouble or malfunction. If you think that there is something wrong with this unit, check the points below. Sometimes the trouble may lie in another component. Inspect the other components and electrical appliances being used. If the trouble cannot be rectified after checking the items below, ask your nearest MARANTZ authorized service center or your dealer to carry out repair work. The disc is ejected automatically after loading.
7 Additional Information The remote control doesn't seem to work. Noticeable difference in DVD and CD volume. • • The remote control is too far from the player, or the angle with the remote sensor is too wide. Use the remote control within its operating range (page 7). • Cannot output 192 kHz or 176.4 kHz digital audio. The player does not output digital audio at these sampling rates. The batteries are exhausted. Put in new batteries (page 7).
Additional Information • If the disc is a recordable CD, make sure that the disc had been finalized. Check that the track(s) are in the MPEG1 Audio Layer 3 format. English A disc containing the MP3 tracks won’t play. 7 Some MP3 tracks appear to be missing from a disc. • If a track name does not end in “.mp3” or “.MP3”, this player will not recognize it as an MP3 track. • This player only recognizes about 650 files per folder and 300 folders per disc.
7 Additional Information 21-pin connector assignment (Europe model only) AV connector output ........................ 21-pin connector This connector provides the video and audio signals for connection to a compatible color TV or monitor. Specifications General System DVD-Video, DVD-Audio, DVD±R/RW, Super Audio CD, Video CD, CD, MP3 files, JPEG files, DivX and WMA Power requirements (U.S.A.).................... 120 V, 60Hz Power requirements (Europe) ...........230 V, 50/60Hz Power consumption............
Additional Information 7 English 61
Printed in China 2007/01 PMC 00M30AK851310