R Model LC1510 User Guide LCD TV/Monitor
RECORD YOUR MODEL NUMBER (Now, while you can see it) The model and serial number of your new TV are located on the back of the TV cabinet. For your future convenience, we suggest that you record these numbers here: MODEL NO.____________________________________ SERIAL NO.____________________________________ WARNING RISK OF ELECTRIC SHOCK DO NOT OPEN WARNING : TO REDUCE THE RISK OF ELECTRIC SHOCK DO NOT REMOVE COVER (OR BACK). NO USER SERVICEABLE PARTS INSIDE. REFER SERVICING TO QUALIFIED SERVICE PERSONNEL.
AVERTISSEMENT RISQUE DE CHOCS ÉLECTRIQUES NE PAS OUVRIR AVERTISSEMENT : AFIN DE RÉDUIRE TOUT RISQUE DE CHOC ÉLECTRIQUE, NE PAS ENLEVER LE COU VERCLE (OU L’ARRIÈRE). AUCUNE PIÈCE NE PEUT ÊTRE RÉPARÉE PAR L’UTILISATEUR. CONFIER L’ENTRETIEN À UN TECHNICIEN QUALIFIÉ.
Left masterSAFETY page INSTRUCTIONS IMPORTANT Important safeguards for you and your new product Your product has been manufactured and tested with your safety in mind. However, improper use can result in potential electrical shock or fire hazards. To avoid defeating the safeguards that have been built into your new product, please read and observe the following safety points when installing and using your new product, and save them for future reference.
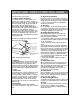
IMPORTANT SAFETY INSTRUCTIONS (Continued from previous page) 14. Outdoor Antenna Grounding If an outside antenna or cable system is connected to the product, be sure the antenna or cable system is grounded so as to provide some protection against voltage surges and built-up static charges. Article 810 of the National Electrical Code (U.S.A.
v
Safety warnings Important safety instructions Controls Basic composition of LCD TV i iii 2 6 2 Connecting Connecting Connecting Connecting antenna external equipment DVD player DTV 9 10 12 13 3 Connecting PC as monitor Function checking in PC mode 14 16 Using remote control Turning on the set Function checking in TV mode Setting language Closed caption function Parental control function Programming / Erasing channels 17 19 20 21 22 26 28 5 Setting Setting Setting Setting 30 32 34 36 6 Adjusti
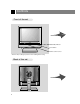
Controls Front of the set On/Standby indicator Power button Remote control sensor * Remove vinyl coating for protection from staining before using.
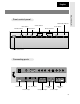
Front control panel On/Standby indicator Volume buttons Menu button TV/Video button Enter button Power button Channel buttons Remote control sensor Connecting ports DC 12V ANT IN 75 Ω Power input PC/DTV INPUT COMPONENT INPUT(480i) CB PC / DTV input Antenna input CR H/P S-VIDEO VIDEO (MONO) L IN AUDIO R Audio/Video Headphone input jack S-Video input Component input 3 INTRODUCTION English
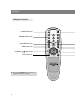
Controls Remote Control POWER BUTTON NUMBER BUTTONS FLASHBK BUTTON MENU BUTTON CHANNEL (5,∞) BUTTONS TV/PC BUTTON ● Press the FLASHBK button to view the last programme you were watching.
INTRODUCTION English TV/VIDEO button on Remote Control TV/VIDEO BUTTON PAGE 11~15 * Each press of this button changes the mode as below. CC BUTTON PAGE 24 MUTE BUTTON ENTER BUTTON VIDEO DVD S-VIDEO PAGE 39 VOLUME (2, 3) BUTTONS SLEEP BUTTON TV programs / Cable TV * VIDEO, S-VIDEO, DVD : Select each mode for watching the corresponding external equipment. PAGE 36 TV/VIDEO button on the Front Panel * Each press of this button changes the mode as below.
Basic composition of LCD TV Accessories Hole Table stand AC Adaptor Remote Control RC1500LC 1.5V 1.
Watching TV programs * Please make sure to connect the power plug to the wall outlet socket after connecting the TV to the adaptor. a. Install the LCD TV in the correct using the installation accessories. Refer to page 8. b. Connect the antenna cable to the antenna input port of the set. c. Connect the adaptor to the power input port of the set. d. Connect the power plug to the wall outlet socket after connecting the power cord to the adaptor.
Basic composition of LCD TV Installations * For safety, use included table stand when place the monitor on the flat surface. a. Place the table stand in the position you wish to install the set. b. Put the set in the table stand. * 8 When you assemble the TV set with table stand, please match the stick of TV set to the hole of the table stand so as not to allow movement of the joint.
English Connecting antenna * To get better picture quality, adjust the direction of antenna. Connecting to wall antenna socket CONNECTION ● In case of wall antenna socket in apartment houses, connect the antenna cable as shown below. (Use the correct type of antenna cable to the type of wall antenna socket.) Turn clock arise to tighten.
Connecting external equipment * TV screen is automatically converted to TV mode by pressing the channel (5,∞) buttons, flashbk or number buttons (0~9) when using VIDEO. * Please connect to other AV equipment by using input ports of the set. Connecting VCR 1 How to connect ● Connect the audio/video output ports of VCR to the corresponding input ports of the set.
English Only watching external AV source ● Connect the audio/video output ports of external A/V equipment to the corresponding input ports of the set. DC 12V ANT IN +75 Ω PC/DTV INPUT COMPONENT INPUT(480i) CB H/P CR S-VIDEO VIDEO (MONO) L IN AUDIO R Camcorder < TV connection panel > VCR Video Game set < Back panel of external equipment > R AUDIO L VIDEO DVD 2 How to use ● Turn the set on and press TV/VIDEO button to select [VIDEO].
Connecting DVD player ● Connect component video inputs to Y, CB, CR (480i) and audio inputs to right and left port of AV ports. 1 How to connect DC 12V ANT IN +75 Ω PC/DTV INPUT COMPONENT INPUT(480i) CB H/P S-VIDEO CR < TV connection panel > < Back panel of DVD > 2 R AUDIO L How to use ● Turn the set on and press TV/VIDEO button to select [DVD]. DVD < On remote control > ● Try this after turning on the DVD set.
English Connecting DTV * Make sure to select PC mode before operating. DC 12V PC/DTV INPUT ANT IN +75 Ω COMPONENT INPUT(480i) CB H/P S-VIDEO CR VIDEO (MONO) L IN CONNECTION 1 How to connect AUDIO R < TV connection panel > R AUDIO L H V R G R AUDIO L B or < Back panel of DTV > 2 How to use ● Turn the set on and press TV/PC button to select [PC]. PC < On remote control > ● Try this after turning on the DTV set.
Connecting PC as monitor * Make sure to select PC mode on before operating. 1 How to connect ● Make sure to set resolution of the PC before connecting. Refer to page 15. ● Connect the set to the PC with PC signal cable. ● Connect the audio ports to the PC to get PC sound.
English 2 How to use ● Turn the set on and press TV/PC button to select [PC]. PC CONNECTION PC < On remote control > ● Try this after turning on the PC. Note : If TV/monitor is cold, there may be a small “flicker” when turned on. This is normal, there is nothing wrong with TV/monitor.
Function checking in PC mode * Make sure to select PC mode on before operating. 1 Press the MENU button. Each time you press the button you can see menus as below. Contrast Brightness H-Poisition V-Poisition Clock Phase Auto Reset : : : : : : 60 90 0 0 40 16 Use 5∞2 3 And ENTER 2 16 Press the channel (5,∞) buttons to select a function you want to use.
English Using remote control Inserting batteries 2 Insert the batteries with correct polarity. 3 Replace the battery compartment cover. remote control sensor BASIC FUNCTIONS 1 Pull the battery cover upward in the arrow direction to remove. * Apply two 1.5V alkaline batteries of AAA type. Don’t mix the used batteries with new batteries. * Remove batteries when you don’t use the remote control for long time. Liquid leakage from old battery may cause operation failure.
Using remote control Notes for using remote control Make sure these are no objects between the remote control and its sensor. 18 Don’t place the remote control near a heater or damp place. Strong impact on remote control may cause operation failure. Signal from the remote control may be disturbed by sun light or other strong light. In this case, turn the set to other direction.
English Turning on the set * First, connect antenna cable and power cord with the adaptor. * Press the power button and you will get stable picture and sound in a few seconds. 1 Press the POWER button to turn the set on. displayed only in stereo signal ST. 7 channel number 12:30 PM displayed only if present time display is set BASIC FUNCTIONS 2 Press the channel (5,∞) or number buttons to select a channel you want after memorizing received broadcasting signals in the local area.
Function checking in TV mode 1 Press the MENU button. Each time you press the button you can see menus shown below.
English Setting language Language 1 Press the MENU button to select the screen display as below. Language Captions Caption/Text Parental Ctl 3 Press the ENTER button. English Off CC1 Use 5∞2 3 And ENTER Language Captions Caption/Text Parental Ctl BASIC FUNCTIONS 2 Press the channel (5,∞) buttons to select a language you want to adjust. English Off CC1 Use 5∞2 3 And ENTER ● Each press of volume (2, 3) buttons changes the screen display as below.
Closed caption function Closed captioning is a process which converts the audio portion of a television program into written words which then appear on the television screen in a form similar to subtitles. Closed captions allow viewers to read the dialogue and narration of television programs. Using Closed Captions FOLLOW ME Captions are the subtitles of the dialogue and narration of television programs. For prerecorded programs, program dialogue can be arranged into captions in advance.
English Operating the Caption 1 Press the MENU button to select the screen display as below. Language Captions Caption/Text Parental Ctl ● Each time you press the volume (2, 3) buttons, the caption mode is displayed one by one as shown below. English Off CC1 CAPTION CC1 CAPTION CC2 Use 5∞2 3 And ENTER CAPTION CC3 CAPTION CC4 BASIC FUNCTIONS 2 Press the channel (5,∞) buttons to select [Caption/Text].
Closed caption function Operating the Caption 1 Press the CC button to select [Captions]. Captions Off Use 2 3 And ENTER 2 Press the volume (2, 3) buttons to select [On] and press the ENTER button. ● Each press of volume (2, 3) buttons changes the screen display as below. Off On EZ Mute ● Captions function setting is completed.
English Using the Text Function 1 Repeat the steps 1-2 at page 23. 2 Press the volume (2, 3) buttons to select [Text 1], [Text 2], [Text 3] or [Text 4]. Language Captions Caption/Text Parental Ctl BASIC FUNCTIONS Text services give a wide variety of information on all kind of subjects (ex. captioned program lists, weather forecasts, stock exchange topics, news for hearing-impaired---) through the half TV screen. But not all stations offer text services, even though they might offer captioning.
Parental control function The Parental Control Function (V-Chip) is used to block program viewing based on the ratings sent by the broadcast station. The default setting is to allow all programs to be viewed. Viewing can be blocked by the type of program and by the categories chosen to be blocked. It is also possible to block all program viewing for a time period. To use the Parental Control Function, the following must be set : 1. 2. 3. 4. Ratings and categories to be blocked.
English Setting up Blocking Language Captions Caption/Text Parental Ctl 4 English Off CC1 2 Language Captions Caption/Text Parental Ctl Press the MENU button to return from [Age Block] or [Content Blk] setting screens. 5 English Off CC1 Use 5∞2 3 And ENTER 3 the channel (5,∞) buttons to the types of blocking to be set. the volume (2, 3) buttons to the types of ratings to block. ● [MPAA], [Age] and/or [Content block] may be set.
Programming / Erasing channels Auto programming channels * This function can be operated only when the set can receive input signal from broadcasting stations and the antenna cable is connected. * [Auto programming] function memorizes all the receiving channels of terestrial TV signals or cable TV programs.
English Memorizing / Erasing current channel * You can select [Memory] or [Erase] for the current channel. 1 Press the MENU button to select the screen display as below. Then press the channel (5,∞) buttons to select [Manual Program]. 3 Press select press select the channel (5,∞) buttons to a channel you want and then the volume (2, 3) buttons to [Memory] or [ Erase ].
Setting current time * If current time setting is erased by power failure or TV is unplugged, reset it. To set current time as 10:30 AM 1 Press the MENU button to select the screen display as below. Clock --:-- AM --:-- AM Hold Off-Timer --:-- AM On-Timer TV 3 Vol 30 Hold Auto Off : Hold Use 5∞2 3 And ENTER 2 Press the channel (5,∞) buttons to select [Clock ].
English 5 ●If you hold the 5 button, the hour display is changed in the sequence of AM 1 ➔ AM 2 ➔ ....PM12 ➔ PM 1 .... ➔ AM 12, and changed in the reverse sequence for ∞ button. ● Select [AM 10]. ● Press the ENTER button. St.SAP 7 10:30AM Use 5∞2 3 And ENTER Press the channel (5,∞) buttons to select current minute. And press the ENTER button. current channel current sound status Press the volume (3) button.
Setting Off-Timer function *Timer function can be operated only if current time has been already set. *Off-timer function is prior to on-timer function if they are set to the same time. Turning of f at 11:30 PM by of f-timer function 1 Press the MENU button to select the screen display as below. Clock 10:30AM --:--AM Hold Off-Timer --:--AM On-Timer TV 3 Vol 30 Hold Auto Off : Hold Use 5∞2 3 And ENTER 2 Press the channel (5,∞) buttons to select [OffTimer].
English 5 ● If you hold the 5 button, the hour display is changed in the sequence of AM 1 ➔ AM 2 ➔ ....PM12 ➔ PM 1 .... ➔ AM 12, and changed in the reverse sequence for ∞ button. ● Select [PM 11]. 7 Press the volume (3) button to select [Hold] or [Run]. 8 Press the channel (5,∞) buttons to select [Run]. Clock 10:30AM 11:30PM --:--AM Run Off-Timer Run --:--AM On-Timer TV 3 Vol 30 Hold Auto Off : Hold Press the volume (3) button.
Setting On-Timer function *Timer function can be operated only if current time has been already set. Turning on at 7:10 AM with volume 40 on channel 8 by on-timer function 1 Press the MENU button to select the screen display as below. 4 Press the channel (5,∞) buttons to select hour you want. ● If you hold the 5 button, the hour display is changed in the sequence of AM 1 ➔ AM 2 ➔ ....PM12 ➔ PM 1 .... ➔ AM 12, and changed in the reverse sequence for ∞ button. ● Select [AM 7].
English 7 8 Press the volume (3) button. 11 Press the volume (3) button. Clock 10:30AM --:--AM Hold Off-Timer --:--AM 7:10AM On-Timer TV 3 Vol 30 Run Auto Off : Hold Clock 10:30AM --:--AM Hold Off-Timer 7:10AM On-Timer --:--AM TV 8 3 Vol 40 30 Run Auto Off : Hold Use 5∞2 3 And ENTER Use 5∞2 3 And ENTER Press the channel (5,∞) buttons to select the channel you want. 12 Press the channel (5,∞) buttons to select [Run] and press the ENTER button.
Setting sleep time function * This function will automatically turn the set off after a set time. 1 Press the SLEEP button to set sleep time function. ● Each press of the button changes setting time status as below. Sleep --- Use 2 3 And ENTER --- 10 240 20 180 30 120 90 60 ● To release sleep time setting, press the SLEEP button repeatedly to select [ --- ]. ● The screen display of [ Sleep ] appears on the screen for one minute untill automatically turning off.
English Adjusting audio condition Adjusting audio condition by user MTS AVL DASP Equalizer 3 Strero Off User MTS AVL DASP Equalizer Use 5∞2 3 And ENTER 2 Press the channel (5,∞) buttons to select a audio item you want to adjust. Press the volume (2, 3) buttons to adjust the audio condition as you want. Strero Off User Use 5∞2 3 And ENTER 4 Press the ENTER button. MTS : ● Refer to page 38 for the details.
Adjusting audio condition Selecting bilingual signals Screen display in stereo signal : Stereo Screen display in bilingual signal : SAP * Bilingual (dual language) signal ● ● ● ● ● 1 This signal contains the secondary language signal in addition to the primary language. There are the primary and secondary language and stereo modes in bilingual signal. [Mono] : The primary language is output from left and right speaker. Signal mode is mono.
English Mute * This function cuts off speaker sound. It’s convenient when getting phone calls. 1 Press the MUTE button. Mute ● To release muted sound, press the MUTE button or volume (2, 3) buttons. ● If muted sound is released, volume level is displayed on the screen. Using headphone AUDIO / VIDEO ● Headphone is an optional item. ● You can adjust headphone sound with volume(2, 3) buttons. While you are listening to sound through headphone, speaker sound is cut off.
Adjusting video condition APC (Auto Picture Control) 1 Press the MENU button to select the screen display as below. Contrast Brightness Color Tint Sharpness APC 100 60 60 0 6 Clear Use 5∞2 3 And ENTER 2 Press the channel (5,∞) buttons to select [APC]. Contrast Brightness Color Tint Sharpness APC 100 60 60 0 6 Clear Use 5∞2 3 And ENTER ● Each press of volume (2, 3) buttons changes the screen display as below. 3 40 Clear Optimum User Soft Press the ENTER button.
English Manual picture control 1 Press the MENU button to select the screen display as below. Contrast Brightness Color Tint Sharpness APC 3 100 60 60 0 6 Clear Press the volume (2, 3) buttons to adjust the picture condition as you want. Contrast Brightness Color Tint Sharpness APC Use 5∞2 3 And ENTER 100 60 60 0 6 Clear Use 5∞2 3 And ENTER ● [Contrast], [Brightness], [Color] are adjusted from 0 to 100. ● [Tint] is adjusted from Red 50 to Green 50. ● [Sharpness] is adjusted from 0 to 10.
Product specifications Model : LC1510 Main body : Horizontal size : 15-1/2 Inches (394 mm) Height : 15-1/8 Inches (384 mm) Thickness : 4-1/8 Inches (105.5 mm) Weight : 12.1 lbs(5.5 Kg) Including table stand : Horizontal size : 15-1/2 Inches (394 mm) Height : 16-1/4 Inches (413 mm) Thickness : 7-5/8 Inches (194 mm) Weight : 17.4 lbs(7.9 Kg) : DC 12V/3.5A Power requirements * CAUTION : For use only with Model No. SAD6012SE AC Adaptor, manufactured by SERONICS CO., LTD.
COUNTRY ALGERIE ARMENIA AUSTRALIA AUSTRIA BAHREIN BANGLADESH BELGIUM BULGARIA CANADA CHINA CYPRUS CZECH REPUBLIC DENMARK DUBAI EGYPT ESTONIA F.Y.R.O.M. FINLAND FRANCE GERMANY GREECE HEADQUARTERS EUROPE: HONG KONG HUNGARY ICELAND INDIA IRAN IRELAND ISRAEL ITALY IVORY COAST JAPAN KOREA KUWAIT LATVIA LEBANON LITHUANIA MALAYSIA MALTA MAURITIUS MILITARY MARKET EUROPE NETHERLANDS NEW ZEALAND NORWAY OMAN POLAND PORTUGAL PROFESSIONAL EUROPE PROFESSIONAL U.S.A.