Model LC3050 User Guide LCD TV
ENGLISH CE MARKING ENGLISH WARNINGS Le LC3050 est conforme à la directive EMC et à la directive sur les basses tensions. - DEUTSCH - Das Modell LC3050 entspricht den EMC-Richtlinien und den Richtlinien für Niederspannungsgeräte. - NEDERLANDS - The LC3050 is in conformity with the EMC directive and low-voltage directive. FRANÇAIS Do not expose the equipment to rain or moisture. Do not remove the cover from the equipment. Do not insert anything into the equipment through the ventilation holes.
NEDERLANDS WAARSCHUWINGEN - - Stel het apparaat niet bloot aan regen of vocht. Verwijder de afdekplaat van het apparaat niet. Duw niets door de ventilatieopeningen in het apparaat. Raak het netsnoer niet met natte handen aan. Bedek de ventilatieopeningen niet met enige voorwerpen, zoals tafelkleden, kranten, gordijnen, enz. Plaats geen brandende voorwerpen, zoals kaarsen, op het apparaat.
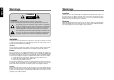
ENGLISH Warnings Warnings WARNING RISK OF ELECTRIC SHOCK DO NOT OPEN WARNING : To reduce the risk of electric shock do not remove cover (or back). No user serviceable parts inside. Refer servicing to qualified service personnel. The lightning flash with arrowhead symbol, within an equilateral triangle, is intended to alert the user to the presence of uninsulated “dangerous voltage” within the product’s enclosure that may be of sufficient magnitude to constitute a risk of electric shock to persons.
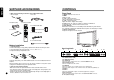
CONTENTS ENGLISH CONTENTS Before operating the set, please read this manual carefully. SUPPLIED ACCESSORIES . . . . . . . . . . . . . . . . . . . . . . . . . . . . . . . . . . . . . . . . . . . . . 2 Battery installation . . . . . . . . . . . . . . . . . . . . . . . . . . . . . . . . . . . . . . . . . . . . . . . . . 2 CONTROLS . . . . . . . . . . . . . . . . . . . . . . . . . . . . . . . . . . . . . . . . . . . . . . . . . . . . . . . . . 2 Front Panel . . . . . . . . . . . . . . . . . . . . . . . . . .
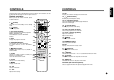
ENGLISH SUPPLIED ACCESSORIES CONTROLS L Make sure the following accessories are provided with Product. Front Panel 1. AC/DC adaptor 1. ON/OFF Switches TV set on or off. 2. MENU Displays a menu. 3. + CH - (Channel Up/Down) Selects a programme or a menu item. 4. + VOL - (Volume Up/Down) Adjusts the volume./ Adjusts menu settings. 5. TV/AV Selects TV, SCART1, SCART2, S-VIDEO, PC-ANALOG or PC-DIGITAL mode./ Clears the menu frorn the screen. 6.
CONTROLS All the functions can be controlled with the remote controller. Some functions can also be adjusted with the buttons on the front panel of the set. 12. OK Remote controller 13. Before you use the remote controller, please install the batteries. ENGLISH CONTROLS Accepts your selection or displays the current mode. (Picture effect) Recalls your preferred picture setting 14. I-II (Language select) 1. (Power) Turns the TV on from standby or off to standby mode. 2.
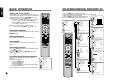
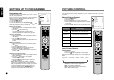
ENGLISH BASIC OPERATION ON SCREEN MENUS AND DISPLAY Turning the TV On and Off 1. Press the MENU button to display main menu. 2. Press the 5∞ button to select menus-Picture, Sound, Special, Setup. 3. Adjust each menu with the 2 3 button. Equalizer 4. Press the MENU button to return to preceding menu. Flat 5. Press the TV/AV button to finish adjusting menu. Standby Setup: The AC-DC adopter and the AC power cord must be set up and connected to have the TV in standby mode ready to be turned on.
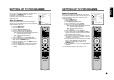
SETTING UP TV PROGRAMME Once you have preset the programme, you will be able to use the CH+ – or NUMBER buttons to scan the programme you programmed. Programme can be tuned using Auto or Manual programme menu. Manual Programme Auto programme System Storage from Start BG 1 Auto Programme All programme that can be received are stored by this method. It is recommended that you use Auto programme during installation of this set. 1. Press the MENU button. 2. Select the Setup menu. 3.
ENGLISH SETTING UP TV PROGRAMME PICTURE CONTROL Programme edit You can adjust picture Contrast, Brightness, Colour, Sharpness and Tint to the levels you prefer. This function enables you to delete, copy, move or skip or skip the stored programme. Also you can move some programme to other programme numbers or insert a blank programme data into the selected programme number. 1. Press the MENU button. 2. Select the Setup menu. 3. Press the 5∞ button select Programme edit.
You can select your preferred sound setting; Flat, Music, Movie or Speech and you can also adjust the sound frequency of equalizer, balance. If you switch AVL to on, the set automatically keeps on an equal volume level even if you change programme. 1. Press the MENU button. 2. Select the Sound menu. 3. Press the 5∞ button to select the desired sound item; Equalizer, Balance, AVL, Surround, Volume or Sub woofer. 4. Press the 2 3 button to make desired adjustment. 5.
ENGLISH OTHER FUNCTIONS OTHER FUNCTIONS Sleep timer Calling the programme list You don’t have to remember to switch the set off before you go to sleep. The sleep timer automatically switches the set to standby after the preset time elapses. Press the button to select the number of minutes. The display will appear on the screen, followed by 0, 10, 20, 30, 60, 90, 120, 180 and 240. The timer begins to count down from the number of minutes selected. Note: a.
TELETEXT TEXT On/Off Special TELETEXT functions MENU Functions Press the button to switch to TELETEXT in TV mode. The initial page or last selected page appears on the screen. The first page number indicates your selection, while the second shows the current page displayed. 1. Press button once, displays the TELETEXT pages. (TEXT) 2. Press button once more, displays the TELETEXT pages superimposed on the TV picture. (MIX) 3.
ENGLISH EXTERNAL EQUIPMENT CONNECTION EXTERNAL EQUIPMENT CONNECTION You can connect additional equipment, such as VCRs, camcorders etc. to your set. Examples are shown below. S-VIDEO input Antenna connection 1. Connect RF out on the VCR to the Antenna input on the rear of the TV. 2. Connect the antenna cable to the antenna in jack on the VCR. 3. Use the TV/AV button to select TV mode. 4. Press the PLAY button on the VCR. DC24V DC24V SCART2 SCART1 ANT.
CONNECTING PC AS MONITOR Picture adjustment PC/DTV INPUT You can adjust picture Contrast, Brightness, Temperature, Horizontal/Vertical position, Clock, Phase, Auto and Reset as you prefer. 1. Press the TV/AV or TV/PC button to select the PC mode. 2. Press the MENU button. 3. Press the 5∞ button to select the desired picture item. 4. Press the 2 3 button to make appropriate adjustments. Contrast Brightness Contrast 5 0 2 100 3 100 ∞ 1024 X 768 AUTO 48.4KHz 60.0Hz 5∞ 23 MENU TV/AV SCART1 ANT.
ENGLISH PRODUCT SPEC. Model TROUBLESHOOTING LC3050 Horizontal size 850 mm Thickness Height 485 mm Weight Television system Television programme LCD Panel Power consumption 15 kg No picture on screen and no sound from speakers. • Insert the AC power cord plug securely in AC power outlet. • Make sure the remote control is not in the standby mode (The POWER/Standby indicator is red.) • Turn on the MAIN POWER button on the top of the display. No picture/No picture from AV terminal.
www.marantz.com You can find your nearest authorized distributor or dealer on our website. JAPAN Marantz Japan, Inc. 35-1 Sagami Ohno 7-Chome, Sagamihara-shi, Kanagawa 228-8505, Japan U.S.A. Marantz America, Inc. 1100 Maplewood Drive, Itasca, IL 60143, U.S.A. EUROPE Marantz Europe B.V. P.O. Box 8744, 5605 LS Eindhoven, The Netherlands is a registered trademark.