Model PD5001 User Guide Plasma Monitor PD4201_Cover_NEW Page 1 06.9.7, 4:41 PM Adobe PageMaker 6.
IMPORTANT SAFETY INSTRUCTIONS Read before operating equipment (Additional Safety Information) 1. 2. 3. 4. 5. 6. 7. Read these instructions. Keep these instructions. Heed all warnings. Follow all instructions. Do not use this apparatus near water. Clean only with a dry cloth. Do not block any of the ventilation openings. Install in accordance with the manufacturer’s instructions. 8.
PRÉCAUTIONS IMPORTANTES DE SÉCURITÉ A lire avant de faire fonctionner l’appareil (Informations de Sécurité Supplémentaires) 1. 2. 3. 4. 5. 6. 7. Lire ces instructions. Garder ces instructions. Respecter tous les avertissements. Suivre toutes les instructions. Ne pas utiliser cet appareil près de l’eau. Nettoyer seulement avec un chiffon sec. Ne pas boucher les ouvertures d’aération. Installer selon les instructions du fabricant. 8.
Important Information Precautions To avoid damage and prolong operating life: 1. Use only with 100 V to 240 V 50 Hz/60 Hz AC power supply. Continued operation at line voltages greater than 100 V to 240 V AC will shorten the life of the unit, and might even cause a fire hazard. 2. Handle the unit carefully when installing it and do not drop. 3. Set the unit away from heat, excessive dust, and direct sunlight. 4. Protect the inside of the unit from liquids and small metal objects.
Recommandations importantes Précaution Pour éviter tout dommage et assurer une utilisation durable: 1. Utiliser seulement une alimentation en courant de 100 V à 240 V 50 Hz/60 Hz. Toute utilisation prolongée avec un courant supérieur à 100 V à 240 V risque de diminuer la durée de vie de l’appareil et même de provoquer un incendie. 2. Manipuler l’appareil avec précautions lors de son installation, ne pas le laisser tomber. 3. L’installer loin de toute source de chaleur ou de poussière.
Important Information Warning Caution Not for use in a computer room as defined in the Standard for the Protection of Electronic Computer/ Data Processing Equipment ANSI/NFPA 75. This model is for use with the following optional accessories. Use with other optional accessories is capable of resulting in instability causing possible injury. This equipment has been tested and found to comply with the limits for a Class B digital device, pursuant to Part 15 of the FCC Rules.
Recommandations importantes Avertissement Attention Ne pas utiliser dans une salle d’ordinateurs telle que définie dans la Norme pour la protection des ordinateurs électroniques/appareils de traitement des données ANSI/NFPA75. Ce modèle peut être utilisé avec les accessoires optionnels suivants. L’utilisation de ce modèle avec d’autres accessoires optionnels peut entraîner une instabilité qui peut causer des blessures.
Contents IMPORTANT SAFETY INSTRUCTIONS ..................... PRÉCAUTIONS IMPORTANTES DE SÉCURITÉ ........... Important Information ...................................... Recommandations importantes ......................... Important Information ...................................... Recommandations importantes ......................... Contents .......................................................... 1 2 3 4 5 6 7 Checking the signal being transmitted to PC/RGB terminal ...
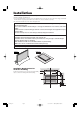
Installation You can attach your optional mounts or stand to the plasma monitor in one of the following two ways: * While it is upright. (See Drawing A) * As it is laid down with the screen face down (See Drawing B). Lay the protective sheet, which was wrapped around the monitor when it was packaged, beneath the screen surface so as not to scratch the screen face. * Do not touch or hold the screen face when carrying the unit. • This device cannot be installed on its own.
Cable Management 2.Align the batteries according to the indication inside the case. Using the cable clampers and beads bands provided with the plasma display; Bundle the signal and audio cables at the back of the unit to connect to the display. and 3.Replace the cover. PD5001 Back of the unit mounting holes Operating Range * Use the remote control within a distance of about 7 m/ 23 ft.
Part Names and Function Front View MENU INPUT / EXIT VOLUME MENU VOLUME 7 6 ON/STANDBY INPUT/ EXIT 5 ON/STANDBY 4 q Power Turns the monitor’s power on and off. t w Remote sensor window Receives the signals from the remote control. 3 1 2 and Enlarges or reduces the image. Functions as the CURSOR ( / ) buttons in the On-Screen Menu (OSM) mode. y VOLUME ▼ and ▲ Adjusts the volume. Functions as the CURSOR (▼/ ▲) buttons in the On-Screen Menu (OSM) mode.
Rear View/ Terminal Board PD5001 L VIDEO B C DVD/HD1 Cb/Pb Cr/Pr AUDIO2 L/R Y DVD/HD2 Cb/Pb PC/RGB Cr/Pr AUDIO 3 DVD/HD3 DVD/HD4 REMOTE IN OUT EXTERNAL CONTROL L/R A AUDIO2 DVD/HD1 DVD/HD2 PC/RGB R R Y 2 L Y D AUDIO1 VIDEO 1 AUDIO1 L/R Cb/Pb Y L (MONO) E AUDIO 3 DVD/HD3 DVD/HD4 HDMI HDMI EXTERNAL CONTROL REMOTE R Cr/Pr Cb/Pb Cr/Pr IN L (MONO) F G A AC IN Connect the included power cord here. H I B EXT SPEAKER L and R Connect speakers (optional) here.
i MUTE Mutes the audio. o VOLUME (+ /–) Adjusts the audio volume. !0 ZOOM (+ /–) Enlarges or reduces the image. !1 SINGLE Cancels the split screen mode. !2 SIDE BY SIDE Press this button to show a couple of pictures in the side-by-side mode. !3 PICTURE IN PICTURE Press this button to show a couple of pictures in the picture-in-picture mode. !4 ACTIVE SELECT Press this button to make the desired picture activate during split screen mode.
Basic Operations POWER OFF TIMER To turn the unit ON and OFF: 1. Plug the power cord into an active AC power outlet. 2. Press the Power button (on the unit). The monitor’s ON/STANDBY indicator turns red and the standby mode is set. 3. Press the POWER ON button (on the remote control) to turn on the unit. The monitor’s ON/STANDBY indicator will light up (green) when the unit is on. 4. Press the POWER STANDBY button (on the remote control) or the Power button (on the unit) to turn off the unit.
WIDE Operations Wide Screen Operation (manual) The picture is expanded in the horizontal and vertical direction, maintaining the original proportions. * Use this for theater size (wide) movies, etc. With this function, you can select one of seven screen sizes. When viewing videos or digital video discs 1. Press the WIDE button on the remote control. 2. Within 3 seconds ... Press the WIDE button again. The screen size switches as follows: 2.35:1 size screen → NORMAL → ANAMORPHIC → STADIUM → ZOOM → 2.
Wide Screen Operation with Computer Signals Information Supported resolution See page 39, 42 and 45 for details on the display output of the various VESA signal standards supported by the monitor. When 852 (848) dot 480 line wide VGA* signals with a vertical frequency of 60 Hz and horizontal frequency of 31.7 (31.0) kHz are input Select an appropriate setting for RGB SELECT mode referring to the“Table of Signals Supported” on page 39, 42 and 45.
SPLIT SCREEN Operations Showing a couple of pictures on the screen at the same time Operations in the Side-by-side mode To change the picture size, press the cursor or button. * There may be some RGB-input signals that may not be displayed as not all signals are supported. 1. Press the button to select a screen mode from among single mode, side-by-side, and picture-in-picture.
Operations in the Picture-in-picture mode Selecting the input signals to be displayed 1. Press the ACTIVE SELECT button to make the desired picture active. 2. Press the PC/RGB, VIDEO1, 2 or DVD/HD1, 2, 3, 4 button to change the selection of the input signal. The INPUT/EXIT button on the monitor can also be used to change the selection. To move the position of the sub screen, press the cursor or button.
OSM (On Screen Menu) Controls Menu Operations Information Advanced menu mode When “ADVANCED OSM” is set to “ON” in the FUNCTION menu, full menu items will be shown. The following describes how to use the menus and the selected items. 1. Press the MENU/ENTER button on the remote control to display the MAIN MENU. PICTURE PICTURE MEMORY : OFF : CONTRAST : BRIGHTNESS : SHARPNESS : COLOR R G : TINT : OFF NR : MIDDLE COLOR TEMP. : ON CINEMA MODE : NORMAL PICTURE MODE : 2.
Menu Tree : Shaded areas indicate the default value. ←→ : Press the or button to adjust. : Menu items in a ruled box are available when the ADVANCED OSM is set to ON. Main menu Sub menu Sub menu 2 PICTURE PICTURE MEMORY CONTRAST BRIGHTNESS SHARPNESS COLOR TINT NR COLOR TEMP.
Main menu Sub menu Sub menu 2 FUNCTION ADVANCED OSM POWER MGT. INPUT SKIP SUB. PICTURE ON←→OFF ON←→OFF ON←→OFF SUB. P DETECT OFF←→AUTO DISPLAY FADE←→NORMAL SUB.
Picture Settings Menu Adjusting the picture The contrast, brightness, sharpness, color and tint can be adjusted as desired. Example: Adjusting the contrast Storing picture settings This function allows you to store in memory the current input signal and PICTURE menu settings and to recall these settings when necessary. There are six picture memories, and notes of up to 15 characters can be added to each. Example: Storing picture settings at MEMORY1 On “CONTRAST” of “PICTURE” menu, adjust the contrast.
Setting the color temperature Use this procedure to set color tone produced by the plasma display. Example: Setting “HIGH” Setting the picture to suit the movie The film image is automatically discriminated and projected in an image mode suited to the picture. [NTSC, PAL, PAL60, 480I (60 Hz), 525I (60 Hz), 576I (50 Hz), 625I (50 Hz), 1035I (60 Hz), 1080I (60 Hz) only] Example: Setting the “CINEMA MODE” to “OFF” On “COLOR TEMP.” of “PICTURE” menu, select “HIGH”.
Changing the Gamma Curve This feature adjusts the brightness of the midtone areas while keeping shadows and highlights unchanged. Example: Setting “2.3” Set “ADVANCED OSM” to “ON” in the FUNCTION menu. On “GAMMA” of “PICTURE” menu, select “2.3”. PICTURE PICTURE MEMORY : OFF CONTRAST BRIGHTNESS SHARPNESS COLOR R TINT : OFF NR : MIDDLE COLOR TEMP. : ON CINEMA MODE : NORMAL PICTURE MODE : 2.3 GAMMA : MODE1 LOW TONE : 0% SET UP LEVEL COLOR TUNE EXIT RETURN SEL. ADJ.
Audio Settings Menu IMAGE ADJUST ASPECT MODE : NORMAL V-POSITION H-POSITION V-HEIGHT H-WIDTH AUTO PICTURE : OFF FINE PICTURE PICTURE ADJ. UNDERSCAN : OFF EXIT RETURN SEL. ADJ. Adjusting the treble, bass and left/right balance and audio input select The treble, bass and left/right balance can be adjusted to suit your tastes.
SET UP Settings Menu Checking the signal being transmitted to PC/ RGB terminal Set “ADVANCED OSM” to “ON” in the FUNCTION menu. Use this to confirm the signal being transmitted to the PC/ RGB terminal. It is set to RGB and can not be adjusted. Setting the language for the menus The menu display can be set to one of eight languages. Example: Setting the menu display to “DEUTSCH” On “LANGUAGE” of “SET UP” menu, select “DEUTSCH”.
Setting the video signal format Use these operations to set the color systems of composite video signals or Y/C input signals. Example: Setting the color system to “3.58 NTSC” Set “ADVANCED OSM” to “ON” in the FUNCTION menu. On “COLOR SYSTEM” of “SET UP” menu, select “3.58NTSC”. Information RGB SELECT modes AUTO: Select the suitable mode for the specifications of input signals as listed in the table “Computer input signals supported by this system” on page 39, 42 and 45.
Setting the gray level for the sides of the screen Use this procedure to set the gray level for the parts on the screen on which nothing is displayed when the screen is set to the 4:3 size. Example: Setting “GRAY LEVEL” to “5” Set “ADVANCED OSM” to “ON” in the FUNCTION menu. On “GRAY LEVEL” of “SET UP” menu, select “5”.
Function Settings Menu Remote ID Set the remote code to adapt the plasma monitor to the remote control. Example: Setting to “1” Set “ADVANCED OSM” to “ON” in the FUNCTION menu. On “REMOTE ID” of “SET UP” menu, select “1”. Setting the menu mode This allows you to access the complete menu. Example: Setting “ON” On “ADVANCED OSM ” of “FUNCTION” menu, select “ON ”.
ON/STANDBY indicator Power ON/ management STANDBY mode indicator Power management operating status Description On Green Not activated. Horizontal and vertical Picture already on. synchronizing signals are present from the computer. Off Red Activated. Horizontal and/or Operate the keyboard or vertical synchronizing m o u s e . T h e p i c t u r e signals are not sent reappears. from the computer. OFF: Turns off the SUB. PICTURE function.
Set “ADVANCED OSM” to “ON” in the FUNCTION menu. On “PICTURE FREEZE” of “FUNCTION” menu, select “BTM LEFT”. PDP SAVER PEAK BRIGHT : 100% ORBITER : AUTO1 INVERSE/WHITE : OFF SCREEN WIPER : OFF SOFT FOCUS : OFF OSM ORBITER : ON OSM CONTRAST : LOW FUNCTION ADVANCED OSM : OFF POWER MGT. : OFF INPUT SKIP : OFF SUB. PICTURE ZOOM NAV : BTM LEFT PICTURE FREEZE : BTM LEFT PDP SAVER : MANUAL CLOSED CAPTION : OFF CAPTION CONT : LOW PWR. ON MODE SEL. ADJ. SEL.
intermittently, making the picture bigger. * When a Video or a DVD/HD signal is input, the AUTO1 and 2 functions will affect only the moving picture and will not make the screen smaller or bigger. Information SOFT FOCUS settings OFF: Turns the SOFT FOCUS function off. LEVEL1, 2, 3, 4: Activates the SOFT FOCUS setting. The higher numbers create a softer image. “SHARPNESS” can not be adjusted on the “PICTURE” menu. INVERSE/WHITE Use this to set the inverse mode or to display a white screen.
The “MULTI SCREEN SETTING ” will appear on the screen. • Use the 5 and buttons to select “MULTI MODE ”, then use the and buttons to choose from “SIDE BY SIDE1~3” and “PICTURE IN PICTURE (BOTTOM LEFT~TOP LEFT)”. • Use the 5 and buttons to select “MAIN ”/“SUB ” and “LEFT ”/“RIGHT ”, then use the and buttons to choose from “VIDEO1~2 ”, “DVD/HD1~4 ” and “PC/RGB ”. Information CLOSED CAPTION settings OFF: This exits the closed caption mode. CAPTION1~4: Text is superimposed.
External Control Pin Assignments Application mini D-Sub 15-pin connector (Analog) These specifications cover the communications control of the plasma monitor by external equipment. PC/RGB Connections 5 4 3 2 1 10 9 8 7 6 15 14 13 12 11 Connections are made as described below. External equipment e.g., Personal computer Pin No. 1 2 3 4 5 6 7 8 9 10 11 12 13 14 15 Display Connector on the plasma monitor side: EXTERNAL CONTROL connector. Use a crossed (reverse) cable.
Connection with STB Following is the connection example of STB (Set-top Box) using the REMOTE IN/OUT connectors of the plasma monitor. Consult your dealer about the actual connection and operation. * Connection Example • STB has the REMOTE IN connector. • The pin assignment of the REMOTE IN connector of STB is same as that of 1/8 stereo mini cable connected to the REMOTE OUT connector (Page 35). • The transmit frequency of the remote control of STB is 37.9 kHz (Typical).
Troubleshooting If the picture quality is poor or there is some other problem, check the adjustments, operations, etc., before requesting service. Symptom The unit emits a crackling sound. Picture is disturbed. Sound is noisy. Remote control operates erroneously. The remote control does not work. Monitor’s power does not turn on when the remote control’s power button is pressed.
Specifications: PD5001 Signals Synchronization Range Input Signals 1.5" (38) 48.1" (1222) 43.5" (1104) Horizontal : 15.5 kHz to 110.0 kHz (automatic : step scan) Vertical : 50.0 Hz to 120.0 Hz (automatic : step scan) RGB, NTSC (3.58/4.43), PAL (B,G,M,N), PAL60, SECAM, HD*1 , DVD*1 3.
Table of Signals Supported Supported resolution: PD5001 • When the screen mode is NORMAL, each signal is converted to a 1024 dots⳯768 lines signal. (Except for *2, 3) • When the screen mode is ANAMORPHIC, each signal is converted to a 1365 dots⳯768 lines signal.
Model Dots ⳯ lines Signal Type Work Station 1280⳯1024 (EWS4800) Work Station (HP) 1280⳯1024 1152⳯900 Work Station (SUN) 1280⳯1024 Work Station 1024⳯768 (SGI) 1280⳯1024 IDC-3000G PAL625P 768⳯576 640⳯480 NTSC525P Sync Polarity Horizontal Vertical frequency frequency Horizontal Vertical (kHz) (Hz) 64.6 60.0 NEG NEG 75.1 71.2 NEG NEG 78.1 72.0 –– –– 61.8 66.0 C Sync C Sync 71.7 76.0 C Sync C Sync 81.1 76.1 C Sync C Sync 49.7 60.0 –– –– 63.9 60.0 –– –– 50.0 59.9 31.4 31.
www.marantz.com You can find your nearest authorized distributor or dealer on our website. is a registered trademark. 09/2006 Printed in Japan PD4201_Cover_NEW Page 2 06.9.7, 4:41 PM 00M25AV851250 Adobe PageMaker 6.