Model PMD325 User Guide CD Player R CLASS 1 LASER PRODUCT LUOKAN 1 LASERLAITE KLASS 1 LASERAPPARAT TEXT
CAUTION RISK OF ELECTRIC SHOCK DO NOT OPEN CAUTION: TO REDUCE THE RISK OF ELECTRIC SHOCK, DO NOT REMOVE COVER (OR BACK) NO USER-SERVICEABLE PARTS INSIDE REFER SERVICING TO QUALIFIED SERVICE PERSONNEL The lightning flash with arrowhead symbol within an equilateral triangle is intended to alert the user to the presence of uninsulated “dangerous voltage” within the product’s enclosure that may be of sufficient magnitude to constitute a risk of electric shock to persons.
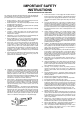
IMPORTANT SAFETY INSTRUCTIONS READ BEFORE OPERATING EQUIPMENT This product was designed and manufactured to meet strict quality and safety standards. There are, however, some installation and operation precautions which you should be particularly aware of. 1. 2. 3. 4. 5. 6. 7. 8. 9. Read Instructions – All the safety and operating instructions should be read before the product is operated. Retain Instructions – The safety and operating instructions should be retained for future reference.
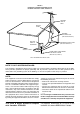
FIGURE 1 EXAMPLE OF ANTENNA GROUNDING AS PER NATIONAL ELECTRICAL CODE, ANSI/NFPA 70 ANTENNA LEAD IN WIRE GROUND CLAMP ANTENNA DISCHARGE UNIT (NEC SECTION 810-20) ELECTRIC SERVICE EQUIPMENT GROUNDING CONDUCTORS (NEC SECTION 810-21) GROUND CLAMPS POWER SERVICE GROUNDING ELECTRODE SYSTEM (NEC ART 250, PART H) NEC - NATIONAL ELECTRICAL CODE NOTE TO CATV SYSTEM INSTALLER: This reminder is provided to call the CATV (Cable-TV) system installer's attention to Article 820-40 of the NEC, which provides guidelin
This section must be read before any connection is made to the mains supply. Warnings Do not expose the equipment to rain or moisture. Do not remove the cover from the equipment. Do not insert anything into the equipment through the ventilation holes. Do not handle the mains lead with wet hands. Do not cover the ventilation with any items such as tablecloths, newspapers,curtains,etc. No naked flame sources,such as lighted candles,should be placed on the equipment.
CONTENTS 1. BEFORE USING .................................................................................................... 3 2. ACCESSORIES ..................................................................................................... 5 3. FEATURES ............................................................................................................ 6 4. CONNECTIONS .................................................................................................... 7 ENGLISH 5.
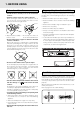
1. BEFORE USING * Handle the discs carefully so as not to scratch their surfaces. * Keep the surfaces of the discs clean at all times. When cleaning the surfaces of discs, always be sure to use the special cleaner and wipe the surfaces in the directions shown in the figure below. Inappropriate places for installation To keep your player in perfect working order for the longest possible time, avoid installing the player in the following locations.
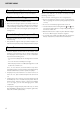
BEFORE USING Do not place objects on top • Refrain from placing any objects on top of the player. Cautions on handling power cord ENGLISH • Do not touch the power cord with wet hands. • When disconnecting the power cord, always make sure that you take hold of the plug. Yanking out or bending the cord can damage it and/or cause electric shocks or a fire. • Get into the habit of disconnecting the power plug before leaving home.
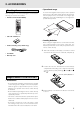
2. ACCESSORIES • Operational range As shown in the figure below, the player can be operated by the remote control unit in a range which of about 5 meters from the player’s remote sensor and over an angle up to 30 degrees to the left and 30 degrees to the right of the position directly in front. After opening the cover of the packing box, check that the following accessories are included.
3. FEATURES • Play of unfinalized CD-R and CD-RW discs supported ENGLISH The PMD325 can play even partially once-written CD-R and CD-RW discs that could not be played by conventional CD players. Since unfinalized discs which have some recording time left can be played, even partially edited discs can be played. • Manual cue function By setting the play start position in advance, play can always be started at the preset position.
4. CONNECTIONS • Connecting the ANALOG BALANCED OUT (analog balanced output) connectors Connect the unit to the stereo amplifier or AV amplifier using XLR connector cables. When making the connections, insert the plugs firmly into the connectors. Failure to insert them securely gives rise to noise. ENGLISH This CD player is connected to an amplifier, CD recorder and other components for use.
CONNECTIONS Connecting to a digital audio component • Connecting the coaxial output connector Use a coaxial digital connecting cable available on the market. ENGLISH This unit comes with three different digital output connectors: OPTICAL (x1), COAXIAL (x1) and DIGITAL OUT (SPDIF) (digital balanced). You can enjoy digital recording when the player is connected to a CD recorder or other digital recording component.
5. NAMES AND FUNCTIONS Front panel CD PLAYER PMD325 TIMER END WARNING DISC TTL TEXT 1 2 RNDM PROG 3 4 5 6 A—B TRK RPT 1 PLAY/PAUSE S.PLAY INDX TTL TIME — ALBUM + EASY JOG MP3 7 8 CUE ENGLISH STOP OPEN/CLOSE 9 10 11 12 13 14 15 16 17 18 19 20 POWER ON/OFF QUICK REPLAY 1 2 3 4 5 6 7 8 9 LEVEL - POWER ON/OFF switch PHONES 0 + (search forward) button This is used to turn the player’s power ON and OFF.
NAMES AND FUNCTIONS Display ENGLISH TIMER RNDM DISC TTL TEXT 1 2 PROG A—B TRK INDX RPT 1 S.PLAY TTL TIME MP3 3 4 5 6 7 8 9 10 11 12 13 14 15 16 17 18 19 20 Main display RPT (repeat) indicator This displays the time information and text information of the disc played, the setting menus, etc. This lights during repeat play. 1 (1-track repeat) indicator TEXT indicator This lights during 1-track repeat play. This lights when a disc supporting CD-TEXT has been loaded. S.
NAMES AND FUNCTIONS , Remote control unit (track skip) buttons : Use this to return to the start of the track now playing or return to the start of the previous track. ENGLISH : Use this to advance to the start of the subsequent track. (stop) button OPEN/ CLOSE DISPLAY 1 2 This is used to stop the play. 3 REPEAT (pause) button This is used to temporarily suspend play.
NAMES AND FUNCTIONS A-B (A-B repeat) button SCROLL/RECALL button This is used to set start point (A) and end point (B) when a particular section is to be played repeatedly. This is used to scroll the text display when text is displayed. When it is pressed during program play, it is possible to check which tracks have been programmed. CANCEL button ENTER button This is used to cancel the programmed tracks. ENGLISH This is used to enter the play function settings.
NAMES AND FUNCTIONS The signals of the music now playing are output from this connector. Using an XLR connector cable, connect the connector to a component equipped with an analog balanced input connector. Note: * Before connecting the unit to another component, check that the XLR connectors have the same pin layout. If they have a different layout, reconnect the conductors of the XLR connector cable in such a way that the pin layouts match.
6. BASIC OPERATIONS Playing CDs • Stopping play CD PLAYER PMD325 STOP OPEN/CLOSE TIMER DISC END WARNING RNDM TTL PROG A—B TRK INDX RPT 1 TTL TIME 1 2 3 4 5 6 7 8 PLAY/PAUSE — ALBUM + EASY JOG MP3 TEXT CUE S.
BASIC OPERATIONS Playing a specific track Select the number of the track to be played directly by pressing the numeric buttons (0 to 9) on the player or remote control unit. To select track number 10 or above, use the numeric buttons to select the higher digit first and then select the lower digit. Once the number of the track is selected, play will start automatically. Example: To play track 3 Press the “3” numeric button.
BASIC OPERATIONS Playing a specific part of a specific track • Using the index function (index skip) TEXT MENU ENGLISH INDEX ENTER SCROLL/ RECALL The search (backward search) mode is established by holding down the button on the player or remote control unit. During MP3 file play, play returns to the album title which is equivalent to the number of times the button has been pressed. Holding down the button initiates a backward search. (Returns during backward searches are not constant.) Q.
7. ADVANCED OPERATIONS • Playing all tracks repeatedly (all-track repeat) • Playing a specific part repeatedly (A-B repeat) This function repeatedly plays all the tracks. Repeat play is possible even during random play or program play. This function repeatedly plays a specific part of a track that you want to hear. Press the REPEAT button on the remote control unit. 1.
ADVANCED OPERATIONS Random play (Playing tracks in a random sequence) ENGLISH This function rearranges the tracks into a random sequence and it then plays all the tracks in this random sequence. If it is used together with repeat play, the same tracks can be repeatedly played but in a different sequence every time. AMS play (Searching for a specific track) This function comes in handy when searching for a specific track that you want to hear.
ADVANCED OPERATIONS Program play (playing tracks in the preferred sequence) 1 2 3 4 5 6 7 8 9 2 3 REPEAT 4 5 6 AMS 7 8 9 RANDOM PROGRAM 0 CANCEL A-B 0 • Program play in the time display mode ENGLISH The order in which the CD tracks are played can be rearranged into the sequence desired. Up to 30 tracks can be programmed. 1 In the case of a CD-TEXT disc, first press the TIME button on the remote control unit to set the main display to the time display mode.
ADVANCED OPERATIONS • Program play in the text display mode The title of each selected track is scrolled, and once it has been scrolled, it is programmed automatically. If you do not want to program the track, select another track before the scrolling is completed. In the case of a CD-TEXT disc, tracks can be selected by title for program play. ENGLISH If the main display is set to the time display mode, press the TEXT button on the remote control unit to establish the text display mode.
ADVANCED OPERATIONS This function makes it possible to skip those tracks that you do not want to hear during CD play. Up to 30 tracks can be deleted from the program. 2. Press the numeric buttons on the remote control unit or player that correspond to the track number that you do not want to hear (the track can also be selected using the and buttons).
ADVANCED OPERATIONS • Delete program play in the text display mode In the case of a CD-TEXT disc, the tracks that are not desired can be selected by title for delete program play. 2. ENGLISH If the main display is set to the time display mode, press the TEXT button on the remote control unit to establish the text display mode. Press the and buttons on the remote control unit or use EASY JOG on the player to select the track which you do not want to hear.
ADVANCED OPERATIONS • Checking the program or delete program contents • Returning program play to normal play (canceling the entire program) TIME STOP TEXT MENU ENTER CUE PLAY/PAUSE SCROLL/ RECALL QUICK REPLAY LEVEL - During programming operation or program play, press the SCROLL/RECALL button on the remote control unit. With program play, the programmed tracks are displayed one after the other in sequence on the main display.
ADVANCED OPERATIONS Pitch control (changing the play speed) The play speed (pitch) can be changed across a ± 12% range. • Returning play to the normal speed (0%) ∗ Press the PITCH RESET button on the remote control unit. Digital signals are not output during pitch control. ENGLISH INDEX • Increasing the play speed PITCH Press the PITCH+ button on the remote control unit. INDEX Q. REPLAY RESET Q. REPLAY PITCH RESET “Pitch: 0%” appears on the main display.
ADVANCED OPERATIONS Once the cue point has been set, the position where it was set will be retained in the memory until the power is turned off or the CD is removed. To set a new cue point, repeat the procedure from step 1. Setting the position to start listening to play (manual cue) • Setting the cue point (play start position) 1. Play the part at the approximate position of the cue point which is to be set, and press the to the pause mode. 2.
8. SETTING THE PLAY FUNCTIONS Using EASY JOG ENGLISH The front panel of the player features the EASY JOG dial to facilitate a number of different operations to be performed. Under normal circumstances, play re-starts at the start of the previous or subsequent tracks by turning the dial clockwise or counterclockwise. The dial also enables the play functions (play modes) to be set from the menu. The menu can also be operated from the remote control unit.
SETTING THE PLAY FUNCTIONS • Pitch 1. Press EASY JOG and then turn it so that “Pitch” appears on the main display. 2. Press EASY JOG (or press the ENTER button on the remote control unit) to select Pitch Control. TIME EASY JOG QUICK REPLAY TEXT 3. ENGLISH This function enables the play speed (pitch) to be adjusted within a +/-12% range. The setting is restored to “0%” when the disc is replaced. Turn EASY JOG (or press the remote control unit).
SETTING THE PLAY FUNCTIONS Various play functions (play modes) • Single Track Play (ON/OFF) ENGLISH This function enables single play searches which come in handy at such times as practicing musical performances or using the player at broadcast facilities. 1. 2. Press EASY JOG (or press the ENTER button on the remote control unit) to select Single Track Play. TIME QUICK REPLAY TEXT Turn EASY JOG (or press the remote control unit).
SETTING THE PLAY FUNCTIONS Auto Cue (ON/OFF) • Repeat (ALL/1/OFF) This function enables a blank part at the beginning of a track to be skipped and play to start where the sound has been recorded. This function enables some or all of the tracks on a disc to be played repeatedly. Press EASY JOG and then turn it to display “Auto Cue” on the main display. 2. Press EASY JOG (or the ENTER button on the remote control unit), and select “Auto Cue.” 1.
SETTING THE PLAY FUNCTIONS • Random (ON/OFF) This function enables the tracks to be rearranged into the desired sequence for play. This function enables the tracks to be rearranged in a random sequence and played. Press EASY JOG and then turn it so that “Program” appears on the main display. 1. Press EASY JOG and then turn it so that “Random” appears on the main display. Press EASY JOG (or press the ENTER button on the remote control unit) to select Program. 2.
SETTING THE PLAY FUNCTIONS • AMS (Auto Music Scan) Time • Quick Replay Time The AMS function enables the intros of all the tracks starting from track 1 to be played for the duration which has been set one after the other. In the case of this player, it enables the intro play time to be set. This is used to set the number of seconds for Quick Replay or End Monitor. 2. Press EASY JOG and then turn it so that “Q.ReplayTime” appears on the main display. 2.
SETTING THE PLAY FUNCTIONS • Quick Replay Key (Quick Replay/End Monitor) This function is used to switch the function when the unit’s QUICK REPLAY button (and the Q.REPLAY button on the remote control unit) has been pressed. ENGLISH 1. Press EASY JOG and then turn it to display “Q.Replay” on the main display. 2. Press EASY JOG (or the ENTER button on the remote control unit), and select “Q.ReplayKey.
SETTING THE PLAY FUNCTIONS This function makes it possible to select pause or play at the beginning of a track when performing play or play with a specific track number designation. • Time Mode (Track Remain/Total Remain/ Track Time/Total Lap) This function selects what kind of time is to be displayed during play. 1. Press EASY JOG and then turn it to display “Play Mode” on the main display. 1. Press EASY JOG and then turn it to display “Time Mode” on the main display. 2.
SETTING THE PLAY FUNCTIONS 4. When EASY JOG (or the ENTER button on the remote control unit) is pressed, the displayed status is entered.
SETTING THE PLAY FUNCTIONS • Tray Lock (ON/OFF) This function uses an indicator to inform you that the end of the track now playing is approaching. This function prevents the tray from opening during play to safeguard against operational errors. 1. Press EASY JOG and then turn it to display “End Warning” on the main display. 1. Press EASY JOG and then turn it to display “Tray Lock” on the main display. 2. Press EASY JOG (or the ENTER button on the remote control unit), and select “End Warning.” 2.
SETTING THE PLAY FUNCTIONS • Key Lock (ON/OFF) • MP3 Load This function disables the input of the unit to safeguard against operational errors. To play a disc recorded with MP3 files, the unit’s system must be switched after turning on the power. Once the system is switched, both music CDs and discs with MP3 files can be played until the power is turned off. The MP3 load function enables the system to be switched manually. 1. Press EASY JOG and then turn it to display “Key Lock” on the main display.
• Auto MP3 Load (ON/OFF) • Default This function enables the unit’s system to be switched automatically in order to play discs recorded with MP3 files. This function enables the data last stored in the memory to be returned to the initial values. For details, refer to “Last Memory” (on page 42). 1. 2. Press EASY JOG and then turn it to display “Auto MP3 Load” on the main display. 1. Press EASY JOG and then turn it to display “Init Preset” on the main display.
9. OTHER FUNCTIONS Last memory ENGLISH This function stores the play function settings even after the power has been turned off. The settings that can be stored include “AMS Time,” “Quick Replay Time” and “Timer Play.” The data that can be stored in the memory is listed below. • During play Each time the TEXT button on the remote control unit is pressed, the information items are displayed in the following sequence. During play, the information of track now playing is mainly displayed.
OTHER FUNCTIONS In addition to conventional music CDs and CD-R (recordable) discs, this player can also play CD-RW (rewritable) discs. It also supports the unfinalized discs that cannot be played by regular CD players. • Playing unfinalized CD-R/CD-RW discs CD players normally play only those discs on which the TOC information (*) has been recorded.
OTHER FUNCTIONS • Precautions for discs recorded using MP3 files ENGLISH ∗ The format of the files played have the “.mp3” or “.MP3” extension. Files with any other extension cannot be played. ∗ The Joliet file system, an extension to the ISO9660 file format, is supported as the write format. Both mode 1 (CDROM) and mode 2 (CD-ROM XA) are supported. MP3 file discs recorded using packet writing cannot be played.
OTHER FUNCTIONS Example of CONTROL I/O (input/output) connections When using pin 4 (FADER NORMAL) ENGLISH 23 14 24 14 2 CUE 2 2 2 15 END 17 FADER 4 2 14 13 12 11 10 9 14 25 24 23 22 8 7 20 NEXT 14 22 9 14 14 PREVIOUS 14 FF FR When using pin 16 (FADER INVERT) 23 2 14 24 2 14 25 2 2 16 2 15 END 17 14 NEXT 20 7 9 14 PREVIOUS 14 FF 22 14 13 12 11 CUE FADER FR 14 25 9 10 8 7 6 5 PAUSE FADER (INVERT) 24 23 22 21 20 19 4 3 2
OTHER FUNCTIONS Fader start Remote control codes When the fader start switch incorporated into a component such as a mixer board or mixing console or an external switch is connected to the fader start jack, play/pause control can be exercised by opening and closing the switch. ENGLISH When using CONTROL I/O connector pins 4 (FADER NORMAL) and 14 (TALLY COMMON) BALANCED R L CONTROL I/O OUTPUT LEVEL L RS232C IN DIGITAL OUT (SPDIF) R OUT CONNECTION 1 GND 3 COAX. ANALOG OUT OPT.
OTHER FUNCTIONS This input/output connector (D-Sub 9-pin female) is used for RS-232C external control. A straight cable available on the market can be connected to this connector to exercise external control and send status information. Example: Reception Time Command (code 2011) 2 6 9 1 5 2 3 5 D-Sub 9 Pin (male) 2 3 5 Rx Data Tx Data Ground D-Sub 9 Pin (female) The wiring requirements for a 9 pin to 9 pin serial connection, are a male to female straight cable.
OTHER FUNCTIONS Installing the rack-mounting kit 3. Follow the steps below to install the rack-mounting kit on the unit. 1. Align the front panel with the boss screws provided in the side panels of the rack-mounting kit, and fit it in place. After having attached the front panel, secure it by tightening up the four box nuts as shown in the figure below. Remove the four screws on the side panels of the unit. ENGLISH Front panel of rack-mounting kit Screw Box nut Screw 2.
10. SPECIFICATIONS AND DIMENSIONS Specifications Dimensions (unit: inch (mm)) Audio characteristics Channels ............................................................................. 2 Frequency response ...................... 20 Hz to 20 kHz ± 0.5 dB Dynamic range .............................................. 100 dB or more Signal-to-noise ratio ................................ Better than 110 dB Channel separation .......................... 100 dB or more (1 kHz) Total harmonic distortion .........
11. TROUBLESHOOTING If you think that something is wrong with your player, first check the points listed below. Incorrect operations can sometimes be taken for trouble and malfunctions. If the trouble persists even after the following points have been checked, consult your dealer or nearest Marantz sales office or service center. ENGLISH Disc fails to turn.
Limited Warranty How You Can Get Service Your Marantz Professional product is warranted against manufacturer defect for period of one year parts and labor. 1. If your unit needs service, contact our service referral at the appropriate telephone number indicated below. We will advise you of the name and location of one or more warranty authorized service centers from which service may be obtained. Please do not return your unit directly to us.
R Printed in Japan is a registered trademark.