Model PMD671 User Guide Portable Solid State Recorder
Warnings and Cautions CAUTION RISK OF ELECTRIC SHOCK DO NOT OPEN CAUTION: TO REDUCE THE RISK OF ELECTRIC SHOCK, DO NOT REMOVE COVER (OR BACK). NO USER-SERVICEABLE PARTS INSIDE. REFER SERVICING TO QUALIFIED SERVICE PERSONNEL. The lightning flash with arrowhead symbol within an equilateral triangle is intended to alert the user to the presence of uninsulated “dangerous voltage” within the product’s enclosure that may be of sufficient magnitude to constitute a risk of electric shock to persons.
Important Safety Instructions WARNINGS • Do not expose the equipment to rain or moisture. READ BEFORE OPERATING EQUIPMENT This product was designed and manufactured to meet strict quality and safety standards. There are, however, some installation and operation precautions which you should be particularly aware of. 1. 2. 3. 4. 5. 6. 7. 8. 9. 10. 11. 12. 13. 14. • Do not remove the cover from the equipment. • Do not insert anything into the equipment through the ventilation holes.
CE MARKING English The PMD671 is in conformity with the EMC directive and low-voltage directive. Français Le PMD671 est conforme à la directive EMC et à la directive sur les basses tensions. Deutsch Das Modell PMD671 entspricht den EMC-Richtlinien und den Richtlinien für Niederspannungsgeräte. Nederlands De PMD671 voldoet aan de EMC eisen en de vereisten voor laag-voltage. Español El PMD671 está de acuerdo con las normas EMC y las relacionadas con baja tensión.
Español ADVERTENCIAS - No exponga el equipo a la lluvia ni a la humedad. - No extraiga la tapa del equipo. - No introduzca nada en el interior del equipo a través de los orificios de ventilación. - No maneje el cable de alimentación con las manos mojadas. - No cubra la ventilación con objetos como manteles, periódicos, cortinas, etc. - No deben colocarse sobre el equipo elementos con fuego, por ejemplo velas encendidas.
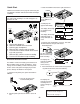
Quick Start 2. Slide the POWER switch to the right and release. Follow the instructions on this page to Quick Start your new PMD671 Portable Solid State Recorder and begin recording. Note: Outside of the USA, a CF card is not included. See page 49 for installing a CF card and page 21 to format a CF card. Quick Start Basic Instructions L 2 3 2 1 1 GND DC IN 15V R MIC 3 2 HOT c. a. On first power up, wait for the PMD671 to initialize.
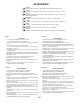
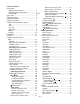
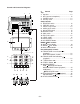
Table of Contents Precautions Warnings and Cautions ........................... 2 Important Safety Instructions ................... 3 CE markings ............................................ 4a/4b Quick Start ................................................... 5 Table of Contents ......................................... 6 US/Europe models ....................................... 7 Package Contents ........................................ 7 Control and Connection Diagrams Top ................................
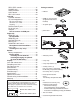
REC LEVEL controls ................................. 47 PHONES jack ............................................ 48 DISPLAY button ........................................ 48 LIGHT button ............................................. 48 KEY LOCK switch ..................................... 49 Left side CHARGE indicator .................................... 49 CF card compartment ............................... 49 To eject a CF card .................................. 49 To insert a CF card ...................
Control and Connection Diagrams 1 2 SOLID STATE RECORDER PMD671 SOURCE STEREO L R FILE MONITOR OFF 0dB OFF FLAT SINGLE ALL PRE REC OFF OFF ON INPUT LOCK INPUT ANC LIMITER ALC MANUAL ON LEVEL CONT.
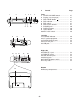
# 1 2 3 4 REC PAUSE 5 6 REC L HP/SPK VOLUME PHONES DISPLAY 7 8 11 12 LIGHT KEY LOCK 9 10 13 CHARGE DIGITAL IN DC IN 15V USB OUT R REC LEVEL Control Page Front 1 HP/SPK VOLUME control ...................... 2 Display (see next page) ......................... 3 REC PAUSE button ............................ 4 REC indicator. ........................................ 5 REC switch ............................................. 6 REC LEVEL controls ..............................
1 23 4 5 6 7 8 TOTAL TRACKTIME REC REMAIN kbps 9 10 11 A-B L kHz-dB AM R PM # 16 17 Control Display 1 REC label ............................................... 2 TOTAL label ............................................ 3 REMAIN label ........................................ 4 TRACK label .......................................... 5 TIME label .............................................. 6 kbps label ............................................... 7 A-B label ..................................
• play audio files on your computer • save audio files to: • your hard drive • a floppy • a CD-R disc • post streaming audio files on your web site • use software and your computer to transcribe digital recordings An editing program (PMDEdit, available from Marantz Professional for PC users) lets you convert and edit audio files that were recorded on the PMD671. Presets The PMD671 has three selectable Presets for commonly used recording situations.
Tracks are numbered from 01 to a maximum of 999. A new track (file) is automatically started each time recording is stopped using the STOP button. Using the "Auto TRK" feature, PMD671 can be set to start a new track at specific time intervals during recording (for example every minute). Using the "Manual TR" feature, you can start a new track during recording by sliding and releasing the REC switch.
• There are four ways to power the PMD671: • Included AC adapter • AA Alkaline batteries (~ 5 hours @ 1450 mAh usage) • Optional rechargeable Ni-Cd battery pack RB1100 (~ 4 hours @1100 mAh usage). • Optional rechargeable Ni-MH battery RB1651 (~ 6 hours @1650 mAh usage). • Built-in Time and Date generator marks the beginning of each track. • REMOTE1 jack permits a wired remote button for controlling the recording process. • REMOTE2 jack permits using the optional RC600 remote for microphone interviews.
RAW (VTH - Virtual Third Head) RAW (Read After Write / VTH - Virtual Third Head) digitally mimics the third head of a three head tape deck. When on and the PMD671 is recording, the audio that is output to the LINE OUT, DIGI OUT, PHONES and SPEAKER is audio that has already been written to the CF card and not audio from the source. This allows you to actually listen to audio written to the CF card, monitoring that the recording is actually taking place.
STEREO L R 8 SOURCE STEREO R L FILE MONITOR OFF 0dB OFF SINGLE 9 10 MIC ATTEN FLAT AUDIO OUT ON -20dB ALL AUDIO OUT Applies to playback output to LINE OUT, DIGITAL OUT, and Internal speaker or headphones. 6 PRE REC OFF ANC LIMITER ALC MANUAL REPEAT OFF ON ON 7 INPUT LOCK EDL PLAY L: Audio recorded on the Left channel is output to both the left and right output channels. LEVEL CONT. EDIT a INPUT A-B REPEAT MARK 6.
SOURCE STEREO R L FILE MONITOR OFF OFF SINGLE ALL ANC LIMITER ALC MANUAL REPEAT ON OFF INPUT LOCK MARK switch at OFF, or no marks were placed manually), playback is not available. Switch to OFF for playback. -20dB MIC ATTEN FLAT AUDIO OUT ON PRE REC OFF 0dB ON EDL PLAY Factory default: EDL PLAY switch at OFF. 11 12 13 LIMITER ALC MANUAL LEVEL CONT. EDIT 14 INPUT A-B REPEAT MARK LEVEL CONT. 11.
SOURCE a STEREO R L FILE MONITOR OFF ON SINGLE ALL INPUT LOCK OFF Input device(s) and channels: ANC LIMITER ALC MANUAL REPEAT ON Use Preset 2 when using the internal microphone. Use Preset 3 for digital input. -20dB MIC ATTEN FLAT AUDIO OUT OFF PRE REC OFF 0dB ON EDL PLAY Stereo with MIC input The microphone connected to the L MIC IN XLR jack is recorded on the Left channel. The microphone connected to the R MIC IN XLR jack is recorded on the Right channel. LEVEL CONT.
SOURCE FILE MONITOR OFF 0dB OFF PRE REC SINGLE ANC LIMITER ALC MANUAL INPUT LOCK ON OFF EDIT ALL REPEAT ON 16, 17, 18. MARK/ EDIT buttons MARK This button group controls EDL Marks and Editing functions. -20dB MIC ATTEN FLAT AUDIO OUT ON OFF STEREO R L EDL PLAY LEVEL CONT. EDIT INPUT A-B REPEAT 15 A-B REPEAT EDL Marks Mark functions: manually adding and locating Marks. MARK 16 17 18 15.
Edit functions: editing EDL Marks to create custom playback sequences, erasing and renumbering Tracks, and formatting the CF card. Custom playback sequences EDL Marks are numbered consecutively from 001 and automatically renumbered when an EDL Mark is added or erased. Playback is also consecutive from the point that playback begins. Press and release the MARK/ EDIT button to tab through the EDL Mark types: Point, Skip, Loop_A, Loop_B and Erase.
EDIT MARK EDIT button Press and hold the EDIT button for about 2 seconds to enter Edit mode. Edit mode Edit mode includes: Renumber (renumber tracks), TrkERASE (erase a track), TrkMkERASE (erase an EDL mark), AllMkERASE (erase all EDL marks), FORMAT (format the CF card), and CARD CHECK. How to renumber tracks If you have erased tracks from the CF card it is easier to locate recordings if the tracks are renumbered. From stop, press and hold the MARK/ EDIT button for about 2 seconds to enter Edit mode.
How to erase all EDL marks within one track How to erase all EDL marks From stop, press and hold the MARK/ EDIT button for about 2 seconds to enter Edit mode. From stop, press and hold the MARK/ EDIT button for about 2 seconds to enter Edit mode. Renumber is flashing in the display. Renumber is flashing in the display. While the display is flashing (3 seconds) press and release the MARK/ EDIT button two more times.
How to check a CF card (CARD CHECK) FORMAT is flashing in the display. While FORMAT is flashing (3 seconds), press and release the ENTER button . FORMAT OK? is flashing in the display. From stop, press and hold the MARK/ EDIT button for about 2 seconds to enter Edit mode. The display asks you to confirm that you want to format the CF card. Formatting the CF card will erase all recordings on the card. While FORMAT OK? is flashing, press and release the ENTER button to confirm. (Or to cancel.
Controls and Connections Top continued 20. TRACK JUMP forward button During playback, press and release to jump to the next track. If pressed while playing the last track, playback jumps to the first track on the CF card. SOLID STATE RECORDER PMD671 SOURCE STEREO L R FILE MONITOR OFF 0dB OFF OFF FLAT SINGLE ALL OFF ON INPUT LOCK INPUT ANC LIMITER ALC MANUAL ON LEVEL CONT.
Controls and Connections Top continued SOLID STATE RECORDER PMD671 SOURCE STEREO L R FILE MONITOR d SOLID STATE RECORDER PMD671 c OFF ON OFF ON INPUT LOCK INPUT FLAT ANC LIMITER ALC MANUAL ON LEVEL CONT.
Date Form – For selecting the date order. 3. Press and release the F.FWD/+ button (c) (d) to tab through or the -/F.REV button Preset1, Preset2 and Preset3. Beep – Turn the beep on or off. A.PowOff – Enable or disable the Automatic Power Off feature. Example display 4. When the correct choice is displayed, press (b) to and release the ENTER button select your Preset choice. Batt type – Set the battery type. Preset - Choose 1, 2 or 3. The display switches to RecFormat flashing for your Preset choice.
Auto Cue – Turn the Auto Cue feature on or off, set the number of milliseconds the dB level must meet or exceed the set threshold, and set the dB threshold level. 1. From stop, press and hold the MENU/ STORE button for about 2 seconds. Preset will appear (flashing) in the display. Example display S.Monitor - Turn the Stop Monitor feature on or off. SinglePly – Turn the single track play feature on or off. 2. With Preset flashing, press and release the . F.
How to set or change the Date Form The hour will be flashing. Example display. PM 7. With the hour flashing, press and release the F.FWD/+ button or the -/F.REV button to tab through hours. AM, PM will change when you pass 12, check that it is correct. When the hour and AM/PM is correct, press and release the ENTER button . The minute will be flashing. Example display PM 8. With the minute flashing, press and release or the -/F.REV the F.FWD/+ button to tab through minutes.
Beep When battery charge can provide no more than 1-3 minutes of recording or playback and Beep is set to On, the CHARGE indicator, REC indicator and the battery indicator in the display will flash, and the PMD671 will beep through the headphones or speaker. 5. When the desired state appears press and . release the ENTER button The display returns to Beep flashing.
4. Press and release the F.FWD/+ button the -/F.REV to button toggle between Yes and No. 1. From stop, press and hold the MENU/ STORE button for about 2 seconds. Preset will appear (flashing) in the display. or Example display 5. When the desired state appears, press and release the ENTER button .The display returns to A.PowOff flashing. You can: or the -/ • Press and release the F.FWD/+ button F.
Rec Format The PMD671 can record from analog or digital inputs, on one channel (mono) or two (stereo), in PCM at 24 or 16 bits, and in MP2 or MP3 compression formats. Channel(s) For given channels and formats the PMD671 can record at several bit rates and sample frequencies. Audio Format Fs kHz and (Bit rate kbps) 24 bit 96, 88.2, 48, 44.1 16 bit 48, 44.1, 32, 24, 22.05, File ext. BWF ext. wav/bwf PCM 16, 12, 11.025, 8 Stereo MP2 The file extension (.wav, .mpg, .
How to set or change the Rec Format parameters. Quick instructions Press & hold MENU/STORE 2 sec ....... Preset .................. RecFormat Double Click ENTER ...................... Mono or Stereo Press ENTER .................... Mono or Stereo Press F.FWD/+ Press ENTER ................. PCM, MP2 or MP3 ............... PCM, MP2 or MP3 Press F.FWD/+ If MP2 or MP3 ................................................ khz .......................... select khz Press F.FWD/+ Press ENTER .............................
4. Press and release the F.FWD/+ to button toggle between Mono and Stereo. When correct, press and release the ENTER button . The display switches to Format flashing. kbps kHz Channel(s) Audio Format 24 bit 96, 88.2, 48, 44.1 16 bit 48, 44.1, 32, 24, 22.05, 16, 12, 11.025, 8 MP2 MP3 Note In the example, the change from Mono to Stereo automatically doubled the bit rate. The change is illustrated in the chart below. 24 bit 96, 88.2, 48, 44.1 16 bit 48, 44.1, 32, 24, 22.05, File ext. BWF ext.
7. Press and release the F.FWD/+ button tab through the available bit rate settings. When correct, press and release the ENTER button to Channel(s) Audio Format Fs kHz and (Bit rate kbps) File ext. BWF ext. kHz 24 bit 96, 88.2, 48, 44.1 16 bit 48, 44.1, 32, 24, 22.05, wav/bwf PCM . 16, 12, 11.025, 8 Stereo The display switches to the next RecFormat menu choice flashing. MP2 MP3 48, 44.1, 32 (384, 256, 192, 128, 96, 64) mpg/bwf 48, 44.1, 32 (320, 256, 160, 128, 80, 64) mp3/bwf 24, 22.
Notes: • An audio drop out of the monitoring signal may occur during RAW during high bit rate MP3 recording. • RAW and 24-bit recording requires high CF card access speed (see CARD CHECK page 22). • RAW is not available for 24-bit recording. • Verify is simultaneously available with RAW or Time Shift for appropriate files (see charts on page 14). Digi-IN Rec Format Most of the RecFormat parameters recorded from a digital input source are determined by the input source.
3. Press and release the F.FWD/+ until button Verify is displayed. The display returns to RAW Mode flashing. You can: • • • Press and release the F.FWD/+ button or the -/ F.REV button to tab to another menu choice, or MENU/STORE button to Press and release the write the menu changes and return to stop mode, or to cancel all Press and release the CANCEL button menu changes and return to stop mode. 4. With Verify flashing, press and release the ENTER button . Verify menu choice is flashing. Verify 5.
How to set or change PupPreRec St Mode Quick instructions Press & hold MENU/STORE 2 sec ....... Preset .................. RecFormat Double Click ENTER Press F.FWD/+ until ................... PupPreRec Press ENTER ..................................... Off/On Press F.FWD/+ ........................ toggle Off/On Stereo Mode determines which input channels are recorded onto the Left and Right channels. 1. From stop, press and hold the MENU/STORE button for about 2 seconds.
3. Press and release the F.FWD/+ button until Mono Mode is displayed. 5. Press and release the F.FWD/+ to tab button through Stereo, L-Stereo and 0-20db. 4. With Mono Mode flashing Press and release the ENTER button . Mono Mode menu choice flashing. 6. When the desired mode is displayed, press and release the ENTER button . The display returns to St Mode flashing. You can: or the -/ • Press and release the F.FWD/+ button F.
How to set or change Auto Mark Manual TR Quick instructions Press & hold MENU/STORE 2 sec ....... Preset .................. RecFormat Double Click ENTER until ..................... Auto Mark Press F.FWD/+ Press ENTER ..................................... Off/On ........................ toggle Off/On Press F.FWD/+ Press ENTER ............................... Auto Mark Press MENU/STORE ....................
You can: or the -/ • Press and release the F.FWD/+ button F.REV button to tab to another menu choice, or MENU/STORE button to write • Press and release the the menu changes and return to stop mode, or to cancel all • Press and release the CANCEL button menu changes and return to stop mode. Auto TRK During recording, Auto Track Incrementing breaks the recording into multiple tracks of a preset length of time. At the preset time, the next track number is begun without stopping recording.
Seamless Play. When Seamless Play is On during playback, multiple tracks will be played back in sequence without any break (space) between the tracks. When Seamless Play is Off during playback, multiple tracks will be played back in sequence with breaks (brief periods of silence) between the tracks. Default setting is Off. How to set or change SeamlsPly Quick instructions Press & hold MENU/STORE 2 sec ....... Preset .................. RecFormat Double Click ENTER until ....................
How to set or change SilentSkp continued Note If you don't want to change the seconds or dB settings press and release the ENTER button several times to tab to SilentSkp flashing. Default settings are Off, 03 seconds and -40 dB. How to set or change SilentSkp 7. Press and release the F.FWD/ to + button tab through seconds. Quick instructions Press & hold MENU/STORE 2 sec ....... Preset .................. RecFormat Double Click ENTER until ...................... SilentSkp Press F.FWD/+ Press ENTER ......
How to set or change Auto Cue Quick instructions Press & hold MENU/STORE 2 sec ....... Preset .................. RecFormat Double Click ENTER until ...................... Auto Cue Press F.FWD/+ Press ENTER ..................................... Off/On ........................ toggle Off/On Press F.FWD/+ Press ENTER ............................ milliseconds .................... tab milliseconds Press F.FWD/+ Press ENTER .................................. decibels ..........................
2. With Preset flashing, in the display, double click the ENTER button How to set or change SinglePly Quick instructions Press & hold MENU/STORE 2 sec ....... Preset .................. RecFormat Double Click ENTER until ...................... SinglePly Press F.FWD/+ Press ENTER ..................................... Off/On ........................ toggle Off/On Press F.FWD/+ Press ENTER ................................ SinglePly Press MENU/STORE .................... store & exit . 3.
Remote Mode (REMOTE1 jack only) Use a wired remote (not supplied) to control the PMD671. There are five remote modes: • StartPause – during recording or playback, switch off to pause and on to resume (recording on the same track). • StrtStp TR - during recording, switch off to pause recording and on to start recording a new track. • EDL Mark – during recording, switch remote to on to add an EDL mark. • PWR REC – during power off, switch remote on to turn power on and begin recording.
1. Select the ID1 menu choice: a. From stop, press and hold the MENU button for about 2 seconds. Preset will appear (flashing) in the display. b. While Preset is flashing, double click the ENTER button . The last Menu choice selected will appear. to 10. When the upper display is flashing, press to and release the F.FWD/+ button switch to another menu choice, or press and release the MENU/STORE button to write the menu change(s) and return to stop mode.
Controls and Connections Top continued 3. Press and release the F.FWD/+ button until Default is displayed. SOLID STATE RECORDER PMD671 SOURCE STEREO L R FILE MONITOR OFF ON 0dB 4. With Default flashing, press and release the ENTER button . Execute will be flashing*. 5. Press and release the ENTER button EXECUTING is displayed briefly. OFF ON FLAT SINGLE ALL INPUT LOCK INPUT OFF ANC LIMITER ALC MANUAL ON LEVEL CONT.
A REC PAUSE does not increment the track. Front 1 2 3 4 5 REC PAUSE If the AUTO MARK switch is at ON, after a REC PAUSE an EDL mark is added when recording is resumed. The following is displayed for a couple of seconds. 6 REC L HP/SPK VOLUME PHONES DISPLAY LIGHT R REC LEVEL KEY LOCK TRACK TIME L -dB R 00 40 20 12 6 2 0 over -dB MARK 1. HP/SPK VOLUME control Turn to adjust the volume of headphones plugged into the HP/SPK VOLUME PHONE jack or the built-in speaker.
Front continued REC PAUSE After the third press, file parameters are displayed. REC L HP/SPK VOLUME PHONES DISPLAY 7 8 PHONES LIGHT R REC LEVEL KEY LOCK 7. PHONES jack Plug stereo headphones in this jack. L -dB R 00 20 40 12 6 0 2 over -dB recording type Current clock time hours:minutes:seconds TIME L -dB R 00 40 20 12 6 2 0 over PM -dB After the fifth press, the display returns to the default: remaining record time on the card.
Door Open is displayed. Front continued REC PAUSE REC L HP/SPK VOLUME PHONES DISPLAY LIGHT The PMD671 automatically turns off. R REC LEVEL KEY LOCK 10 KEY LOCK CF card slot Card eject button 10. KEY LOCK switch The KEY LOCK switch secures the PMD671 in its present state during Record, Playback or Stop. CF card door Card eject button The Card eject button has two positions: click out (a) and click in (b). Slide the switch to the right to turn KEY LOCK on. "Locked" is displayed for three seconds.
Security IN: Connect to the digital out of a digital audio component. PCM audio data input at 44.1. 48, 88.2 and 96 kHz can be recorded. Digi-IN must be selected using the INPUT button. for the signal to be recorded. See page 18. The supplied security screw (3mm x requires using a small Phillips screwdriver to open the Memory 10mm long) compartment door. The screw reduces the possibility that the CF card will be misplaced or stolen. OUT: Connect to the digital in of a digital audio component.
A file titled PMD670.EDL and a folder (directory) titled MPGLANG1 will appear on your computer. Files within the MPGLANG1 folder are numbered from 1001 through the number of tracks recorded to a maximum of 1999. The file extension will be .mp3, .wav, .bwf or .mpg depending on the Rec Format parameters that were set for the recording. How to connect via the USB port 1 3 POWER 2 MARGIN RESET i/O Root MENU/STORE PMD670.EDL MPGLANG1 1. Connect the cable to the PMD671 and your computer. 2.
microphone interviews. It attaches to your microphone. Right side 16 17 REMOTE 2 18 LINE IN L PUSH MIC PUSH L L R PHANTOM +48V R REMOTE 2 ON L REMOTE 1 2 3 1 3 REMOTE 1 PUSH MIC 3 1 1 GND 1 GND 1 2 HOT 3 COLD 3 2 PUSH R PHANTOM +48V ON 2 2 3 1 R 2 HOT 3 COLD OFF OFF 16. REMOTE1 jack Plug a wired remote (not supplied) in this jack. Wiring A switch diagram connected to the 2.5mm mini jack off (open) and on 2.
Right side continued REMOTE 2 19 LINE IN L PUSH MIC PUSH L 21 L Consult with your local dealer to select the appropriate microphone(s) for your specific application. They can demonstrate the various performances and characteristics of microphones for your use. R PHANTOM +48V R ON L REMOTE 1 Dynamic microphone(s) can be used but do not yield optimum audio quality recordings.
Battery power The PMD671 can operate on several types of battery power. Hint: Keep fully charged batteries in the PMD671 when recording using AC power because as much as 30 seconds of your recording could be lost if AC power is interrupted. Eight AA alkaline batteries and the supplied battery holder can be used. Alkaline batteries can power recording or playback for about *6 hours.
settings etc. Associated labels are display items 1-7, 9 and 10. Display 1 2 3 4567 8 TOTAL TRACKTIME REC REMAIN kbps 16 L kHz-dB AM R PM 00 12 40 13 20 12 14 6 2 0 S.SKIP 9. AM / PM label Displays AM or PM when clock time is displayed. over -dB INT MIC LINE TRACK MARK 15 A-B 9 10 11 10. kHz label The kHz label appears to indicate that the last five places in the upper alphanumeric display show frequency in kilohertz. 17 1.
TOTAL TRACKTIME REC REMAIN kbps A-B L kHz-dB AM R PM 00 40 20 12 6 2 S.SKIP 0 over -dB INT MIC LINE TRACK MARK 18 19 20 21 22 23 24 25 26 flashing indicates that the battery has 18. MIC / INT MIC label The MIC label appears when external microphones are selected. The INT MIC label appears when input selected for recording is the internal microphone. approximately 1 to 3 minutes of record or playback time remaining. The CHARGE indicator light will flash.
Recording time chart The recording time available (Hours:Minutes:Seconds) on a CF card depends on the size of the card in megabytes (MB), the recording type (PCM, MP2 or MP3), mono or stereo, bit rate, sample rate, and byte size (8, 16, or 24). This recording time chart lists approximate recording times based on those factors. All times are approximate.
Rec Format charts Analog inputs Channel(s) Audio Format 24 bit Fs kHz and (Bit rate kbps) File ext. BWF ext. 96, 88.2, 48, 44.1 wav/bwf PCM 16 bit 48, 44.1, 32, 24, 22.05, 16, 12, 11.025, 8 Stereo MP2 MP3 24 bit 48, 44.1, 32 (384, 256, 192, 128, 96, 64) mpg/bwf 48, 44.1, 32 (320, 256, 160, 128, 80, 64) mp3/bwf 24, 22.05, 16 (160, 128, 80, 64, 40, 32) mp3/bwf wav/bwf 96, 88.2, 48, 44.1 wav/bwf PCM 16 bit 48, 44.1, 32, 24, 22.05, 16, 12, 11.025, 8 Mono MP2 MP3 48, 44.
Preset 1 - 59 - Monitor 000000 PWR REC/Manual TRK 6-digit ASCII code 6-digit ASCII code 6-digit ASCII code --- ID1Dscrpt ID2Origin ID3OrgRef Default *Default when the function has been set to On.
TROUBLESHOOTING Should faults occur, it is often unnecessary to consult your dealer or technical service department. On the basis of the following checks, you may be able to rectify a number of conditions yourself without difficulty. If the condition cannot be remedied after the following check, please consult your dealer or contact Marantz Professional toll free at (866) 405-2154.
SPECIFICATIONS* Digital audio system System ........................................ Solid State Recorder Usable Media ................. CF memory/Microdrive cards Recording and media methods .mp2 ......................... MPEG1 Layer II compression .mp3 ........................ MPEG1 Layer III compression .mp3 ...................... MPEG2 Layer III compression* *for all half sample rates. PCM ....................................... 16/24 bit linear PCM Recording bit rate (selectable) MP2 mono .............
LIMITED WARRANTY How You Can Get Service (Americas only) Your Marantz Professional product is warranted against manufacturer defects in material and workmanship for a period of one year parts and labor. 1. Except as specified below, this warranty covers defects in material and workmanship. The following are not covered under warranty: 1. 2.
Marantz is a registered trademark.