R Model RC1200 User Guide Learning Remote Control
LOADING BATTERIES .......................... 8 BASIC OPERATION .............................. 9 USE MODE ............................................................. 9 LEARN MODE ...................................................... 10 PROGRAMMING THE JOG DIAL ......................... 13 REWRITING NAMES ............................................ 14 ERASING PROGRAMMED CODES ...................... 16 PROGRAMMING MACROS ................................. 20 EDITING MACROS ..................................
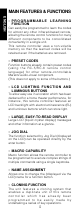
MAIN FEATURES & FUNCTIONS ENGLISH • PROGRAMMABLE LEARNING FUNCTION Can easily be programmed to learn the codes for almost any other infrared-based remote, allowing the remote control functions for many different components to be consolidated conveniently in a single unit. This remote controller uses a non-volatile memory so that the learned codes will be retained even if the batteries are removed.
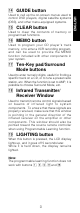
Names of Buttons & Functions z MODE button Used to change the operation mode of the remote controller. Pressing this button cycles the remote controller through USE → LEARN → NAME → CLONE TX → CLONE RX → USE, with the currently selected mode displayed on the LCD. x MACRO button Used to store a string of consecutive button operations in the memory and also to revise them. Pressing it switches the remote controller in and out of the MACRO mode. Its status is displayed on the LCD.
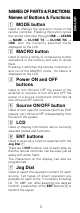
, Function buttons ENGLISH Used to switch the remote controller to the command sets for specific sources (amplifier, receiver, etc.), thereby allowing a single remote controller to control up to 11 different components. To use these buttons to switch the amplifier’s source, press the desired button twice within 2 seconds. The AMP button , is used only to switch the command set of the remote controller itself and therefore does not transmit any signal.
Used to call up the on-screen menus used to control DVD players, digital satellite systems (DSS), and other menu-equipped systems. ⁄5 CLEAR button Used to clear the contents of memory or programmed functions. ⁄6 MEMO button Used to program your CD player’s track memory, or to enter a VCR recording program, and can be used to provide the MEMO function included with other components in your system.
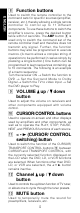
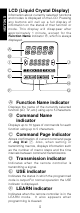
LCD (Liquid Crystal Display) ENGLISH Information about currently selected functions and modes is displayed on the LCD. Pressing any buttons will call up a full display of information on the status of that function or mode. This display will disappear after approximately 1 minute, except for the Function Name indicator A, which is always displayed. A B I J C E D H F G A Function Name indicator Displays the name of the currently selected function (LD, TV, etc.) using up to 5 characters.
Indicates when the remote controller is in the NAME mode and a function name is being changed. H MACRO indicator Indicates when the remote controller is in the MACRO programming mode. I CURSOR indicator Indicates when the CURSOR CONTROL buttons are in the cursor mode. J CONTROL indicator Indicates when theCURSOR CONTROL buttons are in a transport control mode such as PLAY, STOP, etc.
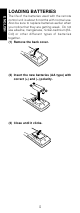
LOADING BATTERIES ENGLISH The life of the batteries used with the remote control unit is about 6 months with normal use. Also be sure to replace batteries earlier when you notice that they are getting weak. Do not use alkaline, manganese, nickel-cadmium (NiCd) or other different types of batteries together. (1) Remove the back cover. (2) Insert the new batteries (AA type) with correct (+) and (–) polarity. (3) Close until it clicks.
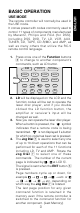
USE MODE The remote controller will normally be used in the USE mode. It comes preset with codes commonly used to control 11 types of components manufactured by Marantz, Philips and RCA (for DSS), including DSS, DVD, TV, LD, VCR, AUX, TUNER, CD, TAPE, CD-R/MD, and AMP, as well as many others that utilize the RC-5 remote control language. 1. Press once one of the Function buttons , to change to another component’s commands, such as LD button. DV D CD 2. 3. 4.
ENGLISH If it is left for approximately 1 minute without pressing any buttons, all items on the LCD will go off except the function indicator. Even if the display goes off, the remote controller will retain the status established before the display went off. When any button is pressed, the display will appear on the whole LCD display. LEARN MODE The remote controller is capable of learning and memorizing the remote control codes used by almost any other remote controller you may already own.
4. If the cursor is not aligned with the control mode after the LD function button , on the remote controller has been pressed, press the < • 3 (CURSOR/CONTROL switching) button ⁄1 to display " ". DSS TV VCR AUX LD TUNER TAPE AMP CLEAR MEMO GUIDE MUTE AUTO DOLBY THX DTS HALL 1 2 3 4 TV VCR AUX LD TUNER TAPE AMP GUIDE CLEAR MEMO AUTO DOLBY THX DTS MUTE HALL 1 2 3 4 5 MATRIX MOVIE 2CH OSD SLEEP 6 7 8 9 0 Press the PLAY button ⁄0 (3 OK).
ENGLISH • In the rare event that NG appears on the LCD, it means that the remote controller you are attempting to learn from uses special signals that cannot be learned by the Marantz remote controller. 6. 7. 8. Follow the same procedure to make the remote controller learn the ten-key ⁄7 operation used by the laser disc player’s remote controller. Repeat the procedure from step 3 to have the remote controller learn the signal codes for the other components such as TV, VCR, etc.
Let’s use the example of setting as the SIDE-B code for the laser disc player. 1. Use a ballpoint pen or other sharp point to press the MODE button z until the LEARN indicator is displayed and starts to blink. 2. Place the laser disc’s remote controller so that its infrared transmitter window is facing the infrared signal receiver window on the Marantz remote controller at a distance of about 5 centimeters (2 inches). 3. Press the LD Function button ,. 4.
ENGLISH • If you do not wish to rewrite the name, simply press the OK Cursor button ⁄0. • If you wish to rewrite the name, input the desired characters using the ten-key pad ⁄7. The part of the display which is to be overwritten can be moved using the left (<) and right (>) Cursor buttons ⁄0 . When you are finished rewriting, press the OK Cursor button ⁄0. To simply erase already existing characters, press the 0 button to replace them with a blank space. (Refer to next section on rewriting names) 6. 7.
The left-hand edge of LCD B now blinks to indicate that the character at the blinking location can now be overwritten. New characters entered will be written over the top of the current character so that the current character is erased. Use the < and > Cursor buttons ⁄0 to select the characters to be rewritten. 5. Use the ten-key pad ⁄7 to select the desired alphanumeric characters.
7. ENGLISH Follow the same procedure to enter “DA”. When finished, press the OK Cursor button ⁄0. Pressing OK permanently fixes the newly written characters. Similarly, the function names can be overwritten by pressing the function buttons. • Up to 5 characters can be entered in the function display and command display. • To rewrite the names of the other items in the Command Name indicator, use the Jog Dial m to select the desired command and repeat from step 5. 8.
ENGLISH POWER SOURCE ON OFF ON / OFF LEARNING REMOTE CONTROL RC 1200 MACRO MODE 2. Erasing by Button(s) To clear the codes and names programmed in any of the buttons • Press the button concerned twice while holding down the CLEAR button ⁄5. When the codes are cleared, the button returns to its factory presets or it is left empty.
3. ENGLISH Erasing Jog Dial Codes To clear all codes and names previously set for each of the functions (LD, TV, etc.). • Press the function button whose codes are to be cleared. When both the left and right ENT buttons n are pressed simultaneously while holding down the CLEAR button ⁄5 , "CLR?" appears at LCD B.
Erasing Codes by Function This procedure clears all the codes and names programmed for the LD, TV or any another function. • When the button for the function to be cleared is pressed twice while holding down the CLEAR button ⁄5, "CLR?" appears at LCD B. To go ahead with the clearing operation, press the OK Cursor button ⁄0.
ENGLISH To go ahead with the clearing operation, release the buttons, and press the OK Cursor button ⁄0. Once the data is cleared, the codes are either returned to their original display or left empty. LCD is similarly returned to its factory preset or left empty. All the macro programs are also cleared. • To cancel the memory clearing operation, do not press the OK Cursor button ⁄0 and simply touch any other button.
Example The LCD A will display LD-M. The characters displayed at LCD A are as follows. However, when a function name has been overwritten, "–M" appears for the first 2 or 3 characters. LD-M, DVD-M, TV-M, DSS-M, VCR-M, AUX-M, TUN-M, CD-M, TP-M, AMP-M, CDR-M (or MD-M for remote controller set for MD). • If a macro has already been set for the selected function button, the LCD A will blink. Also, the number of steps in the macro is displayed on LCD C.
ENGLISH • If, while programming, no buttons are pressed for approximately 1 minute, the remote controller will automatically return to normal mode, and no macro will be programmed in the memory. 4. When you are finished programming macros, use a ballpoint pen or other sharp point to press the MACRO button x. LCD A will display END, and the display will return to normal. • Macros cannot be programmed for the MODE z, MACRO x, < • 3 ⁄1, VOL / ., MEMO ⁄6 or CLEAR ⁄5 buttons.
ENGLISH • The is highlighted if no macros have been programmed, and the remote controller is ready for macro programming. 3. While pressing the VOL button ., press the ^ and v Cursor button ⁄0 to call up the part of the macro to be changed. Once the part is displayed, release the buttons. Pressing the ^ button increments the step number; conversely, pressing the v button decrements the step number. • To change a step by overwriting it, press the button in which the new step will be memorized.
ENGLISH • If while editing macros no buttons are pressed for approximately 1 minute, the remote controller will automatically return to normal mode, and no macro changes will be programmed in the memory. 4. When you are finished editing macros, use a ballpoint pen or other sharp point to press the MACRO button x. END will be displayed on LCD A and the display will return to normal.
Example 1 Change the input source for the amplifier to CD and play the 3rd track on a CD in the CD player. 1. Use a ballpoint pen or other sharp point to press the MACRO button x. POWER SOURCE ON LEARNING REMOTE CONTROL RC 1200 2. MACRO MODE Press the CD function button ,. CD-M is displayed on the LCD. CH VOL OK DVD CD 3. OFF ON / OFF CD-R/MD DSS TV VCR AUX LD TUNER TAPE AMP Press CD ,, 3 ⁄7, and 3 OK ⁄0 in this order.
ENGLISH When you are finished programming the macro, use a ballpoint pen or other sharp point to press the MACRO button x. POWER SOURCE ON OFF ON / OFF LEARNING REMOTE CONTROL RC 1200 MACRO MODE Now, execute the macro you just programmed. 1. Press the CD Function button , for 3 seconds. CH DVD CD 2.
4. To set the various steps of the macro, press the following buttons in order: AMP ,, POWER ON c, LD ,, AMP* ,, 2 (DOLBY) ⁄7, TV* ,, VIDEO (use Jog Dial m to select VIDEO and press ENT button n) , LD* ,, 3 ⁄0. When you are finished programming the macro, use a ballpoint pen or other sharp point to press the MACRO button x. The remote controller returns to normal mode. Now, execute the macro you just programmed. 1. Press the LD Function button , for 3 seconds.
CLEARING MACRO PROGRAMS ENGLISH The following procedure is used to erase macros you have programmed into the remote controller’s memory. • When one of the function buttons , (LD in this example) is pressed for 3 seconds while holding down the CLEAR button ⁄5, "LDCL?" appears at LCD A. If you wish to continue the clearing operation, press the OK Cursor button ⁄0.
All the codes which have been programmed can be copied altogether into another RC1200 remote controller by a few simple operations. (Macros and the set-up contents will also be copied.) Note: The clone function cannot be used for copying unless the same model (RC1200) is used for the remote controllers at the sending and receiving ends. MACRO SOURCE ON / OFF OFF OFF MODE LEARNING REMOTE CONTROL RC 1200 SOURCE POWER MACRO ON / OFF POWER ON LEARNING REMOTE CONTROL RC 1200 2.
3. ENGLISH Use a ballpoint pen or other sharp point to press the MODE button z on the receiving unit to call up the CLONE and RX displays. CLONE appears at LCD A and RX at LCD B. POWER SOURCE ON ON / OFF LEARNING REMOTE CONTROL RC 1200 4. 5. OFF MODE Press the OK Cursor button ⁄0 on the receiving unit. Press the OK Cursor button ⁄0 on the sending unit. The copying operation is now commenced. CH 6.
7. When copying is completed, use a ballpoint pen or other sharp point to press the MODE button z on both remote controllers to call up the USE display. POWER SOURCE ON ON / OFF LEARNING REMOTE CONTROL RC 1200 MACRO OFF MODE Note: If RX NG is displayed, all the receiving unit's buttons which were programmed will be returned to the factory presets (RC-5). 31 ENGLISH • Copying takes about 3 minutes to complete if the programming capacity in the sending unit is 100%.
COPY MODE ENGLISH In the copy mode, the preset codes or programmed codes stored in the buttons can be transferred (copied) to other keys as desired. The information that will be copied includes not only codes but also names which have been assigned. Information can be copied on a button by button basis, and Jog Dial codes can be copied. Buttons which are excluded from the copying process are the MODE button z, MACRO button x, < • 3 button ⁄1 and function buttons ,.
Select 1 of the LD function button on the copy source. Press the LD function button ,, and then press 1 on the tenkey pad ⁄7 for 3 seconds. The display at LCD B changes from LD to 1, and the characters "1" stops blinking and remain lighted. "CPY←" appears at LCD A. DVD CD q LD w 4. VCR AUX TUNER TAPE AMP GUIDE MUTE THX DTS HALL 2 3 4 5 MATRIX MOVIE 2CH OSD SLEEP 6 7 8 9 0 CLEAR MEMO AUTO DOLBY 1 The copy source has now been established.
COPYING THE JOG DIAL INFORMATION ENGLISH As an example, 1 (DISC+) for the CD function will be copied here to 1 (OSD) for the DVD function. 1. Use a ballpoint pen or other sharp point to press the operation MODE button z to call up the LEARN display. LEARN now blinks on the LCD display. POWER SOURCE ON LEARNING REMOTE CONTROL RC 1200 2. MACRO MODE Press the MEMO button ⁄6 for 3 seconds. (The learn mode of the MEMO button is established first, and after 3 seconds it changes to the COPY mode.
4. When copying finishes, the OK display appears at LCD A. "CPY→" appears again at LCD A. Now repeat steps 3 and 4. When copying is completed, press the MODE button z and call up the USE display. Operating tip In the same way, copying is possible from Jog Dial m to a button other than jog and vice versa. Now repeat steps 3 and 4. When copying is completed, press the MODE button z and call up USE on the LCD display.
OTHER FUNCTIONS ENGLISH LIGHTING BUTTON To allow easy use in a location which has been darkened for a home theater performance, for instance, this remote controller has an LCD display which lights up. It lights up when the LIGHTING button ⁄9 or any other button is pressed. While the LIGHTING button ⁄9 is pressed, it lights, and when it is released, it goes off. • Signals can be sent even while the LIGHTING button is held down. • The display can be set to light for a duration of 0 to 10 seconds.
VER: Switches the type of preset codes contained in the remote controller . LCD A displays VER, while LCD B displays either USA or REST. USA means that the CDR/MD Function button , is set to CD-R. REST means that the CD-R/MD Function button , is set to MD. Use the < and > Cursor buttons ⁄0 to select the desired version, then press the OK Cursor button ⁄0 . This will finish the operation and return the LCD to its original state. • To cancel the setting, press any button other than the Cursor buttons ⁄0.
ENGLISH MACRO: Adjusts the time interval between transmissions of macro operations When the v Cursor button ⁄0 is pressed, LCD a displays MACRO, while LCD b displays STEP. One square (7) in LCD c is equivalent to an interval of 0.5 seconds, allowing intervals of up to 5 seconds to be set. The remote controller is set at the factory with an interval of 1 second, as indicated by (77&&&&&&&&).
Each of the 10 Jog Dial commands on the LCD has 5 character labels attached for preprogrammed remote commands. These commands can be used with various Marantz A/V components, or other components using the Philips RC-5 remote control language (without DSS function). You can easily replace the factory-supplied remote command codes with different codes from other brands of component. Most of the supplied functions apply to a wide variety of component from many companies.
ENGLISH Function Command Note TV 1 A/CH alternate channel 2 100S 100's 3 VIDEO selects video 4 INFO information 5 S-PIC smart picture 6 S-SUD smart sound 7 S-CH smart channel 8 ADV advance activates on-screen display 9 OSD 0 MENU menu CD 1 DISC+ CD changer next disc 2 DISCCD changer previous disc 3 TEXT activates text function 4 SHUFL shuffle play function 5 REPT repeat function 6 TRAY tray open/close 7 AMS automatic music scan 8 TIME time display elapsed/ remaining/total 9 FF fast forward 0 REW rewind LD
For USA setups Function Command Note CDR 1 INPUT selects input source 2 INCR increments track number 3 SYNC activates SYNCRO.
ENGLISH For REST setups Function Command MD 1 REC 2 REPT 3 RANDM 4 DISP 5 EDIT 6 EJECT 7 LP 8 DEL 9 ENTER 0 SYNC Note records pause selects repeat mode random play selects display mode selects edit mode eject selects SP/LP mode selects delete selects enter SYNCRO.
System ........ Infrared type programmable remote control Learning and transmission-capable infrared carrier frequency band ............................................ 20 to 70 kHz Transmission infrared wavelength band ...... 950+/-45nm Maximum number of programmable codes .............. 407 Power supply ................... Size "AA" alkaline batteries x 2 Dimensions ........................... 225(H) x 65(W) x 26(D) mm Weight (including batteries) ....................................
⁄8 c POWER SOURCE ON v OFF ON / OFF LEARNING REMOTE CONTROL RC 1200 MACRO z x MODE b ⁄9 n ENT ENT m ⁄0 CH VOL OK .
“Dolby”, “Pro Logic” and the double-D symbol are trademarks of Dolby Laboratories. Confidential Unpublished Works. © 1992-1997 Dolby Laboratories, Inc. All rights reserved. “DTS” and “DTS Digital Surround” are trademarks of Digital Theater Systems, Inc. © 1996 Digital Theater Systems, Inc. All rights reserved. Lucasfilm and THX are registered trademark of Lucas film Ltd. R is a registered trademark. www.marantz.