Model RC3001 User Guide Remote Controller RC3001_E_cover.indd 3 07.8.
For US and Canada Note: This equipment has been tested and found to comply with the limits for a Class B digital device, pursuant to part 15 of the FCC Rules. These limits are designed to provide reasonable protection against harmful interference in a residential installation. This equipment generates, uses and can radiate radio frequency energy and, if not installed and used in accordance with the instructions, may cause harmful interference to radio communications.
For Europe ENGLISH WARRANTY For warranty information, contact your local Marantz distributor. RETAIN YOUR PURCHASE RECEIPT Your purchase receipt is your permanent record of a valuable purchase. It should be kept in a safe place to be referred to as necessary for insurance purposes or when corresponding with Marantz. IMPORTANT When seeking warranty ser vice, it is the responsibility of the consumer to establish proof and date of purchase. Your purchase receipt or invoice is adequate for such proof. FOR U.K.
English - - WARNINGS Do not expose the equipment to rain or moisture. Do not remove the cover from the equipment. No naked flame sources, such as lighted candles, should be placed on the equipment. When disposing of used batteries, please comply with governmental regulations or environmental public instruction’s rules that apply in your country or area. No objects filled with liquids, such as vases, shall be placed on the equipment.
ENGLISH A NOTE ABOUT RECYCLING This product’s packaging materials are recyclable and can be reused. This product and the accessories packed together are the applicable product to the WEEE directive except batteries. Please dispose of any materials in accordance with your local recycling regulations. When discarding the unit, comply with your local rules or regulations. Batteries should never be thrown away or incinerated but disposed of in accordance with your local regulations concerning chemical wastes.
TABLE OF CONTENTS BEFORE USE.......................................... 2 LOAD THE RECHARGEABLE BATTERY PACK INTO THE REMOTE CONTROLLER ........................2 CHARGING THE BATTERY PACK ............................3 ENGLISH Thank you for purchasing the Marantz RC3001 remote controller. This remarkable component has been engineered to provide you with many years of home theater enjoyment. Please take a few minutes to read this manual thoroughly before you operate the RC3001. NAMES AND FUNCTIONS .........
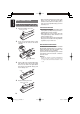
ENGLISH BEFORE USE LOAD THE RECHARGEABLE BATTERY PACK INTO THE REMOTE CONTROLLER 1. Remove the battery case cover. Battery case cover 2. Insert the rechargeable battery cable connector into the socket of the remote controller. • When removing the battery pack, take off the battery case cover, then pull up the ribbon stretched at the bottom of the battery case to take out the rechargeable battery pack from the battery case.
2. Once the rechargeable battery pack is loaded, power is immediately supplied automatically to the remote controller, and Home mode is displayed on the LCD. When it is first unpacked, the supplied battery pack is not fully charged. Be sure to fully charge it before usage. Also, if the remaining power is low, the remaining power level indicator at the bottom right of the LCD changes to the LOW BATTERY warning. Charge the battery pack as soon as this warning is displayed.
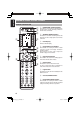
ENGLISH NAMES AND FUNCTIONS REMOTE CONTROLLER q w e r r q POWER ON and OFF buttons These buttons are used when controlling devices that have been set with separately powered on and off remote commands. w SOURCE ON/OFF button This button is used when controlling devices that have been set with a single power on/off remote command. e LCD Display Remote controller display r t y o u i t Page Scroll buttons These buttons are used when scrolling pages in Home mode and the device modes.
!0 ENGLISH !0 !1 !1 USB port This port is used to connect the remote controller and a PC with the supplied USB cable to enable editing with the Wizz.it 3 editor software. Charging terminal This terminal is used to connect the supplied AC adapter used to charge the remote controller. REMOTE CONTROLLER LCD A A Mode display area Home: This is displayed during Home mode. Device Name: This displays the device mode name that is currently active. This area is always highlighted.
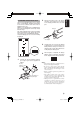
ENGLISH RX3001 ON OFF 1 2 3 4 ID 1 2 m , . n 1 x ⁄0 2 3 4 5 6 b c RX3001 z v z DC jack This jack connects to the supplied AC adapter. x Antenna This is a rod antenna for receiving RF signals. c IR blasters (upper direction) These transmit IR signals. The Wizz.it 3 editor software can be used to turn transmission of the IR signals on and off. m IR output level switches These DIP switches set the IR transmission level from IR output jacks 1 to 3 and IR output jacks 4 to 6.
ENGLISH INSTALLATION MOUNTING THE RX3001 TO A WALL MOUNTING LOCATION PRECAUTIONS • Before mounting, check the material and structure of the mounting location. If the location does not have the proper material or structure, the RX3001 can fall and cause an injury. • Use commercial items that best match the wall structure and material for the screws and other fixtures. • Do not mount near a kitchen counter, humidifier, or other location in which it can be exposed to smoke or steam.
ENGLISH 2. The positional relationship between the RX3001 key holes and the screw mounting positions are shown in the figure below. Notes: • When mounting the screws to the wall, leave a space between the wall and screw cap as shown in the figure. • You can use attached template sheet for the position of screws. 30mm (1-3/16ins.) 4.5mm (3/16 ins.) 4.5mm (3/16 ins.) 30mm (1-3/16ins.) 3. Insert the RX3001 key holes onto the two screws mounted to the wall, and then slide downward to secure in place.
USING THE REMOTE CONTROLLER WITH RADIO FREQUENCY By default, the remote controller uses infrared (IR) signals to operate devices. This means that you have to point the IR sending eye of the remote controller towards the devices you are operating. Operate the device with the remote controller within the range of the illustration below. You can choose to operate devices using Radio Frequency (RF) signals instead of IR signals. RF signals can, unlike IR signals, go through obstacles like furniture or walls.
ENGLISH CONNECTING THE RX3001 WITH OTHER DEVICES 1. CONNECTING TO MARANTZ EQUIPMENT Note: When connecting to other equipment, set the REMOTE CONTROL switch on the rear panel of the connected equipment to EXT.
Notes: • When affixing the IR emitter, be sure to affix it in front of the IR receiver of the equipment to which it will be connected. • Do not connect a commercial dual IR emitter to the IR output jack. In some cases, this could disable operation. IR ENGLISH 2.
ENGLISH SETUP SETTING THE IR OUTPUT LEVEL The DIP switches at the bottom of the RX3001 can be used to set the IR output levels from IR output jacks 1 to 3 and IR output jacks 4 to 6. Note: The default setting is high output (LEVEL 4), and so when the IR emitter is affixed to a device, the output level can be so high that remote commands cannot be controlled properly. Be sure to set the IR output level according to the status of the connected device.
The RC3001 can use the Wizz.it 3 editor to set the group ID for each device. If a different ID signal is sent from the remote controller, no control signal is output from the RX3001. Normally, set to ID1 when not using the group ID function.
ENGLISH BASIC OPERATION RC3001 BUTTON SETTINGS The Wizz.it 3 editor software can be used to make the settings for the IR Command, LINK, JUMP, One Touch Operation (Macro) and other functions in the RC3001. This enables a customized user interface, optimized for the customer s environment, to be built. The Wizz.it 3 editor software can be downloaded from www.marantz.com. For more information about the setting procedures, see the PC Editor Software Wizz.it 3 User Guide.
MAIN MENU 1. LEARNING FUNCTION 1. Place the remote controller so that its infrared signal transmitter is facing the infrared signal receiver on the Marantz remote controller at a distance of about 2 inches (0.05 m). 2. Display the MAIN MENU on the LCD of the RC3001, and then press the button next to the LEARNING indicator. 3. The screen appears as shown below. Either press the ENTER button or wait for three seconds. The various settings for the remote device are made in the main menu.
ENGLISH 4. This screen changes to HOME mode. Press the button next to the displayed device name whose commands you want to learn. 7. The remote controller has completed learning when LEARN OK is displayed on the LCD. • Pressing the ENTER button enables you to continue learning commands for another button in the same device mode. • When the learning mode is completed, press the Home button three times to return the LCD to the MAIN MENU.
The timer function of the RC3001 can be used to send a preset remote controller command at a programmed time. The Wizz.it 3 editor can be used to operate multiple devices. One Touch Operation (Macro) can also use the timer function for transmission. OPERATION SETTINGS 1. Press the button next to the TIMER SET indicator in the LCD in the TIMER menu screen to display the timer programming setting screen. 2. Use the numeric buttons (0 to 9) and cursor buttons (t and u) to set the time for the timer.
ENGLISH 3. Home mode is shown in the LCD. Select the commands and devices for the commands that will be sent by timer programming. • If a command assigned to the HARD button is to be sent by timer programming, press the HARD button when selecting the command to make the setting. 4. Press a button next to the EVERYDAY or ONE TIME indicators on the LCD to set timer operation to either everyday or onetime only operation.
1. 2. Press the button next to the ON/OFF indicator in the TIMER menu screen on the LCD to display the timer operation ON/OFF setting screen. Press the button next to the TIMER ON (Enable) or TIMER OFF (Disable) indicators on the LCD to either enable or disable timer operation. 3. Either press the ENTER button or wait three seconds so that COMPLETED is displayed on the LCD and the operation settings are automatically completed.
ENGLISH 3. SYS.SETUP 2. Use the numeric buttons (0 to 9) and cursor buttons (t and u) to set the current time. After setting the correct time, press the ENTER button. 3. The message COMPLETED is displayed in the LCD to indicate that the clock setting is completed. Display the MAIN MENU on the LCD of the RC3001, then press the button next to the SYS. SETUP indicator. The items below can be set in the SYS.SETUP screen.
Press the LIGHT button on the RC3001 to turn on the backlight, then set the time until the backlight turns off. 1. 3. The message COMPLETED is displayed on the LCD to indicate that the illumination time setting is completed. ENGLISH BACK LIGHT (BACKLIGHT ILLUMINATION TIME SETTING) Press the button next to the BACKLIGHT indicator in the SYS.SETUP menu screen in the LCD to display the backlight illumination time setting screen.
ENGLISH LCD (LCD SETTING) Press the button next to the LCD indicator in the SYS.SETUP menu screen in the LCD. The LCD setting menu is displayed. LCD TIMER (LCD timer setting) This sets the time that the LCD remains on, after a button is pressed on the RC3001. When there are no operations and the LCD is turned off, this setting enables power consumption to be reduced and the life of the battery pack to be extended. The default setting is 10 seconds. 1.
BEEP (BEEP SOUND SETTING) This sets the built-in beep sound in the RC3001. 1. Press the button next to the BEEP indicator in the SYS.SETUP menu screen in the LCD to display the beep setting screen. 2. Press the button next to the ENABLE or DISABLE indicators on the LCD to either enable or disable the beep sound. 3. The message COMPLETED is displayed on the LCD to indicate that the setting is completed.
ENGLISH MEM CLEAR (INITIALIZATION SETTING) This returns the settings made in the RC3001 to their initial settings. 1. Press the button next to the MEM CLEAR indicator in the SYS.SETUP menu screen in the LCD to display the initialization setting screen. 2. Press the button next to the NO (Disable) or YES (Enable) indicators on the LCD to either enable or disable initialization. Note: The LEARNING and CLOCK settings are not initialized.
This displays the settings made in the MAIN MENU and the status of the remote device. CHECKING THE STATUS 1. 2. Display the MAIN MENU on the LCD of the RC3001, then press the button next to the STATUS indicator. Pressing the ENTER button cycles through the statuses of each of the items below. • Remaining learning memory 5. RESET If the RC3001 is not operating properly, use the procedure below to perform a reset (restart). Performing a reset does not erase the settings in the RC3001. 1.
ENGLISH SPECIFICATIONS RC3001 228mm (9 ins.) LCD Resolution .............................................“11x81pixel x6 line ................................................9x81pixel x1line” Backlight .............................................. EL back light Transmission ..............................................IR or RF Learning .......................... Capability: MAX 1000code Operating/ learning IR frequency range .....................................................
ENGLISH RX3001 DC 9V 63.5mm (2-1/2ins.) RF carrier frequency ............................... 433.92MHz Operating/ learning IR frequency range .....................................................Up to 100kHz IR emitter output ...................................................x6 Dimensions (W x H x L) ... 102 x 63.5 x 27 mm (4-1/16 x 2-1/2 x 1-1/8 ins.) Unit Weight ............................................ 90g (0.2lbs) AC Adapter Power Supply................. 100 V-240 V AC / 50-60 Hz Power Output ..
ENGLISH OTHERS The section describes the care and maintenance tasks that must be performed to optimize the operation of your Marantz component. CLEANING OF EQUIPMENT EXTERNAL SURFACES The exterior finish of your unit will last indefinitely with proper care and cleaning, Never use scouring pads, steel wool, scourging powders or harsh chemical agents (e.g., lye solution), alcohol, thinner, benzine, insecticide or other volatile substances as these will mar the finish of the equipment.
www.marantz.com You can find your nearest authorized distributor or dealer on our website. is a registered trademark. Printed in China RC3001_E_cover.indd 2 09/ 2007 00M43CW851010 mzh-d 07.8.