User Guide To The RC9200/RC5200 Touch Screen Remote Controls Automating Your Home Theater With Marantz
Automating Your Home Theater With The Marantz RC9200/5200 RC9200/5200 Remote Control User Guide The information in this manual is copyright-protected. No part of this manual may be copied or reproduced in any form without prior written consent from Marantz America, Inc. MARANTZ AMERICA, INC. CORPORATION SHALL NOT BE LIABLE FOR OMISSIONS OR FOR TECHNICAL OR EDITORIAL ERRORS CONTAINED IN THIS MANUAL. MARANTZ AMERICA, INC.
Table of Contents Introduction 1. The Marantz RC9200/5200 2. The Battery User Guide 2 2 3 Getting Started 1. Activating the RC9200/5200 2. Navigating Control Panels 3. Operating a Device 4. Check Battery Life - The INFO Panels 5 The Setup Panels 6. The Mode Menus 6 6 7 12 13 13 15 Customizing Your RC9200/5200 7. Managing Memory 1. Introduction 2. Cloning All Your Existing Remotes 3 Complex Operation? Macros or Help... 4. Programming Help Lists 5. Macro/Panel Jump Capabilities 6.
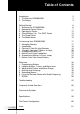
Introduction 1. The Infrared Eye The Marantz RC9200/5200 The RC9200/5200 is designed to control most devices that understand infrared remote control signals. Its easy-to-use touchscreen and its intuitive interface make it a perfect remote control for every user. The RC9200/5200 is completely customizable and programmable. You can add devices and functions, relabel buttons, record macros and animate your macros.
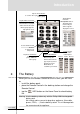
Introduction Tap the Scroll Arrows: to scroll to other panels within the active group. Tap the Macro menu Bar: to use your one touch Macro buttons. Tap again and a menu of all of your Macro groups appears. Tap again to select: Tap the Device menu bar: to operate devices. Tap again and a menu of all your devices appears. Tap again to select: Use the Control Panel Buttons: to operate your components Tap the Scroll Arrows: to scroll to other panels within the active group. 2.
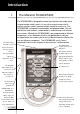
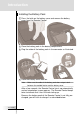
Introduction Installing the Battery Pack 1 Press the latch on the battery cover and remove the battery cover from the Remote Control. 2 Place the battery pack in the battery compartment. 3 Plug the cable of the battery pack in the connector as illustrated. 4 Place the battery cover back on. Note Make sure the cable of the battery pack does not get stuck between the molded interior and the battery cover. After a few seconds, the Remote Control starts up automatically and an Introduction screen appears.
Introduction Charging the Remote Control For charging the Remote Control you use the docking station. 1 Plug the power adapter into a wall outlet and connect it to the docking station. 2 Place the Remote Control in the docking station. Make sure you hold the Remote Control at an angle of 30° to 45° when you place the it in the docking station. Charging starts immediately. The green charging LED on the front of the docking station indicates charging takes place.
Getting Started 1. Activating the RC9200/5200 Turning on the Display Tap the screen gently with your finger or a blunt, soft object like a pencil eraser. The display is activated and you see the Home panel. Notes · If the display stays blank or becomes black, adjust the contrast dial on the left side. · If another panel is displayed, tap the Home button . · The RC9200/5200 shuts down automatically after being left alone for a few seconds (you can adjust the time out period in the Setup panels).
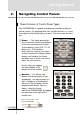
Getting Started 2. Navigating Control Panels Three Divisions of Control Panel Types Your RC9200/5200 is capable of displaying hundreds of different control screens. By grouping them into sensible divisions, it is easy to navigate to the control panel you want. The three main divisions are: Home — The Home group displays convenient instant jump buttons to the main control panels of your system devices (your VCR, TV, CD player etc.).
Getting Started Macros — The Macro side of your RC9200/5200 displays Macro buttons. Macro buttons play back a sequence of up to 255 different commands (and panel jumps, which can be programmed to do crude animations or to give messages during the Macro). You can always select the Macro side of the RC9200/5200 by tapping the menu bar to the left. Tap to select the Macro side of your RC9200/5200.
Getting Started Home Buttons Jump to Device Panel Groups and Change Your Receiver’s Inputs Each of the Device Panel Groups has a matching Device button on the home panel. These Device buttons perform two actions when pressed: 1 Jumps to the main panel of the Device Group. 2 Changes your home theater receiver/preamp to the appropriate input. See page 30 to program for a non-Marantz receiver/preamp. Jump to a Device Panel Group Without Changing Inputs 1 Pop up the Device menu, by tapping the Device Menu bar.
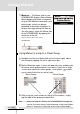
Getting Started Using the Scroll Arrows To Scroll to Panels Tap the Scroll arrows to navigate to other panels within the active group (home, macros or devices). Opposite the scroll arrow on the bottom of the screen, the Panel display shows you which panel you are viewing. Using the Back & Ahead Hard Buttons Tap the Back hard button to navigate to last six panels you’ve viewed. Use the Ahead hard button to navigate in the other direction.
Getting Started Using Tab Buttons to Jump to Panels All of your device groups have been programmed with “onetouch” jump buttons to all of the panels for that device. Simply touch the tab label and the RC9200/5200 will jump to the appropriate panel. 1. To view the TV’s Effects panel, press the EFX tab. 2. The RC9200/5200 will jump to the TV Effects panel. Your Macro Groups have also been programmed with “onetouch” jump buttons and tab style navigation to make it easy to sort your macros out.
Getting Started 3. Operating a Device You operate devices using two kinds of buttons: Touchscreen buttons Hard buttons - nine buttons below the screen (Home is not programmable and doesn’t count) and five to the right of the screen (Vol, Channel and Mute). Using Touchscreen Buttons Sending commands Infrared commands are invisible. However, when you send a command, an animated icon appears at the top of the panel to While RC9200/5200 show that a command is being sent.
Getting Started 4. Check Battery Life - The Info Panels Access INFO panel display by navigating to the Home panel (tap the Home button), then tapping the INFO button at the top of the screen. The Percentage of battery life. The Percentage of free memory available for new programming. There are two configurations built in to your RC9200/5200. If your info screen says: MZE EV2.0 MZE REV You are using the factory default file. You are using the memory saving, strippeddown file. See pages 17 and 57.
Getting Started First setup panel Setting Function Adjusting LCD Sleep Sets how long the touchscreen stays on. Sets how long the backlight of the touchscreen stays on. Sets how long the backlight of the direct-access and Left/Right buttons stays on. Selects the beep volume (Off, 1,2,3) for Touch Screen buttons Selects the beep volume (Off, 1,2,3) for Hard buttons. Tap the LCD button and use the Left and Right buttons. Tap the LCD Light button and use the Left and Right buttons.
Getting Started 6 The Mode Menu To help you plan how your RC9200/5200 will operate your home theater system, you should practice using the three mode menus. Working with Modes All customization is done via the three Mode menus. They differ in their capabilities: Macro Side - No IR learning is possible, so there is no LEARN ability. Home Panels - Since there is only one Home group, there is no ability to add or move groups. Device Side - No Macros can be programmed, so there is no EDIT button.
Getting Started For labeling buttons and commands. For adding new devices. For deleting buttons, devices and macros. For changing the order in a menu. For selecting the correct ID for the RF Extender To switch to another mode 1 Tap the Mode button at the bottom of the touchscreen or the label of the mode you are using. The Mode menu pops up. 2 Tap the mode you want to use. The label of the active mode appears on the RC9200/5200 icon. You can now work in the selected mode.
Getting Started 7. Managing Memory As you customize your remote, the RC9200/5200 will manage memory automatically. It will keep deleted groups of panels restorable as long as possible. When you need additional memory, it will notify you that it needs to do “Memory Cleanup,” which will permanently erase everything you have deleted so far. See page 50. You can choose to manually manage your memory by choosing a smaller template file to program with. There are two configurations built-in.
Customizing Your RC9200/5200 1. Introduction It is best to proceed with customizing in several stages. The first stage is to teach all of your existing remote codes to the RC9200/5200. The second stage is to practice using your home theater system with the RC9200/5200. As you gain familiarity with your system, you’ll notice that many operations in a home theater require several steps.
Customizing Your RC9200/5200 device group (in Use Mode, you cannot see buttons that have no RC codes). 7 Switch back to DEL mode and delete the group if it is not a good match to your component. Repeat steps 4 through 6 until all of your remote controls have a matching device group. 8 Switch to LABEL mode to relabel each device group (see page 32-34). 9 Switch to MOVE mode to re-order your devices, so that your home panel is arranged the way you want (see page 39-40).
Customizing Your RC9200/5200 3 Complex Operation? Macros or Help... If your entire system is new to you, practice using the RC9200/5200 manually for a few days before programming any macros. You’ll find that your home theater requires many operations that require multiple steps to do. You have to decide whether to use a: Macro - The entire operation happens in an automated sequence when you touch one button.
Customizing Your RC9200/5200 the example ALL ON and ALL OFF macros preprogrammed in the default configuration. The problems don’t stop with powering up a system. Often, you will want to construct a macro to watch or listen to a specific source. This may require that both the Television and the Surround Receiver be set to new inputs. Some components have “discrete” commands to select sources (meaning the command will only have one effect on the components, like the CD input on most receivers).
Customizing Your RC9200/5200 4. Programming Help Lists 1 Write a list of all of the actions in the operation you want to record. 2 Gather all of the remote controls you will need for the operation. 3 Navigate to the Device side of the RC9200/5200. 4 Select ADD from the Mode menu. Choose “Create New Device” when prompted (see page 35-40). In the “Other” division there is a device group labeled “Help.” Add the Help device. 5 Switch to LABEL mode.
Customizing Your RC9200/5200 5. Macro/Panel Jump Capabilities Macros can range from a one step jump to any device or home panel to sequences with up to 255 steps. In order to plan your macros, you should understand the capabilities as follows. Device Panel Buttons Can’t Perform Jumps/Macros You can program a macro to be played back when any button on the Macro side of the RC9200/5200 is pressed (see page 43).
Customizing Your RC9200/5200 Macros Send Commands To Your System You can make any or all of the 255 steps send an remote control command to your system. The step is actually just a recording of the location of any button on any device panel. To record an RC command, you simply navigate to the panel and button you want, then touch it. Thus, all RC commands in a Macro must first be taught to a button location first. You cannot learn a new IR command.
Customizing Your RC9200/5200 and creating a new Macro group. 3 Use DEL mode to delete all of the macro groups that you don’t like (see page 40-42). 4 Use ADD mode to add a new macro group empty of any programming (see page 35-40). 5 Switch to LABEL mode to relabel your Macro group (see page 32-34). 6 Switch to MOVE mode to re-order your Macro groups, so that the most commonly used Macro groups are near the top (see page 39-40). 7 Switch to LABEL mode and navigate to the your new Macro group.
Customizing Your RC9200/5200 Note Use the Scroll arrows to navigate; the tab style navigational jumps will not work. If you accidentally record a tab button as a macro step, it will do nothing because you cannot alias to a button that jumps. Since it will confuse you to see it in the Macro Edit window, it is best to delete it. 11 Once all steps have been programmed, test your macro by pressing the right hard button (now labeled Play). 12 Typically you will need to adjust the timing of the macro.
Customizing Your RC9200/5200 7. Macros From Your Home Buttons It is possible to program a macro to occur when you select a device (the macro will occur both when you press a home button AND when you select the device from the pull down Device menu). To program: 1 Navigate to the Device side of the RC9200/5200. 2 Tap the mode button and press the LEARN mode button. 3 Tap the Device Tab and reveal the Device Menu.
Reference 1. Programming Buttons You program the RC commands (RC for Remote Control) by transmitting infrared signals from your existing remote controls to the RC9200/5200’s learning eye. To do this, place the RC9200/5200 and the device’s remote control on a flat surface, 1 to 100cm (1/2 to 36 inches) apart. With each new remote control, you have to find the correct learning distance.
Reference The following buttons can be programmed: control panel buttons, Device menu items and Direct Access buttons. You cannot program Home menu buttons directly. You have to program them via the Device menu (see page 30). The RC9200/5200 also offers empty control panel buttons which you can program and label as existing buttons. They are only visible in Learn and Label mode and appear without label or with label (intended for a specific function).
Reference Programming The HOME Buttons to Switch Sources Note When you teach a command as a Device Action, this command is automatically assigned to the corresponding button in the Home menu AND to the act of selecting the Device from the pull down Device Menu. Typically, you teach the preamp/receiver source selection or “input” command to the device action.
Reference Programming Hard Buttons Globally And/Or Locally Per Device The Hard buttons are defined as the five hard buttons on the right side of the screen (Mute, Channel Up/Down, Volume Up/Down) and the nine buttons below the screen (don’t count Home, since you cannot program it). WARNING It is possible to teach commands to the LEFT and RIGHT hard buttons. However, only via a PC can you reprogram the buttons to scroll up and down so do not reprogram these keys without considering carefully.
Reference Programming a Hard Button Globally 1 Tap the Home button to navigate to the Home Panel. 2 Complete steps 2 to 7 in “Programming device panel buttons” on page 29. Instead of tapping a button on the touchscreen, press the Hard button you want to program. The label of the button you have pressed (e.g. chan+ or vol-) starts flashing on the RC9200/5200 icon. Programming a Hard Button Locally 1 Switch to the device for which you want to program the button.
Reference Labeling a Button or a Text Frame 1 Navigate to the panel containing the button/frame you want to label. 2 Switch to Label mode via the Mode button . 3 Tap the button/frame you want to label. The display shows a “virtual auto-zooming” mini-keyboard. The button/frame you want to label is displayed above the keyboard. 4 Edit the label. n To delete a character, press the Right button. n To enter a character, tap the keyboard near the character you want to use.
Reference For capital letters and symbols, press the Left hard button repeatedly to display the keyboard you want. n 5 Tap Enter to save the changes and return to the panel you were at. -orTap Cancel to return to the panel you were at without saving changes. 6 Label all other items you want and return to Use mode via the Mode button.
Reference 3. Working with Device and Macro Groups If you have a device that is not provided in the Device menu, you can add it to the RC9200/5200. You cannot add devices to the Home menu directly. You have to add them via the Device menu. There are three possible ways to add a device: Create New Device Copy Existing Device Restore Deleted Device In the following sections we’ll discuss what these options offer you. Create New Device Choose this option to add a completely new device.
Reference Each time you touch the scroll arrow down, more devices will appear as follows: Marantz constantly updates the templates for new models, so your remote may show considerably more models than we show here. Note If you try to Create New Device and you cannot use a scroll arrow to reveal all of these devices, you have the Revert configuration loaded (see pages 15,17 and 60).
Reference All of the devices shown are Marantz model #’s with the exception of the first division, called “Other.” Below the “Other” division are three device templates that are meant for other purposes. DSS - Since Marantz does not make a DSS receiver (yet!), we included a template. Simply teach the RC9200/5200 from your original remote. Status - This template is used to provide status screens you can jump to during a macro. Five panels are created with the device name “Status.
Reference Creating a New Device From a Marantz Template If you have the exact Marantz model # in the list, add the device with RC codes. If you have a Marantz component not listed, or your component is not Marantz, add the device without RC codes and use the LABEL and LEARN modes to customize it to your liking. Note When you add a device without RC codes, all buttons are invisible until you enter LABEL or LEARN mode.
Reference Copy Existing Device Choose this option to copy a device that is already active (you are already using it). TIP It is often useful to have two almost identical device groups for your Television. The only difference between the two is one would have the Vol+ and Vol- Direct Access buttons programmed locally with the televisions internal volume + and commands. Label this device TV Only (for use late at night without Surround Sound).
Reference Note The device or macro tab is active when the name of a device or macro is displayed. 2 Switch to Move mode via the Mode button The RC9200/5200 displays the menu. 3 Tap the menu item of your choice. The menu item is highlighted. 4 Use the Left and Right buttons to move the menu item up or down. 5 Tap Accept to save the changes. You return to Use mode. 4. Deleting and Restoring Deleting You can delete control panel buttons and actions associated with a direct-access or a Left/Right button.
Reference n n n Control panel button: The button disappears from the display. Left or Right button command: The corresponding label disappears from the display. Direct-access button: The button becomes inactive. 4 Delete all the items you want and return to Use mode via the Mode button. Deleting a device or macro menu item 1 Switch to Delete mode via the Mode button . 2 Navigate to the menu item you want to delete.
Reference Warning Do Not Delete the Left and Right hard Buttons! Remember, your RC9200/5200 is programmed at the factory with the Browse feature. If you accidentally reprogram the Left/Right hard buttons from the home panel, you cannot restore them with the remote control. The only way to restore deleted back and ahead global buttons is to use a Windows PC with RCEdit. Reteaching Control panel buttons 1 Switch to LEARN mode via the Mode button The deleted buttons become visible. .
Reference 5. Recording Macros Edit Window Notation Before you begin to program a Macro, study the notation used in the EDIT Window. Each type of action has its own notation. TV - When only a device name is listed, the macro step will be a Device Action (the action that occurs when the Device is selected, which is typically the preamp/receiver’s source selection or input command). GO: TV Main - A Go command indicates a panel jump.
Reference Delay - A delay counts as one of the 255 macro steps. Delays can be adjusted in 1/10th of a second intervals to be any value between .1 second and 99.9 seconds. Adjusting Delays - When a delay is “Selected,” you can adjust the delay with the plus and minus buttons. Recording A Macro Step By Step To record a macro, there must be at least one macro group in the Macro menu. To create these groups, see page 35-40.
Reference The macro is ready to be used. There are two extra commands you can record as any step in a macro: Recording a Device Action (Source Switching or Input) To record a Device menu item containing a source switching command, open the Device menu, hold down the Right button (labeled Action) and tap the device you want to switch to. This action places the entire Device Action in the Macro.
Reference commands to it, allowing the device to warm up): 1 Tap Delay. 2 Tap or delay. to decrease or increase the length of the 3 Use the arrow buttons right place. and to move the delay to the 5 Press the Left button to close the macro. A confirmation screen appears where you can save or cancel the macro. 6 Tap Save. The macro is ready to be used. Organizing macros into groups You can create as many macro groups as you like. Each group can contain up to 25 macros. 1 Open any macro group.
Reference 6. Using the Remote Control with Radio Frequency Warning To use the Remote Control with radio frequency (RF) you need an RF-77 RF Extender, which is only included with the RC9200. It is an optional accessory for the RC5200. By default, the Remote Control uses infrared (IR) signals to operate devices. This means that you have to point the Remote Control’s sending eye towards the device you’re operating. IR signals have an operating distance of 10 meters (33 feet).
Reference Changing the Remote Control’s RF IR Settings All devices are set up by default to work with IR signals. To be able to operate one or more devices with RF signals, you have to change the Remote Control’s RF IR settings for those devices. 1 Make sure the Device tab is active.The Device tab is active when the name of a device is displayed at the right side of the touch screen . 2 Tap the Mode button and select RF IR. The Device menu appears.
Reference 8 Repeat instructions 1 to 3 for all devices for which you want to change the RF IR settings. 9 Tap Close. The Remote Control switches back to Use mode. The Remote Control is configured to operate the devices you have set with RF signals. 10 Try out the devices for which you just changed the RF IR settings. Note It is possible that a device does not respond properly when operated with RF signals. In that case, you have to reconfigure the Remote Control to operate the device with IR signals again.
Reference 7. RC Edit Touch Screen Setup Program If you want to personalize your Remote Control even more, beyond its standard programming features, RCEdit Touch Screen Setup is the tool for you to use. RCEdit Touch Screen Setup is the RC9200/5200’s companion software that you can download from the following internet address: http://www.marantz.com With RCEdit Touch Screen Setup you can: Upload and download new configurations to and from your Remote Control.
Reference Import new graphics to create new buttons and designs. Personalize configuration files to optimize the use of your Remote Control. Make any button a macro. Share your work with other enthusiasts on the internet. Create animated slide shows using your own photos or art.
Troubleshooting General Problems The display is blank n Tap the screen to make sure the RC9200/5200 is turned on. n Adjust the contrast dial on the left side. n Make sure the batteries are properly installed. n Install new batteries or recharge the battery pack using the recharging dock. The display is too light or too dark Adjust the contrast dial on the left side. n The RC9200/5200 shuts itself off n This is a feature of the RC9200/5200 to save power.
Troubleshooting n n n Insert delays to allow devices to start up properly (see page 26). Check if you have included inactive buttons in your macro. Check if you haven’t reprogrammed the buttons. Macros do not store commands, they store button locations. If you reteach a button, the macro will execute the newly learned code, not the code that you taught to the original button. The TV goes blank or the input source changes The Device menu item might be programmed to switch the input source.
Troubleshooting need the Marantz factory default configuration, you will have to use RCEdit with a Windows PC to restore it (see page 57). Remote Control error messages If one of the following error messages occurs, please contact your Marantz dealer or Marantz customer service: n Can’t open configuration file Configuration file error n No configuration file found n Invalid configuration file version n n Tip The bulletin boards and friendly users at www.remotecentral.
Frequently Asked Questions Can I program a device button to execute more than one command? No, you can’t. However, you can program a button on the macro side of the remote to execute a sequence of commands (see page 24). How do I program source switching? See “Programming device items” on page 16. How can I edit, label or delete buttons on home panels? You can do this via the Device menu items. All changes you make to these items are automatically updated in the Home menu.
Frequently Asked Questions WARNING Should you use the REVERT button, the only way to recover the factory configuration is by using RCEdit and a Windows PC. Procedure for reverting to the memory saving REVERT file: 1 Navigate to the HOME panel. 2 Touch the Mode button. The Mode Menu appears. 3 Touch the Setup button. The first setup panel appears. 4 Scroll to the second setup panel. 5 Tap the Revert button. 6 Tap Revert to confirm the action.
Overview of Symbols Pause Stop Play, Normal run, normal speed Reverse Play, Normal run, normal speed Fast Forward, Scan Forwards, Fast run, fast speed Rewind, Scan Backwards, Fast run, fast speed Slow Motion Forwards, Slow run, slow speed Slow Motion Backwards, Slow run, slow speed Eject, Open/Close Record, general Key, Lock Navigate in the direction of the arrow Still mode, Freeze Frame Autoreverse a tape, Tape running direction Next track, Next chapter, Next song Previous track, Previous chapter, Previous
Overview of Symbols Page number up Page number down Page enlargement TV and text mixed 1st or 2nd language Last view, previous program Power, Stand-by Zone focus: long distance Zone focus: very short distance Single or multi-digit selection Brightness, brilliance Contrast Brightness/contrast Color saturation Lamp, lighting, illumination Split screen freeze / double screen freeze Split screen swap / double screen swap Split screen / double screen Movie expand Personal preference Picture-in-picture freeze Mai
Specifications Hardware Adjustable high-resolution (320 x 240) liquid crystal display (LCD) Large touchscreen Fourteen programmable direct-access buttons Backlighting for LCD and direct-access buttons Built-in Marantz codes Infrared sending and learning eyes 3-wire (RS232) serial port connector Software Dynamic, animated interface Editable macros (up to 255 commands per macro) Total number of devices and macros limited only by memory and imagination Infrared (IR) Operating distance of 10 meters (33 fee
The Revert Configuration Why Use The Revert Configuration By deleting the Marantz factory default, you will add 400K of free memory. The Revert configuration includes all of the button art and fundamental features of the Default configuration; however, it does not have all of the pre-programmed Marantz RC codes, nor does it have all of the demonstration macro groups (Help, FAV CD, etc.).
Index A GO 43 Add Mode 16 Switch Modes, 16 Anchored Macros 21 H B Backlight button, 2 Button Light Timeout 14 Help Lists Programming 22 Home Buttons, 9 Home Theater Operation 20 Home, 7 macros from a home button 26 C Calibrate 14 Cloning 18 Contrast Dial, 2 Control Panel Buttons, 3 Control Panel, 7 customizing, 18 J Jump Capabilities 23 Jump To A Device Group, 8 Without Changing Inputs, 9 Jump to a Macro Group, 8 D Delays 24 Delete Mode, 16 Switch Modes, 16 Device menu bar, 3 Devices, 7 Direct Acces
Index from a home button 26 From Device Buttons 23 jumps to panels 23 moving commands 26 RC Commands 24 Step by Step 24 Use the Scroll arrows 26 Mode Button, 3 Switch Modes, 16 Modes, 6 Switch Modes, 16 Working with Modes, 15 Move Mode 16 Switch Modes, 16 multiple step operations 20 Help Lists 22 R Revert 14 right menu bar, 8 S Scroll Arrows, 3, 10 in macros 26 Scroll TV Inputs Command, 21 Selecting Source Macros 21 Sending Eye, 2 Serial Port, 2 Setup Panels 13 Show/Hide Device, 14 Show/Hide Macro, 14 Sp
Service and Support Service and Support For service and support, please contact Marantz customer service at 1-800-447-1970. When you contact Marantz customer service, you will be asked for the technical information listed on the Info panel. To view this information, follow these steps. 1 In Use mode, navigate to the HOME panel by touching the Home button. 2 Touch the INFO icon to display the INFO screen. 3 When you wish to return to USE mode, tap the INFO icon again.
Printed in the USA