Model SC-7S2 User Guide Stereo Control Amplifier SC-7S2 UN 00 Cover Page 5 06.8.9, 1:51 PM Adobe PageMaker 6.
CAUTION RISK OF ELECTRIC SHOCK DO NOT OPEN CAUTION: TO REDUCE THE RISK OF ELECTRIC SHOCK, DO NOT REMOVE COVER (OR BACK) NO USER-SERVICEABLE PARTS INSIDE REFER SERVICING TO QUALIFIED SERVICE PERSONNEL The lightning flash with arrowhead symbol within an equilateral triangle is intended to alert the user to the presence of uninsulated “dangerous voltage” within the product’s enclosure that may be of sufficient magnitude to constitute a risk of electric shock to persons.
IMPORTANT SAFETY INSTRUCTIONS READ BEFORE OPERATING EQUIPMENT This product was designed and manufactured to meet strict quality and safety standards. There are, however, some installation and operation precautions which you should be particularly aware of. 1. Read these instructions. 2. Keep these instructions. 3. Heed all warnings. 4. Follow all instructions. 5. Do not use this apparatus near water. 6. Clean only with dry cloth. 7. Do not block any ventilation openings.
ENGLISH FRANÇAIS WARRANTY For warranty information, contact your local Marantz distributor. RETAIN YOUR PURCHASE RECEIPT Your purchase receipt is your permanent record of a valuable purchase. It should be kept in a safe place to be referred to as necessary for insurance purposes or when corresponding with Marantz. IMPORTANT When seeking warranty service, it is the responsibility of the consumer to establish proof and date of purchase. Your purchase receipt or invoice is adequate for such proof. FOR U.K.
ENGLISH TABLE OF CONTENTS INSTRUCTION FOR USE...................................................................................................................... 2 FOREWORD ....................................................................................................................................................... 2 EQUIPMENT MAINS WORKING SETTING ....................................................................................................... 2 COPYRIGHT ..................................
ENGLISH INSTRUCTION FOR USE FOREWORD This section must be read before any connection is made to the mains supply. EQUIPMENT MAINS WORKING SETTING Your Marantz product has been prepared to comply with the household power and safety requirements that exist in your area. “SC-7S2/N1G” version product can be powered by 230 V AC only. “SC-7S2/U1G” version product can be powered by 120 V AC only. COPYRIGHT Recording and playback of any material may require consent.
The concept: channel separation for super wide range & dynamic audio We think it’s of the utmost importance to extend high frequency response as well as channel separation so you can hear the true meating of “Super Audio.” This is why we have designed the input and output circuitry, volume control section, and power supply circuits according to this philosophy. The result: an astonishing channel separation of over 100dB at 20kHz.
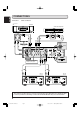
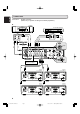
ENGLISH CONNECTIONS Connection 1 Stereo connection :Signal flow CD Player CD Recorder / Tape Deck 4 5 6 3 7 2 8 1 9 0 10 POWER RIGHT ANALOG OUTPUTS LEFT L UNBALANCED R O UT P UT I NP UT ANALOG BALANCED 1 1 Unbalanced connection or ID NO. balanced connection 1 2 3 SC-7S2 Setting 1 4 5 6 PUSH PUSH MODE STEREO Setting STEREO To connect analog output of FM tuner, DVD player. or or MA-9S2 For L ch PUSH BI-AMP MA-9S2 For R ch PUSH This connection can have options i.e.
ENGLISH CONNECTIONS Connection 1–4 are recommended by Marantz for SC-7S2 with Marantz MA-9S2. If using the MA-9S2s, Please read the instruction manual for the MA-9S2. Name and Function ➔ P13 Standard set-up in using Marantz Monaural Power Amp MA9S2. Please refer to this connection in event of using other Power Amps also. • SC-7S2 doesn't have Phono equalizer. So in the event of using a turn table, please use a Phono equalizer to connect with the SC-7S2.
ENGLISH CONNECTIONS Connection 2 Bi-Amp connection (Make sure your speakers are designed for Bi-Amp capabilities) :Signal flow CD Player CD Recorder / Tape Deck 4 5 6 3 7 2 8 1 9 0 10 POWER RIGHT ANALOG OUTPUTS LEFT L UNBALANCED R OUTPUT INPUT ANALOG BALANCED 1 1 Unbalanced connection or ID NO. balanced connection 1 2 3 SC-7S2 Setting 1 4 5 6 PUSH PUSH MODE STEREO BI-AMP Setting STEREO To connect analog output of FM tuner, DVD player.
ENGLISH CONNECTIONS This connection can have options i.e. You may connect the units using either balanced or unbalanced cables to connect your CD player and control Amp. But you can not inter match. Please select either way of connection. Enhance the connection 1 to Bi-Amp connection, and drive the Bass speaker and Mid/High speakers with separate power Amplifiers. BI-AMP (CONNECTION) The benefits of Bi-Wiring; drive the Bass speaker and Mid/ High speakers with separate power Amplifiers.
ENGLISH CONNECTIONS Connection 3 Complete Bi-Amp connection (Make sure your speakers are designed for Bi-Amp capabilities) :Signal flow CD Player CD Recorder / Tape Deck 4 5 6 3 7 2 8 1 9 0 10 POWER RIGHT ANALOG OUTPUTS LEFT UNBALANCED L BALANCED 1 R 1 OUTPUT INPUT ANALOG To connect analog output Lch of FM tuner, DVD player. To connect analog output Rch of FM tuner, DVD player. ID NO. 1 ID NO.
ENGLISH CONNECTIONS This connection can have options i.e. You may connect the units using either balanced or unbalanced cables to connect your CD player and control Amp. But you can not inter match. Your Control Amp & Power Amp can also be wired the same way. Please select either way of connection. COMPLETE BI-AMP CONNECTION Enhance connection 2, by having one more control Amp. SC7S2, this is a wiring which separates Mid/High signal and Low signal from the Pre-Amp section.
ENGLISH CONNECTIONS INSTALLING THE SUPER AUDIO CD MULTI-CHANNEL AUDIO SPEAKERS In order to enjoy Super Audio CD multi-channel sound with the best possible acoustics, it is recommended that the speaker systems be laid out in compliance with the ITU-R BS.775-1 recommendation which is a standard formulated by the International Telecommunication Union (ITU).
CONNECTIONS Connection 4 5.1ch multi-channel connection This Connection is standard for Multi-channel sound source. This will enable you to experience the high quality sound acoustic for the professional Home theatre and pure multi channel Super Audio CD. The complete system is controlled using 3 SC-7S2 Stereo Control Amplifiers.
NAME AND FUNCTION FRONT PANEL DISPLAY SECTION r I stereo control amplifier sc- 7s2 BALANCED CD A SYNC II B LINE 1 A power on/off LINE 2 DISPLAY RECORDER IV volume input selector e w q Power switch q u y w Remote control sensor This is the IR (Infra Red) window which receives IR control signals being sent from the remote controller. How to use remote control → p.
ENGLISH NAME AND FUNTION REAR PANEL PUSH PUSH z x c v z Input Balanced terminal This terminal is to connect the components which have balanced outputs i.e. CD Player. When Bi-Amping, terminal B can not be used. Balanced terminal → p5 x Input CD, Line 1, Line 2, Recorder (Unbalanced) terminal This terminal is to connect the unbalanced terminals of components., i.e. CD etc. When Bi-Amping, terminal B can not be used. c Rec out terminal The terminal connects to the Input of Recording equipment i.e.
ENGLISH NAME AND FUNTION REMOTE CONTROLLER This remote controller can control the SC-7S2 and Marantz Super Audio CD players and DVD players that have a remote control receptor. The operations possible by remote control may differ with each component, therefore see the instruction manual that came with the component. Remote controller buttons are laid out as shown below. z Input Selector Buttons These buttons are for selecting the input source to use in playback.
The buttons in groups , and . are for operating Marantz products other than the SC-7S2, such as Super Audio CD players and DVD players. The function of each button changes to match the component selected as the input source from the input selector buttons z. When the CD and BALANCED buttons are pressed, the buttons in groups , and . function as indicated in the below table. These buttons can be used only when a Marantz Super Audio CD player is connected to the CD input or BALANCED INPUT jacks.
ENGLISH STANDARD OPERATION q Power on the SC-7S2. In case you have several SC7S2s connected, please power on from the smaller No. of ID to the larger No. Once the power is on, the Front display and input indicator for the currently selected source will be illuminated.
HOW TO OPERATE FUNCTION AND HOW TO SET UP e Press the ATT button, the attenuation level will be changed with every press. ATTENUATE FUNCTION stereo control amplifier sc- 7s1 With one touch, the volume can be decreased, instantly. The ATT button on the SC-7S2 or the remote controller, is used for this function.
ENGLISH HOW TO OPERATE FUNCTION AND HOW TO SET UP TRIM ADJUSTMENT FUNCTION You can adjust the output level within -6.0dB–+6.0dB (0.5dB step) for each channel. e Once the 3 button on remote controller is pressed, Indicator on the A ch will be turned off, the indicator on the B ch will be illuminated. Then Sync indicator remains flashing Green. + stereo control amplifier sc- 7s2 7 How to adjust Trim setting In case R of 1 unit ENTER A q Press the TRIM button on the remote controller.
C T C T 7 If using more than 1 SC-7S2 Set up the ID numbers to the respective SC-7S2s to identify each of the SC-7S2s. q Set up the ID No. switch <1> for the main unit of the SC7S2 to control others, which is called unit. The ID No. set up will be indicated in the display window for 3 seconds when the unit is powered on. stereo control amplifier sc - 7s2 PRE OUT UNBALANCED 1 2 BALANCED REMOTE CONTROL t Please refer to p.18 for Trim adjustment.
ENGLISH SPECIFICATION DIMENSIONS SPECIFICATION Maximum output voltage (20Hz-20kHz) ............ 13.5V (BALANCED) ................................................. 13.5V (UNBALANCED) Total harmonic distortion (20Hz-20kHz) ....... 0.0015% (BALANCED) ............................................... 0.003% (UNBALANCED) 441 Frequency response (+0/-3dB) ............. 3Hz–150kHz (BALANCED) ...................................... 3Hz–150kHz (UNBALANCED) Input sensitibity/Input impedance ..........
Should faults occur, in many cases it is not necessary to consult your dealer or a Marantz technical service department. On the basis of the following checks you will be able to rectify a number of faults yourself without difficulty. If the fault cannot be remedied after the following checks, please consult your dealer or nearest Marantz service agent. 7 The unit does not turn ON 1.
www.marantz.com You can find your nearest authorized distributor or dealer on our website. is a registered trademark. Printed in Japan SC-7S2 UN 00 Cover 08/2006 00M340J851320 mzh-g Page 4 06.8.9, 1:51 PM Adobe PageMaker 6.