Model SR8400 User Guide AV Surround Receiver SR8400U DFU_00_cover Page 11 04.1.7, 11:20 AM Adobe PageMaker 6.
IMPORTANT SAFETY INSTRUCTIONS CAUTION RISK OF ELECTRIC SHOCK DO NOT OPEN CAUTION: TO REDUCE THE RISK OF ELECTRIC SHOCK, DO NOT REMOVE COVER (OR BACK) NO USER-SERVICEABLE PARTS INSIDE REFER SERVICING TO QUALIFIED SERVICE PERSONNEL READ BEFORE OPERATING EQUIPMENT This product was designed and manufactured to meet strict quality and safety standards. There are, however, some installation and operation precautions which you should be particularly aware of. 1.
12. Grounding or Polarization – This product may be equipped with a polarized alternatingcurrent line plug (a plug having one blade wider than the other). This plug will fit into the power outlet only one way. This is a safety feature. If you are unable to insert the plug fully into the outlet, try reversing the plug. If the plug should still fail to fit, contact your electrician to replace your obsolete outlet. Do not defeat the safety purpose of the polarized plug. 16.
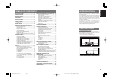
INTRODUCTION .................................. 2 PRECAUTIONS ................................... 2 DESCRIPTION ..................................... 2 FEATURES .......................................... 3 ACCESSORIES ................................... 3 FRONT PANEL .................................... 4 FL DISPLAY ................................................................... 5 REAR PANEL ...................................... 6 REMOTE CONTROLLER RC1400 ...... 7 NAMES AND FUNCTIONS .................
ENGLISH DESCRIPTION DTS was introduced in 1994 to provide 5.1 channels of discrete digital audio into home theater systems. DTS brings you premium quality discrete multichannel digital sound to both movies and music. DTS is a multichannel sound system designed to create full range digital sound reproduction. The no compromise DTS digital process sets the standard of quality for cinema sound by delivering an exact copy of the studio master recordings to neighborhood and home theaters.
HDCD® (High Definition Compatible Digital ®) is a patented process for delivering on Compact Disc the full richness and details of the original microphone feed. HDCD encoded CDs sound better because they are encoded with 20-bits of real musical information as compared to 16-bits for all other CDs. HDCD overcomes the limitation of the 16-bit CD format by using a sophisticated system to encode the additional four bits onto the CD while remaining completely compatible with the CD format.
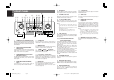
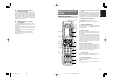
ENGLISH !0 FRONT PANEL qw @1 !5 !6 !7 !8 !9 !0 u i o e r t y !1 !2 AV SURROUND RECEIVER SR8400 MEMORY SPEAKERS A/B TUNING MULTI F/P MULTI SPEAKER DOWN MODE 7.1CH INPUT UP AUX2 MUTE ENTER TV STANDBY DVD VCR1 DSS/VCR2 AUX1 CD-R TAPE CD S-DIRECT TUNER AUX1 INPUT POWER ON/STANDBY !1 !9 DIGITAL PHONES S-VIDEO VIDEO L AUDIO R !3 !4 @0 POWER switch and STANDBY indicator When this switch is pressed once, the unit turns ON and the display illuminates.
s ¡8 f a d DISP MULTI SLEEP h g AUTO AUTO SURR TUNED DIRECT k ¡0 ¡2 ¡4 l ¡1 ¡3 j ST V – OFF DISC 6.1 NIGHT MTX 6.1 PEAK SPKR AB ATT ANALOG SURROUND EQ DIGITAL DIGITAL L ¡7 ¡9 j C S SR ¡6 V (video)-OFF mode indicator This indicator is illuminated when the SR8400 is in the display off condition. This indicator is illuminated when the Video-OFF function is active.
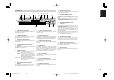
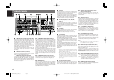
ENGLISH y REAR PANEL q w e r COMPONENT VIDEO ANTENNA INPUT-1 Y FM (75Ω) GND CB/ PB INPUT-2 CR/ PR CB/ Y PR Y CB/ PB CR/ DVD VCR1 IN DSS/VCR2 OUT IN OUT VCR1 MONITOR MULTI OUT TV DVD RC-5 MULTI RC OUT IN OUT DSS/VCR2 IN OUT L SL S-VIDEO MONITOR OUT 3 4 5 6 OPT. FLASHER IN SBL R L C IN DIGITAL OUT DIGITAL IN 2 u PR RS-232C 1 o MODEL NO.SR8400 MONITOR OUT CR/ PB i AM VIDEO TV ty u AC IN SURROUND BACK / MULTI SPEAKER COAX.
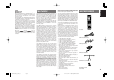
AUDIO IN/OUT (CD, TAPE, CD-R, TV, DVD, VCR1, DSS/VCR2) These are the analog audio inputs and outputs. There are 7 audio inputs (4 of which are linked to video inputs) and 4 audio outputs (2 of which are linked to video outputs). The audio jacks are nominally labeled for cassette tape decks, compact disc players, DVD players and etc.... The audio inputs and outputs require RCA-type connectors. !9 REMOTE CONTROLLER RC1400 NAMES AND FUNCTIONS z DIGITAL INPUT (Dig.
ENGLISH , MUTE button This button is used to mute the audio for the SR8400 and television. Note: • Set the AMP mode to use this button with the SR8400. (8) OSD button When this button is pressed, the current setting are displayed on the TV monitor. (9) SLEEP (sleep timer) button This button is used for setting the sleep timer. It can be operated the same way as the button in unit. .
This is displayed when the remote control is in renaming mode. J LEARN indicator This is displayed when the remote control is in learning mode. 3. REMOTE CONTROL RANGE Close the cover until it clicks. The distance between the transmitter of the remote control and the IR SENSOR of the SR8400 should be less than 5 meters. If the remote control is pointed in a direction other than the IR SENSOR or if there is an obstacle between them, use of the remote control may not be possible.
ENGLISH Whenever the batteries are replaced, the clock shows 00:00. Please reset the clock. (The time setting is not backed up.) SETTING THE TIME Example: Setting to 6:20PM (18:20) 1 2 CHECKING THE TIME POWER OFF ON/OFF POWER OFF ON/OFF To check the time, hold down the > button for three seconds or more. The current time is displayed for five seconds. ON 3. SOURCE AMP MODE M D1 ON SOURCE M D1 D1 D2 D2 D3 D4 D5 CH D3 3. 2.
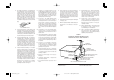
SPEAKER PLACEMENT The ideal surround speaker system for this unit is 7-speaker systems, using front left and right speakers, a center speaker, surround left and right speakers, a surround back left and right speakers, and a subwoofer. For best results we recommend that all front speakers be of the same type, with identical or similar driver units. This will deliver smooth pans across the front sound stage as the action moves from side to side.
Banana plug connections are also possible. Tighten the knob by turning clockwise and then insert the banana plug. CONNECTING AUDIO COMPONENTS OUT IN L L R R L R Caution: • Be sure to use speakers with the specified impedance as shown on the rear panel of this unit. • To prevent damage to circuitry, do not let the bare speaker wires touch each other and do not let them touch any metal part of this unit. • Do not touch the speaker terminals when the power is on.
There are 3 types of video jacks on the rear panel.
ENGLISH ADVANCED CONNECTING CONNECTING THE REMOTE CONTROL JACKS COMPONENT VIDEO ANTENNA INPUT-1 Y FM (75Ω) GND CB/ PB INPUT-2 CR/ PR Y CB/ TV DVD RC-5 MULTI RC PB VCR1 DVD IN R L DVD AUDIO PLAYER or SACD MULTI CHANNEL PLAYER GND DSS/VCR2 OUT IN OUT COMPONENT VIDEO INPUT-1 CB/ PB INPUT-2 CR/ PR CB/ Y PB CB/ Y PR PB CR/ 3 4 MONITOR MULTI OUT TV OUT DVD IN MULTI RC 5 6 OPT.
AM LOOP ANTENNA FM EXTERNAL ANTENNA FM FEEDER ANTENNA COMPONENT VIDEO ANTENNA INPUT-1 Y FM (75Ω) GND C B/ PB INPUT-2 C R/ Y CB / PB TV DVD IN RC-5 MULTI RC PR C B/ PB Y C R/ PR AM VIDEO TV MODEL NO.SR8400 MONITOR OUT CR / PR VCR1 DVD IN DSS/VCR2 OUT IN OUT VCR1 MONITOR MULTI OUT OUT OUT DSS/VCR2 IN OUT L SL S-VIDEO MONITOR OUT RS-232C 2 3 4 5 6 OPT.
ENGLISH CONNECTING FOR THE MULTI ROOM (Multi room speaker ) LEFT RIGHT SPEAKER SPEAKER COMPONENT VIDEO ANTENNA INPUT-1 CB/ Y FM (75Ω) GND PB INPUT-2 CR/ PR Y CB/ TV DVD RC-5 MULTI RC PB Y CB/ PB CR/ PR AM VIDEO TV MODEL NO.SR8400 MONITOR OUT CR/ PR DVD VCR1 IN DSS/VCR2 OUT IN OUT VCR1 MONITOR MULTI OUT OUT IN OUT DSS/VCR2 IN OUT L SL S-VIDEO MONITOR OUT RS-232C 2 3 4 5 6 OPT.
1 2 3 4 5 6 7 8 9 After all components are connected, initial setup must be performed. ON SCREEN DISPLAY MENU SYSTEM The SR8400 incorporates an on-screen menu system, which makes various operations possible by using the cursor ( , , , ) and OK buttons on the remote control or MULTI FUNCTION dial, TUNING / button and ENTER button on the front panel.
ENGLISH 1 INPUT SETUP (ASSIGNABLE DIGITAL INPUT AND COMPONENT VIDEO INPUT) Six digital inputs can be assigned to a desired source. Use this menu to select the digital input jack to be assigned to the input source. 1. Select “INPUT SETUP” in SETUP MAIN MENU with or cursor button, and press the OK button. 1 CD T APE CD - R I NPU T S E T UP : D6 - AT : ANA : D1 - AT MA I N 2. 3. 4. 5.
Use this parameter to specify the distance of each speaker’s position from the listening position. The delay time is automatically calculated according to these distances. Begin by determining the ideal or most commonly used seating position in the room. This is important for the timing of the acoustics to create the proper sound space that the SR8400 and today’s sound systems are able to produce. Note : For speakers that you have selected “None” the Speaker Configuration sub-menu will not appear here.
ENGLISH 4 SURROUND 4 S U RROUND S URR . MOD E : AU T O H T - EQ L FE LEVEL C E N T ER S URR L S URR R S URR B A CK L S URR B A CK R S UB W MA I N 1. 2. : : : : : : : : OF F 0 dB 0 dB 0 dB 0 dB 0 dB 0 dB 0 dB EX I T Select “SURROUND” in the SETUP MAIN MENU with the or cursor buttons, and press the OK button. To select a desired content , press the or cursor buttons. SURR.MODE : Select the desired surround mode with the or cursor buttons. HT-EQ : Select to active the HT-EQ with the or cursor buttons.
Note: • This setting can be changed when the Surr Back is set “None” in 2-1 SPEAKER SIZE menu. When this setting is unavailable, “✽✽✽” is displayed VOL (VOLUME SETUP): Select whether the Multi-speaker output level is variable or fixed with a or cursor buttons. Note: • This setting can be changed when the Surr Back is set “None” in 2-1 SPEAKER SIZE menu. When this setting is unavailable, “✽✽✽” is displayed LEVEL (VOLUME LEVEL): Adjust the Multi-speaker output level with or cursor button.
ENGLISH BASIC OPERATION (PLAY BACK) SELECTING AN INPUT SOURCE Before you can listen to any input media, you must first select the input source on the SR8400. Example : DVD ER SR8400 TV CLEAR MEMORY SPEAKERS A/B TV TUNING MULTI DVD VCR1 F/P MULTI SPEAKER DSS/VCR2 AUX1 7.
TEMPORARILY TURNING OFF THE SOUND PREV MUTE The SR8400 is equipped with many surround modes. These are provided to reproduce a variety of surround sound effects, according to the content of the source to be played. The available surround modes may be restricted depending on the input signal and speaker setup. GUIDE EXIT MENU TEST CH.SEL SURR 1 2 3 7.
ENGLISH DTS-ES (Discrete 6.1, Matrix 6.1) DTS-ES adds the surround center channel audio to the DTS 5.1-channel format to improve the acoustic positioning and makes acoustic image movement more natural with the 6.1-channel reproduction. This receiver incorporates a DTS-ES decoder, which can handle DTS-ES Discrete-encoded and DTS-ES Matrix-encoded program sources from DVD, etc.. DTS-ES Discrete 6.
Surround Mode Input Signal Decoding AUTO Dolby Surr. EX Dolby D (5.1ch) Dolby D(2ch) Dolby D (2ch Surr) DTS-ES DTS 96/24 DTS (5.1ch) PCM(Audio) PCM 96kHz HDCD Analog Dolby D Surr. EX Dolby D (5.1ch) Dolby D (2ch) Dolby D (2ch Surr) DTS-ES DTS 96/24 DTS (5.1ch) PCM (Audio) PCM 96kHz HDCD Analog Dolby D Surr. EX Dolby D (5.1ch) DTS-ES DTS(5.1ch) Dolby D Surr. EX Dolby D (5.1ch) Dolby D (2ch) Dolby D (2ch Surr) PCM (Audio) Analog DTS-ES DTS 96/24 DTS (5.
ENGLISH OTHER FUNCTION ATTENUATION TO ANALOG INPUT SIGNAL VIDEO ON/OFF When no video signal is connected to the SR8400 or a DVD, etc., is connected directly to your TV, the unnecessary video circuit can be turned off by selecting the “VIDEO OFF” setting. To select video off, press the AMP button and press the > button until PAGE4 is displayed. Press the V-OFF (D4) button.
In normal operation, the audio or video source selected for listening through the SR8400 is sent to the record outputs. This means that any program you are watching or listening to may be recorded simply by placing machines connected to the outputs for TAPE OUT, CD-R/MD OUT, VCR1 OUT, and DSS/VCR2 OUT in the record mode. To record the input source signal you are currently watching or listening to 1.
ENGLISH BASIC OPERATION (TUNER) MANUAL TUNING 3. M 2. 1. 3. M 2. D1 D1 D2 VOLUME D2 D3 D4 R LISTENING TO THE TUNER 1. (FM) TUNING MODE (AUTO STEREO OR MONO) SOURCE MEMORY TUNING F/P DOWN MODE USE S A/B MULTI MULTI SPEAKER 7.1CH INPUT PAGE 2 D5 AUX2 3. 2. D3 G F/P DOWN MODE D4 UP USE AKER 7.1CH INPUT D5 3. AUX2 MUTE CD-R 1 PAGE TAPE CD S-DIRECT TUNER MUTE AUX1 INPUT Frequency scan step for AM is selectable.
4. PRESET SCAN M D1 D1 2. 5. 2. D2 D3 D4 USE 2 PAGE “xx CLEAR” appears on the display to indicate that the specified preset number has been cleared. M D5 D2 D3 D4 D4 USE 2 PAGE 4 D5 4. 4. Notes: • To clear all stored preset stations, press and hold the CLEAR and the F/P buttons for two seconds. 1. 2. 3. SORTING PRESET STATIONS Note: • When entering a single digit number (2 for example), either input “02” or just input “2” and wait for a few seconds. 7.
ENGLISH 2. MULTI ROOM SYSTEM 3. The Multi Room system is a function which allows you to listen to the same or a different source in a room other than the room in which the SR8400 is located. To use this function, a multi room remote unit and remote control signal receiver available from your Marantz dealer are necessary. The operations possible with the multi room function are explained briefly below.
ENGLISH ENGLISH REMOTE CONTROLLER OPERATION CONTROLLING MARANTZ COMPONENTS 1. Press the desired function button. • The selected function name and USE are displayed in the LCD. 2. Press the desired operation buttons to play the selected component. • For details, refer to the component’s user guide. • It may not be possible to operate some models.
ENGLISH CONTROLLING A MARANTZ CD RECORDER (CDR MODE) SOURCE ON/OFF Turns the CD recorder on and off POWER OFF ON/OFF CONTROLLING A MARANTZ MD DECK (MD MODE) SOURCE M SOURCE ON/OFF Turns the MD deck on and off POWER OFF ON ON/OFF ON Turns the MD deck on POWER OFF Turns the MD deck off D1 - D5 / >(Page) (Refer to page vi) MENU Switches the display information 0-9 Input the numeric MEMO Programs CLEAR Clears the inputting 2 Play Skip forward or previous track 4/¢ 9 Stop ; Pause
USE MODE (Normal operation status) This remote control is preset with a total of 12 types of remote codes, including Marantz TV (television), DVD, VCR (VCR deck), DSS (satellite broadcasting tuner), TUNER, CD, CD-R, MD, TAPE (tape deck), AUX1, AUX2, and AMP (amplifier). Learning is not necessary for Marantz products. You can use these products without setting any codes. 1. 2. 3. Press the SOURCE button. For this example, press DVD. DVD is shown on the LCD, and the remote control is set for DVD.
ENGLISH LEARN MODE Programming the (PLAY) and Other Control Buttons and Numeric Buttons This remote control is capable of learning and storing codes used by other remote controls that you already own. For codes which are not learned, the remote control will transmit either the Marantz preset codes from the initial settings, or remote codes from another manufacturer’s AV equipment which is set by the customer. The receiver sensor for the remote control signals is located at the top of the remote control.
4. 5. 6. 7. 8. 9. 10. 11. 12. 13. Press the D3 (NAME) direct button . Press the DVD source button . The NAME indicator blinks. The “ ” blinks to indicate that the letter can be changed. Press the cursor button twice. The D in DVD blinks to indicate that the letter can be changed. Press the 1 numeric button to select A. Each time the numeric buttons are pressed, the button cycles through the alphanumeric characters shown below.
ENGLISH Erasing All This procedure clears (resets) all programmed codes and names. Once all the data is cleared, the memory is returned to the factory default status. The programmed macros are also erased. 1 3 4 LEARN LEARN USE 1. 2. 3. 4. PAGE 1 USE PAGE USE 1 2 PAGE 1 2 Hold down the M button for three seconds or more. The menu is displayed. Press the D5 (ERASE) direct button . The USE and LEARN indicators blink.
2. 3. 4. 5. 6. 7. 8. 9. Hold down the M button for three seconds or more. The menu is displayed. Press the D4 (MACRO) direct button . The macro menu is displayed. The MACRO indicator displays and LEARN blinks. Press the D1 (M-01) direct button . The NAME is displayed. Press the D3 (NAME) direct button . The “ ” blinks to indicate that rewriting is possible. Press the 5 numeric button to select M. Press the cursor button to next. The “ ” blinks to indicate that rewriting is possible.
ENGLISH 1. SETTING THE MACRO TIMER EXECUTING THE MACRO TIMER Setting the macro timer enables the macro program to automatically turn the power for a device on or off or perform other operations. In the settings, you can select to execute the macro timer everyday or only once. Be sure to set the clock to the correct time before using the timer. The macro timer can only be set for one program a day. This example shows how to use the timer only once at 20:35 to execute a macro programmed to M-01.
11. Once copying is completed, press the M button on both remote controls. 4. 5. 6. Press the or cursor button to set the lighting time. Press the OK cursor button to enter the lighting time. Once the setting is finished, press the M button . ADJUSTING THE DISPLAY CONTRAST The contrast of the LCD can be adjusted. Adjust for maximum visibility according to your viewing environment.
ENGLISH SYMPTOM TROUBLESHOOTING Can not select EX/ES mode. In case of trouble, check the following before calling for service: 1. Are the connections made properly ? 2. Are you operating the unit properly following the user’s guide ? 3. Are the power amplifiers and speaker working properly ? If the unit does not operate properly, check items shown in the following table.
Memory backup • In case a power outage occurs or the power cord is accidentally unplugged, the SR8400 is equipped with a backup function to prevent memory data such as the preset memory from being erased. HOW TO RESET THE UNIT ENGLISH ENGLISH GENERAL MALFUNCTION If the equipment malfunctions, this may be because an electrostatic discharge or AC line interference has corrupted the information in the equipment memory circuits.
AUDIO SECTION Power Output (20 Hz - 20 kHz/THD=0.08%) Front L&R ......................................... 8 ohms 110 W / Ch Center .............................................. 8 ohms 110 W / Ch Surround L&R .................................. 8 ohms 110 W / Ch Surround Back L&R ......................... 8 ohms 110 W / Ch GENERAL Power Requirement .............................. AC 120 V 60 Hz Power Consumption .............................................. 648 W Weight .....................................
SETUP CODES AMPLIFIER Source button name : AMP Brand name Amstrad Arcam Audiolab Carver GE Genexxa Grundig Harman/Kardon JVC Left Coast Linn Magnavox Marantz Micromega Myryad Optimus Panasonic Philips Pioneer Polk Audio Realistic Revox Sony Soundesign Technics Thorens Victor Wards Yamaha Setup code 0105 0296 0296 0296 0105 0422 0296 0919 0358 0919 0296 0296 0919, 0296 0296 0296 0422 0335 0919, 0296 0040 0919, 0296 0422 0296 0247 0105 0335 0296 0358 0105, 0040 0381 RECEIVER/TUNER Source button name : AMP,
SATELLITE TAPE DECK CD/CD-R PLAYER TV Source button name : DSS Source button name : TAPE Source button name : CD, CDR, MD Source button name : TV Brand name Nokia OctalTV Orbitech Pace Panasonic Panda Paysat Philips Brand name Aiwa Carver Grundig Harman/Kardon Magnavox Marantz Myryad Optimus Philips Pioneer Polk Audio RCA Revox Sansui Sony Thorens Wards Brand name Genexxa Goodmans Grundig Harman/ Kardon Hitachi JVC Kenwood Krell LXI Linn MCS Magnavox Marantz Matsui Memorex Meridian Micromega Miro
TV TV TV TV Source button name : TV Source button name : TV Source button name : TV Source button name : TV Brand name Chun Yun Chung Hsin Cimline Cineral Citizen Clarion Clarivox Clatronic Condor Conrac Contec Craig Crosley Crown Curtis Mathes Brand name GE Brand name Kathrein Kendo Kenwood Kneissel Kolin Korpel Koyoda L&S Electronic LG LXI Leyco Liesenk & Tter Loewe Luxor M Electronic Brand name Onwa Optimus Optonica Orion Osaki Otto Versand Palladium Panama Panasonic Pathe Cinema Pausa Penney
TV TV Source button name : TV Source button name : TV Source button name : VCR Source button name : VCR Brand name Sambers Sampo Brand name Teac Brand name Anam Anam National Anitech Asha Asuka Audiovox Baird Basic Line Beaumark Bell & Howell Blaupunkt Brandt Brandt Electronic Broksonic Bush CCE CGE Calix Canon Carver Cimline Cineral Citizen Colt Combitech Craig Crown Curtis Mathes Cybernex Cyrus Daewoo Dansai De Graaf Decca Denon Dual Dumont Dynatech ESC Elcatech Electrohome Electrophonic Emerex Em
VCR VCR VCR DVD Source button name : VCR Source button name : VCR Source button name : VCR Source button name : DVD Brand name Matsui Matsushita Medion Memorex Brand name Realistic Reoc ReplayTV Rex Roadstar Runco SBR SEG SEI STS Saba Salora Sampo Samsung Sanky Sansui Sanyo Saville Schaub Lorenz Schneider Scott Sears Seleco Semp Sharp Shintom Shogun Siemens Silva Singer Sinudyne Sonic Blue Sontec Sony Sunkai Sunstar Suntronic Sylvania Symphonic TMK Tandy Tashiko Diamond Digitrex Emerson Tatung Teac
DIRECT BUTTON FUNCTIONS Source button name : AMP PAGE Command Note PAGE 1 1 AUTO SELECT AUTO SURROUND 22 SELECT DOLBY MODE 3 DTS SELECT DTS MODE 4 EX/ES SELECT EX/ES 5 DIRECT SELECT SOURCE DIRECT PAGE 2 1 MCH-ST SELECT MULTI CHANNEL STEREO 2 STEREO SELECT STEREO MODE 3 VIRTUA SELECT VIRTUAL MODE 4 CS-II SELECT CS-II MODE 5 HT-EQ SELECT HT-EQ PAGE 3 1 NIGHT NIGHT MODE ON/OFF 2 BASS + BASS + 3 BASS BASS 4 TREB + TREBLE + 5TREB TREBLE PAGE 4 1 MULTI MULTI ROOM ON/OFF 2 M-SPKR MULTI SPEAKER ON/OFF 3 A/D SELECT
www.marantz.com You can find your nearest authorized distributor or dealer on our website. JAPAN Marantz Japan, Inc. 35-1 Sagami Ohno 7-Chome, Sagamihara-shi, Kanagawa 228-8505, Japan U.S.A. Marantz America, Inc. 1100 Maplewood Drive, Itasca, IL 60143, U.S.A. EUROPE Marantz Europe B.V. P.O. Box 8744, 5605 LS Eindhoven, The Netherlands Manufactured under license from Dolby Laboratories. “Dolby”, “Pro Logic” and the double-D symbol are trademarks of Dolby Laboratories. Confidential Unpublished Works.