Model TT-15S1 User Guide Turntable
CAUTION RISK OF ELECTRIC SHOCK DO NOT OPEN CAUTION: TO REDUCE THE RISK OF ELECTRIC SHOCK, DO NOT REMOVE COVER (OR BACK) NO USER-SERVICEABLE PARTS INSIDE REFER SERVICING TO QUALIFIED SERVICE PERSONNEL The lightning flash with arrowhead symbol within an equilateral triangle is intended to alert the user to the presence of uninsulated “dangerous voltage” within the product’s enclosure that may be of sufficient magnitude to constitute a risk of electric shock to persons.
IMPORTANT SAFETY INSTRUCTIONS READ BEFORE OPERATING EQUIPMENT This product was designed and manufactured to meet strict quality and safety standards. There are, however, some installation and operation precautions which you should be particularly aware of. 1. Read Instructions – All the safety and operating instructions should be read before the product is operated. 2. Retain Instructions – The safety and operating instructions should be retained for future reference. 12.
20. Servicing – Do not attempt to service this product yourself as opening or removing covers may expose you to dangerous voltage or other hazards. Refer all servicing to qualified service personnel. 21. Damage Requiring Service – Unplug this product from the wall outlet and refer servicing to qualified service personnel under the following conditions: 22.
CONTENTS CONTENTS ............................................................................................................................................1 BEFORE USE .........................................................................................................................................2 ACCESSORIES ......................................................................................................................................3 ASSEMBLING AND ADJUSTING..............................
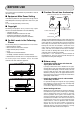
BEFORE USE This section must be read before any connection is made to the mains supply. 7 Equipment Main Power Setting 7 Caution: Do not lose the bearing. (View from underneath the turntable chassis) Your Marantz product has been prepared to comply with the household power and safety requirements that exist in your area. TT-15S1 can be powered by 120V AC only. 7 Copyright Recording and playback of any material may require consent.
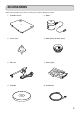
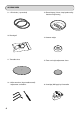
ACCESSORIES Before using the turntable, please make sure that you have all of the following accessories. 1. Turntable chassis 5. Motor 2. Center shaft 6. Motor pulley (for 60Hz areas) 3. Tone arm 7. Gloves (pair) 4. Turntable 8.
ACCESSORIES 9. 2 Drive belts (1 spare belt) 13. Record clamp (“Clever clamp” produced by Southern Engineering) 10. Bearing oil 14. Counter weight 11. Turntable sheet 15. Tone arm height adjustment sheet 12. 3 Allen wrenches (large/medium/small) 1 adjustment screwdriver 4 16.
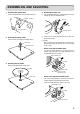
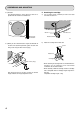
ASSEMBLING AND ADJUSTING 1. Installing the ground wire 4. Attaching the tone arm Connect the ground wire to the turntable shaft base. a) Pass the Phono cable that is connected to the tone arm through the tone arm attachment hole. Turntable shaft base Tone arm phono cable Ground wire Turntable chassis b) 2. Inserting the center shaft Insert the center shaft into the turntable chassis. Determine the height and direction of the tone arm attachment position.
ASSEMBLING AND ADJUSTING 5. Attaching the cartridge b-2) Direction The direction position is correct when the tone arm is parallel with the side of the turntable base. a) Use the Allen wrench (medium) to remove the head shell from the tone arm. Allen wrench (medium) Tone arm Tone arm Head shell Based side of turntable Parallel b) Attach the cartridge to the head shell.
ASSEMBLING AND ADJUSTING c) Attach the cartridge that you attached in the previous step to the tone arm. 6. Adjusting arm balance a) Remove the anti-skating adjustment screw. Screw Tone arm Head shell Cartridge Anti-skating adjustment screw • When using the included cartridge Attach to the front attachment hole position on the tone arm. b) Attach the counter weight to the back of the arm.
ASSEMBLING AND ADJUSTING Tone arm Rotating the counter weight by 1 scale graduation adds 0.1g of pressure. Therefore, as the counter weight has 5 graduations, one complete turn will add 0.5g of pressure. Counter weight 0 0. 4 0 .1 As the recommended stylus pressure for the included cartridge is 2.2g, rotate the counter weight 4 complete turns and 2 scale graduations from the reference point at balance adjustment to reach the correct stylus pressure position. Lifter lever e) 3 0.
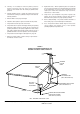
ASSEMBLING AND ADJUSTING 9. Attaching the motor pulley 11. Installing the belt Attach the motor pulley to the motor. Use one of the belts included and attach it between the motor pulley and turntable. Using the adjustment screwdriver included to fix the pulley’s 3 plastic screws. When attaching the belt, hook it over the central slot. Be careful not to turn the screws with too much force, as they are made from plastic and can break easily. (There are 2 belts included with the turntable.
NAMES AND FUNCTIONS q !0 w !1 o e i r u t y q Power switch (OFF, ON) When it is switched ON, the turntable rotates. w Pulley This is changed to suit the rpm speed of the record to be played. 33 1/3 rpm record ....................................[Lower side] 45 rpm record ..........................................[Upper side] e Belt r Turntable t Turntable sheet y Cartridge u Tone arm i Lifter lever This is used to raise and lower the tone arm.
CONNECTIONS AND OPERATION Amplifier Power switch White Red TT-15S1 7 Connections 6. Lift the lifter lever, then use the head shell finger hook to Make sure that the power supply to both this turntable and the amplifier are OFF before you start connecting. 7. Lower the lifter lever. move the tonearm to the play position of the record. The tonearm slowly lowers the stylus onto the record, and the record starts to play. 1.
TROUBLE SHOOTING If you think a malfunction has occurred, first check the points listed below. 7 Check Items 7 Are each of the connections correct? The stylus won’t lower onto the record. 7 Are you operating the turntable correctly as described in this instruction manual? • Is the tone arm height adjusted correctly? If the turntable does not operate correctly, check all of the items in the following table.
SPECIFICATIONS AND EXTERNAL DIMENSIONS DIAGRAM 440 350 110 350 7 Turntable section RPM ................................................33 1/3 rpm, 45 rpm 7 Included Cartridge (Clearaudio) Frequency response...................................20Hz - 20 kHz Turntable ............................................High density acrylic 3.6 mV ˜ Channel separation ............................................ > 30 dB Turntable depth ......................................................
OTHERS The section describes the care and maintenance tasks that must be performed to optimize the operation of your Marantz equipment. 7 Cleaning external surfaces of equipment The exterior finish of your unit will last indefinitely with proper care and cleaning, Never use scouring pads, steel wool, scourging powders or harsh chemical agents (e.g., lye solution), alcohol, thinner, benzine, insecticide or other volatile substances as these wil mar the finish of the equipment.
www.marantz.com You can find your nearest Marantz Authorized Dealer on our website. U.S.A. Marantz America, Inc. 1100 Maplewood Drive, Itasca, IL 60143, U.S.A. is a registered trademark.