
User`s guide
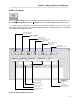

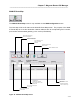

Table Of Contents
- Introduction
- Magnum Router Features
- Pre-Installation
- Installing the Hardware
- Magnum Router Manager Installation
- Logging Onto a Magnum Router
- Magnum Router GUI Manager
- Magnum Router Manager Main Screen
- Toolbar Buttons
- New Config Button
- Port Config Button
- WAN Config Button
- Other WAN Config Buttons
- Master WAN-IP Address
- WAN-IP Route Map
- Advanced Routing
- RIP Version 1 Routing
- Ethernet Config Button
- Micro-Band Voice Over IP
- Save Configuration
- Send Configuration
- Reboot the Magnum Router
- Menu Bar
- Configuration Menu (ALT-C)
- Settings Menu (ALT-S)
- System Menu (ALT-Y)
- Statistics Menu (ALT-T)
- Help Menu Item (ALT-H)
- Exit Menu Item (ALT-X)
- Toolbar Buttons
- Magnum Router Manager Main Screen
- Magnum Router Specialized Functions
- Sample Configurations
- Magnum Router Troubleshooting
- Magnum Router Cable Specifications
- Marathon Port Configuration
- Configuration Worksheets

Chapter 7: Magnum Router GUI Manager
___________________________________________________________________
7-12
WAN-IP Route Map
The WAN IP Route Map screen is only available via the WAN Configuration screen.
The next step will be to fill data into the WAN-IP Route Map screen. The purpose of the WAN-
IP Route Map is to set the destination network address with its corresponding DLCI number,
port number and associated gateway (a.k.a. next hop IP address).
Add a NEW WAN entry
into the configuration
Delete a WAN entry
from the configuration
Save changes to the
Magnum Router
Manager
Exit this screen to the
Main Screen
Enter additional routes
Port number assigned
for this route
DLCI Number assigned
to this route
Destination IP
NETWORK address
and subnet mask of the
remote site
Address of the "Next
Hop" router
Add documentation
notes for each entry
Figure 19 - WAN-IP Route Map Screen