
Instructions / Assembly


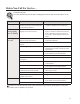

20
1. Turn off power to the unit.
DANGER: Make certain power
to the water heater is “OFF”
before removing any jacket access
panel for any reason. Failure to
do so could result in property
damage, bodily injury, or death.
2. Open a hot water faucet and allow
water to flow until the water is cold.
3. Empty the water out of the unit by
following the instructions given in
the “Draining the Water Heater”
section (see page 16) of this manual.
4. Remove the snap-in access panel
cover. Insert finger into latch hole on
the bottom of the cover and push up
to release the latch. Pull forward and
remove the cover and insulation.
5. Remove the (4) screws that secure
the jacket access panel to the unit.
Remove the jacket access panel and
insulation exposing the thermostat
and element. Use care when
removing the insulation pads.
6. Flip up the bottom of the plastic
protector up to expose the head of the
heating element.
7. Loosen the terminal screws on the
element to disconnect the two wires
and slightly bend them away from
the element.
8. Using a wrench or socket to fit the
1 7/8 inch hex nut, remove the old
element. For 15 and 20 gallon units
use a 1/2 inch socket and remove
the (4) bolts and lock washers on the
element.
NOTICE: An element wrench is
available for purchase through your
water heater distributor.
NOTICE: Make sure the threads on
the unit are clean. Brush debris off of
threads with a toothbrush if needed.
NOTICE: The elements are unique
to the upper and lower port. Make
certain the replacement element is
correct for the port into which you
are installing it.
9. On the new element make certain the
element gasket is in place and not
twisted.
10. Thread the new element into the
tank and tighten with a wrench or
socket to 13 – 15 ft-lbs. For 15 and
20 gallon units install the element
with the arrow on the head pointing
“UP” using the same bolts and lock
washers that were removed in step 8.
NOTICE: DO NOT over tighten the
element. DO NOT apply torque over
18 ft-lbs.
11. Reconnect the two wires to the
element and tighten the terminal
screws.
12. Reference the “To Fill the Water
Heater” section of this manual for
instructions on refilling the unit.
13. After the unit is completely filled
with water and under pressure, verify
the element is properly installed with
no water leakage.
14. Lower the protector to cover the
head of the heating element.
15. Replace the rectangular insulation
and thermostat access panel. Secure
the panel to the unit using the (4)
screws provided. Tighten the screws
until only snug.
16. Replace the access panel cover and
insulation and snap in position.
17. Turn on power to the water heater.
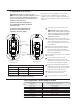
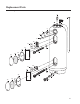
Element Replacement Instructions
!
75 - 85 - 105 GALLON