
Fan User Manual


INSTALLATION IN EXISTING HOMES
(MODELS: 7100, 7130, 7150, 8090, 8100, 7100L, 7150L,
7100H, 7100FLH, 7150H, 7150FLH, 7100FL, 7150FL, 8090L & 8100L)
1. Carefully read all previous installation instructions and follow those applicable to your installation, including ducting
and wiring. (Figs. 6 & 7.)
2. Drill a small hole in the ceiling from below in proposed location, then locate this hole in the attic (or crawl space).
3. In attic, mark ceiling for cutout by using housing as a template. Using this line, make a cutout about 1/4” larger.
4. Place housing with mounting brackets installed into hole and rest mounting brackets on sheetrock. Extend and
nail all four ends of mounting brackets.
5. Perform steps 1 through 10 as for new construction.
REQUIREMENTS AND ADJUSTMENTS FOR HUMIDITY SENSING UNITS ONLY
The unit should be mounted on a flat ceiling surface that does not exceed twelve feet in height and is away from
a direct heat source such as a room or sauna heater.
Note: Open windows may affect the humidity level in the room and cause the unit not to operate properly.
Once the location is selected, refer to the previous figures for instruction on determining the proper hole size for
mounting the unit.
The unit is operated by a wall switch. Each time the switch is turned on, the unit will operate until the preset
time on the timer is expired. After time has expired, the unit will be in the automatic mode. At this point the opera-
tion of the unit is dependent upon the humidity level of the room. When the humidity level of the room is above the
set-point selected on the humidity sensor, the unit will run. It will operate until the humidity level of the room drops
below its set-point. For the unit to come on when it is on automatic mode, the set-point of the sensor must be below
the existing humidity level in the room. It takes some amount of time for the unit to stop when the moisture is
removed or decreased and it also takes some amount of time for the unit to come on when the moisture is
increased. This prevents short cycling of the motor or its coming on and off too fast.
The automatic mode can be bypassed by simply switching the unit off and back on again through its wall switch.
This will allow immediate operation of the unit for the pre-set amount of time on the timer. the timer is preset for
about 15 minutes from factory with an adjustment range of 18 seconds minimum to a maximum of thirty minutes.
To adjust the humidity and time settings follow the steps below:
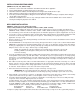
–Disconnect power and remove the grille
–Refer to Figure 11 for location and orientation of components
–Timer knob can be adjusted with your fingers. Turn clockwise to increase pre-set time delay. Full clockwise position
will set it to thirty minutes. Full counter clockwise position will set it to 18 seconds minimum.
–The humidity sensor can also be adjusted with your fingers. Turn shaft to full clockwise position to start at minimum
(contacts close) and turn counterclockwise to increase set-point level. If you are turning the shaft counterclockwise
and you hear a click from the sensor switch, this means you are going higher than the existing relative humidity in
the room and the contact has opened.
–Replace the grille and turn the unit on to check its operation.
FIG. 10
FIG. 11
1”
11”
15
HUMIDITY
SENSOR
SHAFT
TIMER KNOB