READ AND SAVE THESE INSTRUCTIONS.
IMPORTANT SAFETY INSTRUCTIONS WARNING: TO REDUCE THE RISK OF FIRE, ELECTRICAL SHOCK OR INJURY TO PERSONS, OBSERVE THE FOLLOWING: 1. Do not use this fan with any Solid-State Speed Control Device. 2. Use this unit only in the manner intended by the manufacturer. If you have questions, contact the manufacturer. 3. Before servicing or cleaning unit, switch power off at service panel and lock service panel to prevent power from being switched on accidentally. 4.
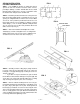
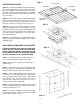
CEILING INSTALLATION FIG. 1 LOCATING & MOUNTING FAN STEP 1 — The A24DD fan mounts on ceiling joists that are spaced 16” O.C. Fan should be located in center of house, preferably in hallway or corridor. This will allow air to be drawn through all parts of living space. (See Fig. 1.) Determine tentative location of fan and proceed as shown below. STEP 2 — Determine joist direction and locate center joist in tentative fan opening.
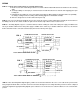
WIRING STEP 6 — PRECAUTIONS: READ CAREFULLY BEFORE WIRING FAN! A. Electrical connections and all wiring should be in accordance with the National Electrical Code and all local codes that may apply. B. To avoid possibility of serious injury or electrical shock, the installer must disconnect electrical circuit supplying power prior to wiring fan. C. CAUTION: Incorrect wiring can cause motor failure and possibly fire.
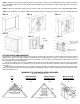
FIG. 8 SHUTTER INSTALLATION SPRING ATTACHED CONNECTOR STEP 10 — Unpack Model A3024 shutter and read instructions included. Note that the first part of the shutter instructions refer to cutting the shutter hole, which you have already done, and so they may be disregarded. Follow the remaining instructions to adjust springs so that shutters open and close freely. (See Fig. 8.) STEP 11 — Mount shutter to joists directly below fan opening with wood screws provided.
STEP 7 — Nail frame assembly securely in place with 2 x 2 furring strips. See Fig. 17. Put moulding around outside of shutter as shown in Fig. 17. Moulding should be at least 4” wide. Caulk around moulding to provide a water-tight seal. Check shutter again to be sure it opens and closes freely. STEP 8 — Wire fan to 120V power supply and 3-speed control. Follow steps 6 through 9 under wiring section of “CEILING INSTALLATION.” STEP 9 — Fan installation is now complete.
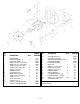
REF NO. DESCRIPTION QTY. MODEL USED ON 1 1 1 1 1 4 4 4 4 2 1 2 2 1 2 1 1 ALL A24DD B30DD A24DD B30DD ALL ALL ALL ALL ALL ALL ALL ALL ALL ALL A24DD B30DD REF NO.
OPERATING HINTS AND SUGGESTIONS 1. Never operate a wholehouse ventilator with all outside doors and windows closed. Air will be drawn down the chimney, bringing soot into the house. This could also impair flue gas ventilation of furnaces, water heaters, etc. located in the house, possibly drawing fumes into the house. Be sure to open enough doors and windows to provide adequate ventilating air intake. 2. For best results, open windows in OCCUPIED rooms only.