VIDEO VIDEO DOORPHONE 210 DOORPHON ™ USER MANUAL 3 GEBRAUCHSANLEITUNG 21 GUIDE UTILISATEUR 41 MODO DE EMPLEO 61 MANUALE D’ISTRUZIONI 81 GEBRUIKSAANWIJZING 101 20650/20151030 • VIDEO DOORPHONE 210™ ALL RIGHTS RESERVED MARMITEK ©
© MARMITEK
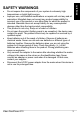
x x x x x x x Do not expose the components of your system to extremely high temperatures or bright light sources. Improper use, self-installed modifications or repairs will void any and all warranties. Marmitek does not accept any product responsibility for incorrect use of the product or use other than for which the product is intended. Marmitek does not accept liability for any consequential damage other than the legal product responsibility. This product is not a toy. Keep out of reach of children.
TABLE OF CONTENTS SAFETY WARNINGS ..................................................................................... 3 TABLE OF CONTENTS .................................................................................. 4 INTRODUCTION ............................................................................................ 5 FEATURES..................................................................................................... 5 SET CONTENTS ......................................................
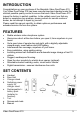
ENGLISH INTRODUCTION Congratulations on your purchase of the Marmitek Video DoorPhone 210. Your Video DoorPhone 210 has been manufactured and checked under the strictest possible quality control to ensure that each Video DoorPhone 210 leaves the factory in perfect condition. In the unlikely event you find any defect or experience any problem, please contact our service centre or dealer, do not attempt to repair by yourself.
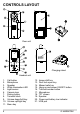
CONTROLS LAYOUT Door unit Charging stand Handset unit 1. 2. 3. 4. 5. 6. 7. 8. 9. 10. 11. 6 Call button Microphone Speaker White illumination LED Light sensor Camera lens Pairing button Terminal block Volume down/Left key Volume up/Right key Menu key 12. 13. 14. 15. 16. 17. 18. 19. 20. 21.
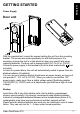
ENGLISH GETTING STARTED Power Supply Door unit With the supplied tool, loosen the screws holding the unit from the mounting bracket. The screws are made specifically for anti-theft purposes. It is necessary to keep the tool in a safe place for when you need it later when replacing batteries. The door unit is powered with 8 to 12V AC or 12V DC. Connect a power supply to the terminals (8) at the back marked with (not included).
Handset The supplied Li polymer battery pack is already installed in the handset. (To replace the battery, press down and slide open the battery door in the direction as shown, take out the battery pack and disconnect it from the socket. With the handset remaining switched off, place it onto the charger stand. Plug in the supplied AC switching power supply into an AC outlet and connect its output plug to the USB port (21) located at the back of the charger stand.
Use the left/right key (9)(10) to select either “FRONT” (represent front gate), “BACK” (represent back gate) or “CLEAR”, then touch the menu key (11) to confirm. The power indicator (20) should now flash rapidly, showing the handset has entered pairing mode. In case “CLEAR” is selected, all the originally paired door units will be cleared and you will then need to perform pairing again. Now install alkaline batteries or connect 12V DC to the door unit. (If the door unit was already on, do a powercycle.
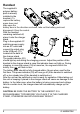
Mounting of door Unit Insert the plugs into the holes (for concrete wall only) Select a location near your door entrance where the surface is not too rough. We recommend that you do some polishing to Drilled holes get a plane surface or otherwise the unit may not be able to mount properly. It should be noted that the mounting bracket is not installed on metal screening surfaces nor in the vicinity of other electronic devices that may reduce the operating range.
These two terminals act like a switch and will be short circuited as long as the doorbell button (1) is pressed, however, there is no voltage supply from these terminals. They can be used to trigger a conventional door chime or a courtesy light at the entrance. Now insert the 3 pcs AAA (UM-4) alkaline batteries into the battery compartment as this can serve as a battery back-up in case the 12V DC supply fails.
During standby mode, a short press of the Talk/answer button / (16) will initiate communication with the door unit and wake up the screen (18) showing the view as captured by the lens (6) (In case a backgate caller unit has been installed, the screen (18) will prompt you to select “FRONT” or “BACK”. Use the left/right key (9) (10) to select and menu key (11) to confirm.).
ALARM MODE This will set the method of alert when a visitor calls, either with a ding-dong sound or vibration or both. Use the left/right key (9) (10) to select between (ding-dong sound and vibration) or (ding-dong sound only) or (vibration only). Short touch the menu key (11) to confirm. The corresponding icon will be shown on the top of the screen (18).
EXIT Select this parameter to exit from the menu, short touch the menu key (11) to confirm. Alternatively, in case no key is being touched within a period of 10 sec, the menu will exit from the screen (18) automatically. To return to standby mode and switch off the screen (18), short press the power/hang up button (15). Alternatively, if no key is being touched for over 1 min, the handset will return to standby mode automatically.
lock open key (13) to remotely open the electric door latch for the visitor (this function is only available if there is 12V DC supply to the caller unit and your door is equipped with an electric latch). Long touch the door lock open key (13) for over 3 sec and the text “DOOR OPENED” appears on the screen (18’, showing the door latch is opened. The text will disappear after 3 sec.) Under standby mode (i.e.
Whenever the handset is located at a spot which is outside the communication range of the caller unit (either front or back gate or both), an alarm will be heard and the screen (18) will show the following: Such alarm cannot be immediate and will alert you only when you are out of range for over 2 minutes (when 12V DC supply is available or 20 minutes if a battery is used). Once the handset falls back in range, the alarm will stop automatically.
Short press the Talk/answer button / ENGLISH MISSED CALL(S) Under the circumstances of an unanswered call from a visitor (e.g. you are away from home), the missed call indicator will start flashing in standby mode. At the same time, the text “X MISSED CALL(S)“ will be shown at the bottom part of the screen (18) whenever it is woken up (X represents the total number of missed calls, the maximum number of missed calls that can be stored is 10, with the most updated entry overriding the oldest entry).
FREQUENTLY ASKED QUESTIONS The handset and door unit cannot communicate x The handset and door unit have a different ID code, perform the pairing process x The battery has run down. Replace the batteries in the door unit or recharge the battery in the handset using the charger stand. The communication distance becomes short x There are many steel structures between the handset and the door unit. Relocate the position of the handset. x Battery has run down.
ENGLISH TECHNICAL DATA Handset Power Charger Power consumption Active Doorbell Dimensions Door unit Range Backup Power Power adapter Frequency Power consumption Material Connection Ambient temperature IP value Camera Dimensions Rechargeable Li battery pack 800mAh 3.7V 5V 600mA Stand-by 78mA Transmission mode 190mA Reception mode 410mA max Selectable audio, visual or vibration alert 50x142x22mm Up to 300m in free field, up to 30m through walls and ceilings.
Environmental Information for Customers in the European Union European Directive 2002/96/EC requires that the equipment bearing this symbol on the product and/or its packaging must not be disposed of with unsorted municipal waste. The symbol indicates that this product should be disposed of separately from regular household waste streams.
x x x x x x Setzen Sie die Komponenten Ihres Systems nicht extrem hohen Temperaturen oder starken Lichtquellen aus. Bei einer zweckwidrigen Verwendung, selbst angebrachten Veränderungen oder selbst ausgeführten Reparaturen verfallen alle Garantiebestimmungen. Marmitek übernimmt bei einer falschen Verwendung des Produkts oder bei einer anderen Verwendung des Produktes als für den vorgesehenen Zweck keinerlei Produkthaftung.
INHALTSVERZEICHNIS SICHERHEITSHINWEISE ............................................................................ 21 INHALTSVERZEICHNIS............................................................................... 22 EINFÜHRUNG .............................................................................................. 23 FUNKTIONEN .............................................................................................. 23 INHALT DES SETS ..........................................................
Herzlichen Glückwunsch zum Erwerb dieser digitalen, drahtlosen Türsprechanlage. Ihr Video DoorPhone 210 wurde unter den strengsten Qualitätsanforderungen hergestellt und kontrolliert, sodass ein jedes System in makellosem Zustand das Werk verlässt. Für den unwahrscheinlichen Fall, dass Sie dennoch einen Defekt oder ein Problem entdecken bitten wir Sie, sich mit Ihrem Händler in Verbindung zu setzen. Versuchen Sie niemals das Problem selbst zu beheben.
INHALT DES SETS a. b. c. d. e. f. g. h.
DEUTSCH BEDIENUNGSÜBERSICHT Deurunit Oplaadhouder Handgerät-Einheit 1. 2. 3. 4. 5. 6. 7. 8. 9. Klingeltaste Mikrofon Lautsprecher Weiße LED-Beleuchtung Lichtsensor Objektiv Paarungstaste Anschlussfläche Volumen leiser/Taste links 10. Volumen lauter/Taste rechts 11. Menütaste Video DoorPhone 210 12. 13. 14. 15. 16. 17. 18. 19. 20.
LOS GEHT’S SPEISUNG AUSSENSTATION Lösen Sie die Schrauben, womit die Einheit an die Montageplatte befestigt ist mit dem enthaltenen Schraubenzieher. Mit den speziellen AntiDiebstahlschrauben ist eine hohe Produktabsicherung gegeben. Bewahren Sie den Schraubenzieher für den Fall Sie ihn später noch zum Wechseln der Batterien benötigen, an einem sicheren Ort auf. Die Außeneinheit wird mit 12V Gleichstrom oder 8 bis 12 V Wechselstrom gespeist, der oftmals am Eingang (Klingeltrafo) vorhanden ist.
HANDGERÄT Der enthaltene LiPolymer Akku ist im Handgerät installiert. (Zum Wechseln der Batterien drücken Sie die Verschlusstaste nach unten und schieben das Batteriefach auf. Entfernen Sie nunmehr den Akku und lösen Sie den Anschluss.) Stellen Sie das noch ausgeschaltete Handgerät in die Ladeschale Schließen Sie das schaltende Wechselstromnetzteil an eine Steckdose und den Anschlussstecker an den USB Anschluss (21) an der Rückseite der Ladeschale an.
ACHTUNG: PRÜFEN SIE NACH, OB DER AKKU IM HANDGERÄT WIRKLICH EIN AUFLADBARER IST, BEVOR SIE DAS HANDGERÄT IN DIE LADESCHALE STELLEN, DA ES SONST ZU EINER EXPLOSION FÜHREN KÖNNTE. HANDGERÄT UND AUSSENSTATION PAAREN Während dieses Prozesses wird die Außenstation mit dem Handgerät verbunden (gepaart), sodass beide miteinander kommunizieren können und keine anderen Geräte (auch keine identische Türsprechanlage) bei Ihnen oder beim Empfang des Signals eine Störung verursachen können.
MONTAGE DER AUSSENSTATION Wählen Sie einen Ort nahe der Tür mit nicht zu rauer Oberfläche. Zur korrekten Befestigung der Außenstation auf einem Bohrlöcher glatten Untergrund empfehlen wir, die Oberfläche zunächst gut zu säubern. Berücksichtigen Sie, dass der Halter nicht auf Metallrosten oder nahe anderer elektronischer Geräte angebracht werden darf, um die Funkreichweite nicht zu verringern. Verwenden Sie die enthaltenen, selbstschneidenden Schrauben zur Montage des Halters gegen die Wand.
Immer geschlossen Diese zwei Anschlüsse liefern normalerweise 12V. Während des Gesprächs wird diese Spannung während der durch die TRIGGER TIME(13) Funktion spezifizierten Zeit zeitweise, sobald die Türöffnertaste betätigt wird, auf 0V abfallen Immer offen Diese zwei Anschlüsse liefern normalerweise 0V. Während des Gesprächs wird diese Spannung, während der durch die TRIGGER TIMEFunktion spezifizierten Zeit, sobald die Türöffnertaste (13) betätigt wird, zeitweise 12V betragen.
BEDIENUNG EIN/AUS Schalten Sie das Handgerät ein, indem Sie die Ein/Austaste (15) anhaltend (gute 3 Sekunden lang) betätigen. (Drücken Sie nochmals anhaltend dieselbe Taste, wenn Sie die Einheit ausschalten möchten). Die Stromanzeige (20) wird nun blau aufleuchten. Ist die Li-ion Batterie leer, so wird die Stromanzeige blau blinken. Im Bildschirm (18) wird gleichzeitig Leer sichtbar werden und blinken. Stellen Sie das Batteriepiktogramm die Einheit in die Ladeschale, um die Batterie zu laden.
BESUCHER EINSTELLUNG GATE (TÜR) Wählt die Türeinheit, dessen Einstellungen Sie ändern möchten. Verwenden Sie zur Wahl zwischen FRONT (Haustür) und BACK (Hintertür) die links/rechts Taste (9) (10). Drücken Sie zur Bestätigung der Einstellung kurz die Menütaste (11). LAUTSTÄRKE Stellt das Lautsprechervolumen der Türeinheit ein. Verwenden Sie die links/rechts Tasten (9) (10) um zwischen den 5 Niveaus zu wählen, wobei 1 die geringste und 5 die höchste Lautstärke ist. Drücken Sie zur Bestätigung (11).
ALARMMODUS Hiermit wird die Warnmethode für einen klingelnden Besucher eingestellt: Klingelton, vibrieren oder beides. Verwenden Sie die links/rechts Tasten (9) (10) um zwischen (Klingelton und vibrieren) oder (nur Klingelton) oder (nur vibrieren) zu wählen. Drücken Sie zur Bestätigung der (11). Einstellung kurz die Menütaste Das dazugehörige Piktogramm wird oben im Bildschirm (18) wiedergegeben.
EXIT (Ende) Wählen Sie diesen Parameter zum Verlassen des Menüs und betätigen Sie (11) zur Bestätigung. Das Menü erlischt auch kurz die Menütaste automatisch nach 10 Sekunden im Bildschirm (18), wenn keine Taste betätigt wurde. Um in den Stand-by Modus zurückzukehren und den Bildschirm (18) auszuschalten, drücken Sie kurz die Auflegen/Ein-Aus Taste (15). Das Handgerät kehrt auch automatisch in den Stand-by Modus zurück, wenn über 1 Minute lang keine Taste betätigt wurde.
Nach der Entgegennahme eines Gespräch zeigt der Bildschirm (19) das Bild des Besuchers. Eine AudioKommunikation mit dem Besucher ist jedoch erst dann möglich, wenn der Anruf durch eine kurze Betätigung / (16 beantwortet wird. / (16) betätigt wurde, Nachdem die Sprechtaste kann ein Gespräch stattfinden und ist die Stimme des Besuchers über den Lautsprecher (19) zu hören.
wiedergegeben, um anzuzeigen, dass das Türschloss geöffnet wird. Der Text erlischt nach 3 Sekunden.
DEUTSCH VERPASSTE(R) AUFRUF(E) Nach einem unbeantworteten Aufruf eines Besuchers (z.B. weil Sie nicht zu Hause waren) wird die Anzeige Verpasster Aufruf im Stand-by Modus blinken. Zugleich erscheint "X VERPASSTE(R) AUFRUF(E))" unten im Bildschirm (18) nachdem sich dieser einschaltet (X zeigt die Anzahl der verpassten Aufrufe an). Die Höchstanzahl der gespeicherten Aufrufe ist 10, wobei der aktuellste Aufruf die älteste Registrierung überschreibt).
HÄUFIG GESTELLTE FRAGEN Handgerät und Türeinheit können nicht miteinander kommunizieren x Handgerät und Türeinheit haben verschiedene ID Codes. Führen Sie das Paarungsverfahren durch. x Die Batterie ist leer. Ersetzen Sie die Batterien der Türeinheit oder laden Sie die Batterie des Handgeräts mithilfe der Ladeschale auf. Die Kommunikationsentfernung ist zu kurz x Zwischen Handgerät und Türeinheit befinden sich viele Stahlkonstruktionen. Stellen Sie das Handgerät an einem anderen Ort auf.
TECHNISCHE DATEN Ladegerät Stromverbrauch Aktiver Türklingel Maße: Türeinheit Reichweite Back-Up Speisung Speisungsadapter Frequenz Stromverbrauch Aktiver Material Anschluss Umgebungstemperatur IP Wert Kamera Maße Wieder aufladbare Lithium-Ionen Batterie 800mAh 3,7V 5V600mA Stand-by 78mA Übertragungsmodus 190mA Empfangsmodus 410mA max. Audio, visuell oder vibrieren wählbar. 50x142x22mm DEUTSCH Handgerät Speisung Bis zu 300m freies Feld, bis zu 30m durch Wände und Decken hindurch.
Umweltinformation für Kunden innerhalb der Europäischen Union Die Europäische Richtlinie 2002/96/EC verlangt, dass technische Ausrüstung, die direkt am Gerät und/oder an der Verpackung mit diesem Symbol versehen ist nicht zusammen mit unsortiertem Gemeindeabfall entsorgt werden darf. Das Symbol weist darauf hin, dass das Produkt von regulärem Haushaltmüll getrennt entsorgt werden sollte.
• • • • • • Ne pas exposer les composants de votre système à des températures extrêmement élevées ou à des sources de lumière trop fortes. La garantie n'est plus valable en cas d'usage inapproprié, de modifications ou de réparations effectuées par des personnes non agréées. Marmitek se dégage de toute responsabilité du fait des produits en cas d'usage inapproprié du produit ou d'utilisation non conforme à l'usage auquel le produit est destiné.
TABLE DES MATIÈRES CONSIGNES DE SÉCURITÉ ....................................................................... 41 TABLE DES MATIÈRES ............................................................................... 42 INTRODUCTION .......................................................................................... 43 FONCTIONS................................................................................................. 43 CONTENU .....................................................................
INTRODUCTION Félicitations pour l'achat de ce Système d'Interphone Numérique sans Fil. Votre Video DoorPhone 210 a été fabriqué et testé conformément aux contrôles de qualité les plus stricts, afin que chaque système quitte l'usine en parfait état. Dans le cas improbable où vous décèleriez un défaut ou une anomalie, veuillez contacter votre distributeur. Surtout n'essayez jamais de résoudre le problème vous-même.
CONTENU a. b. c. d. e. f. g. h.
APERÇU DU FONCTIONNEMENT FRANÇAIS Unité extérieure Base de charge Combiné 1. 2. 3. 4. 5. 6. 7. 8. 9. Touche d’appel Microphone Haut-parleur Eclairage LED blanc Capteur de luminosité Objectif de la caméra Touche d'appairage Bornier Volume vers le bas/touche à gauche 10. Volume vers le haut/touche à droite 11. Touche menu Video DoorPhone 210 12. Touche de fonction pan 13. Touche d'ouverture de serrure de porte 14. Touche des appels en absence 15. Touche fin d’appel et marche/arrêt 16.
PRISE EN MAIN ALIMENTATION : UNITÉ EXTÉRIEURE Dévissez avec le tournevis fourni les vis avec lesquelles l'unité est fixée sur le support de montage. Ces vis sont des vis spéciales antivol. C'est pourquoi il est nécessaire de garder le tournevis dans un endroit sûr, au cas où vous en auriez besoin ultérieurement pour changer les piles. L'unité extérieure est alimentée en courant continu 12V ou en courant alternatif 8V à 12V, qui est souvent disponible à l'entrée (transformateur de sonnette).
La pile Lithiumpolymère fournie est déjà installée dans le combiné. (Pour la remplacer appuyez sur la touche de fermeture vers le bas, puis faites glisser le couvercle pour ouvrir. Retirez ensuite la pile et débranchez-la.) Placez le combiné encore désactivé sur le chargeur. Branchez l’adaptateur secteur fourni sur une prise de courant et branchez la fiche de sortie sur le port USB (21) à l’arrière de la base de charge. Le voyant de charge (20) s'allume en rouge pendant le processus de charge.
APPAIRAGE DU COMBINÉ À L'UNITÉ EXTÉRIEURE Ce processus est prévu pour appairer l'unité extérieure au combiné, de sorte qu'ils puissent communiquer entre eux et qu'aucun autre appareil (même pas un modèle d'interphone identique) ne puisse provoquer des interférences chez vous ou perturber la réception de votre signal. L'unité extérieure et le combiné sont appairés en usine par le biais d'un code préprogrammé.
INSTALLATION DE L'UNITÉ EXTÉRIEURE Choisissez un endroit près de votre porte, là où la surface n'est pas trop rugueuse. Nous Mettez les chevilles dans les trous (seulement pour les murs vous conseillons de bien nettoyer d’abord la en béton) surface afin d'obtenir une surface lisse, sinon l'unité extérieure risquerait de ne pas être fixée correctement.
Toujours fermé Ces deux bornes fournissent normalement une tension de 12V. Dès que la touche de déverrouillage de porte (13) est enfoncée, cette tension passera durant la communication temporairement à 0V, pendant le temps qui est spécifié par la fonction TRIGGER TIME. Toujours ouvert Ces deux bornes fournissent normalement une tension de 0V.
L'unité extérieure est logée dans un boîtier robuste en ABS/PC qui répond à la robustesse professionnelle qui est requise pour la plupart des applications à l'extérieur. Des joints en caoutchouc assurent l'étanchéité des jonctions tout autour et empêchent ainsi la poussière, la pluie et la neige de pénétrer dans le boîtier. Cela garantit des années de fonctionnement fiable, même dans des conditions difficiles. L'unité répond à la norme IP-54 et fonctionne à des températures allant de -20 ˚C à 50 ˚C.
CONFIGURATION DE L’UNITÉ EXTÉRIEURE GATE (PORTE) Cela permet de sélectionner l'unité extérieure dont vous souhaitez modifier les paramètres. Utilisez les touches à gauche/à droite (9) (10) pour sélectionner entre FRONT (porte d'entrée) et BACK (porte arrière) et appuyez ensuite brièvement sur la touche menu (11) pour valider le réglage. VOLUME Cela permet de régler le volume du haut-parleur de l'unité extérieure.
MODE D'ALERTE Cela permet de programmer le mode d'alerte lorsqu'un visiteur sonne : sonnerie, vibrations ou les deux. Utilisez les touches à gauche/à droite (9) (10) pour sélectionner entre (sonnerie et vibrations) ou (seulement sonnerie) ou (seulement vibrations). Appuyez brièvement sur la touche menu (11) pour valider votre choix. L’icône correspondante est affichée en haut de l'écran (18).
EXIT (Fin) Sélectionnez ce paramètre pour quitter le menu, appuyez brièvement sur la touche menu (11) pour valider. Le menu disparaît automatiquement de l’écran (18) si l’on n’a pas appuyé sur une touche pendant 10 secondes. Appuyez brièvement sur la touche fin d'appel/ marche-arrêt (15) pour revenir en mode veille et pour désactiver l’écran (18). Le combiné reviendra automatiquement en mode de veille si l’on n’a pas appuyé sur une touche pendant plus de 1 minute.
touche d'ouverture de serrure de porte (13) pour ouvrir à distance la serrure de porte électrique (cette fonction n'est disponible que si une alimentation 12V en courant continu est connectée à l'unité extérieure et si votre porte est équipée d'une serrure électrique). Appuyez sur la touche d'ouverture de serrure de porte (13) pendant au moins 3 secondes et le texte 'PORTE OUVERTE' est affiché à l’écran (18), pour signaler que la serrure de porte est ouverte. Le texte disparaît après 3 secondes.
En mode veille (lorsqu’il n’y a pas d’appel actif entre le combiné et l’unité extérieure), la serrure de porte électrique peut également être ouverte en appuyant brièvement sur la touche de communication / (16), et ensuite en appuyant longuement sur la touche d'ouverture de serrure de porte pendant au moins 3 secondes. (13) Cette fonction pour ouvrir la serrure de porte peut être activée ou désactivée afin d'éviter tout abus par des enfants.
APPEL(S) EN ABSENCE Si vous ne répondez pas à l'appel d'un visiteur (par exemple parce que vous êtes absent), le voyant d’appel en absence clignotera en mode veille. En même temps le texte "X APPEL(S) EN ABSENCE" est affiché en bas de l'écran (18) dès que l'écran est activé (X indique le nombre d'appels en absence, 10 appels en absence peuvent être au maximum stockés et la notification la plus récente efface la plus ancienne). brièvement sur la touche des appels en absence (14) pour afficher la 1ère image.
FOIRE AUX QUESTIONS Le combiné et l'unité extérieure ne peuvent pas communiquer x Le combiné et l'unité extérieure ont des codes ID différents, effectuez la procédure d'appairage. x La pile est vide. Remplacez les piles dans l’unité extérieure ou rechargez la pile dans le combiné à l’aide de la base de charge. La distance de communication est trop courte x Il y a trop de structures en acier entre le combiné et l'unité extérieure. Placez le combiné à un autre endroit. x La batterie est vide.
CARACTÉRISTIQUES TECHNIQUES Combiné Alimentation Pile lithium-ion rechargeable 800mAh 3,7V Chargeur 5V 600mA Consommation d’électricité En veille 78mA Actif Mode de transmission 190mA Mode de réception 410mA max. Sonnette de porte Audio, visuelle ou vibrante au choix Dimensions 50x142x22mm Jusqu’à 300 m en champ libre, jusqu’à 30 m à travers les sols et les murs. Alimentation de secours Piles (3x AAA alcalines, pour 3 jours de sauvegarde, non fournies) Adaptateur secteur 8…12V DC ou AC, min.
Informations environnementales pour les clients de l’Union européenne La directive européenne 2002/96/CE exige que l’équipement sur lequel est apposé ce symbole sur le produit et/ou son emballage ne soit pas jeté avec les autres ordures ménagères. Ce symbole indique que le produit doit être éliminé dans un circuit distinct de celui pour les déchets des ménages.
x x x x x x No exponga los componentes del sistema a temperaturas extremamente altas o a focos de luz intensa. En caso de uso indebido o modificaciones y reparaciones realizadas por usted mismo, la garantía se caducará. En caso de uso indebido o impropio, Marmitek no asume ninguna responsabilidad para el producto. Marmitek no asume ninguna responsabilidad para daños que resultan del uso impropio, excepto en caso de responsabilidad para el producto como determinada por la ley.
ÍNDICE AVISOS DE SEGURIDAD ............................................................................ 61 ÍNDICE.......................................................................................................... 62 INTRODUCCIÓN .......................................................................................... 63 FUNCIONES................................................................................................. 63 CONTENIDO DEL SET ......................................................
INTRODUCCIÓN Felicidades por la compra de este sistema de portero automático digital inalámbrico. El Video DoorPhone 210 fue fabricado y comprobado según los controles de calidad más exhaustivos, para garantizar que cada sistema salga de la fábrica en perfecto estado. En el caso poco probable de que encuentre un defecto o un problema, le rogamos entrar en contacto con su distribuidor. En ningún caso intente solucionar el problema usted mismo.
CONTENIDO DEL SET a. b. c. d. e. f. g. h.
PIEZAS Y BOTONES ESPAÑOL Unidad exterior Cargador Auricular 1. 2. 3. 4. 5. 6. 7. Botón de timbre Micrófono Altavoz Luz LED blanca Sensor de luz Lente de cámera Botón de emparejamiento 8. Bloc de conexión 9. Bajar volúmen/botón inzquierda 10. Subir volúmen/botón derecha Video DoorPhone 210 11. 12. 13. 14. 15. 16. 17. 18. 19. 20.
PRIMEROS PASOS Alimentación UNIDAD EXTERIOR Suelta los tornillos que fijan el auricular encima de la placa de montaje usando el destornillador suministrado. Los tornillos son tornillos especiales antirrobo. Por esta razón es necesario guardar el destornillador en un sitio seguro para luego poder cambiar las baterías. La unidad exterior se alimenta con una corriente continua de 12 V o una corriente alterna de 8 a 12 V.
La batería de polimero de litio suministrada ya está instalada en el auricular (para sustituirla, hay que pulsar el botón de cerradura y deslizar la tapa. Luego hay que quitar la batería y soltar la conexión.) Coloca el auricular todavía apagado en el cargador. Conecta la alimentación conmutada de corriente alterna suministrada con una toma de corriente y conecta el enchufe de salida con el puerto USB (21) en la parte trasera del cargador.
EMPAREJAR EL AURICULAR CON LA UNIDAD EXTERIOR Con este proceso la unidad exterior se acopla (empareja) con el auricular en la vivienda para facilitar una comunicación entre ambos. Encima el emparejamiento evita interferencias por otros dispositivos (incluso por el mismo modelo de videoportero) para garantizar que la señal se reciba claramente. La unidad exterior ya está emparejada con el auricular en la fábrica, empleando un código preprogramado.
MONTAJE DE LA UNIDAD EXTERIOR Coloca los tacos en los Elige una zona cerca de la puerta, donde la agujeros (solamente para superficie no sea demasiado rugosa. En pared de hormigón) primer lugar, aconsejamos limpiar la superficie a fondo para tener una superficie lisa, puesto que la unidad exterior de otra Bocas manera no se puede montar correctamente. La placa de montaje no se debe fijar encima de rejillas metálicas o cerca de otros dispositivos electrónicos que pudrían reducir el alcance operativo.
Siempre cerrado Estas dos conexiones normalmente suministran una corriente de 12 V. Cuando se pulsa el botón abrir cierre de puerta (13) durante una comunicación, la tensión baja temporalmente a 0 V durante el tiempo que fue determinado por la función de TRIGGER TIME. Siempre abierto Estas dos conexiones normalmente suministran una corriente de 0 V.
aplicaciones al aire libre. Los envases de goma sellan todas las conexiones y conservan el material, protegiéndolo contra la lluvia y la nieve. Esto garantiza un funcionamiento duradero y fiable, incluso bajo condiciones climatológicas extremas. La unidad exterior cumple con la norma IP-54 y funciona con temperaturas de -20˚C a 50˚C. CONTROL ENCENDER/APAGAR Enciende el auricular, manteniendo el botón de encender/apagar (15) apretado largamente (3 segundos como mínimo).
AJUSTES DE LA UNIDAD EXTERIOR GATE (PUERTA) Selecciona la unidad de la que quiere cambiar los ajustes. Selecciona “FRONT” (principal) o “BACK” (de atrás) con los botones de izquierda/derecha (9) (10) y pulsa brevemente el botón de menú (11) para confirmar los ajustes. VOLUMEN Ajusta el volumen de la unidad exterior. Selecciona uno de los 5 niveles con (9) (10). 1 es el volumen más bajo, 5 es los botones de izquierda/derecha el volumen más alto.
MODO DE ALARMA Ajusta el tipo de aviso cuando una visita toca a la puerta: timbre acústico, vibración o las dos cosas. Selecciona (timbre acústio y vibración), (solo timbre acústico) o (solo vibración) con los botones de izquierda/derecha (9) (10). Pulsa brevemente el botón de menú (11) para confirmar la selección. En la parte superior de la pantalla (18) aparece el pictograma correspondiente.
izquierda/derecha (9) (10). El diagrama de volumen se visualiza en la pantalla (18). Atención: el volumen del timbre no se puede ajustar. La unidad exterior necesita tensión (corriente continua de 12 V o baterías de alcalina). Al pulsar el botón de timbre (1) se emite un sonido. Este sonido se repite periódicamente hasta que la llamada será respondida por el auricular. Cuando la llamada no se ha respondido después de 30 segundos, la unidad exterior interrumpe automáticamente la emisión del sonido.
Este sistema dispone de una función automática para interrumpir conversaciones. Cuando el habitante no responde a la llamada de la visita (es decir que no usa el botón hablar/responder / (16) durante más que 60 segundos), la conversación se interrumpe automáticamente. Esta función protege la privacidad cuando se olvida interrumpir la conversación pulsando (15).
N.B. Este aviso de “fuera de alcance” también se realiza cuando las baterías de la unidad exterior están casi agotadas y no hay alimentación de corriente continua. Cuando el sensor de luz (5) detecta una intensidad de luz baja, la iluminación LED blanca (4) resplandece automátiamente al pulsar el botón de timbre (1), para iluminar el rostro de la visita. Esto se realiza cuando en el menú de funciones para “ILUMINACIÓN DE PUERTA” se ha seleccionado “AUTO”.
MEDIDAS DE PRECAUCIÓN x x x x ESPAÑOL x x Usa exclusivamente la alimentación conmutada de corriente alterna suministrada para cargar el auricular. El empleo de otras alimentaciones puede dañar el auricular. No mezcle baterías nuevas y viejas en la unidad exterior. Cuando el Video DoorPhone 210 no se usa durante cierto tiempo, quita todas las baterías del auricular y de la unidad exterior para evitar fugas de líqudos.
PREGUNTAS FRECUENTES No hay comunicación entre el auricular y la unidad exterior x El auricular y la unidad exterior tienen distintos códigos ID. Hay que realizar el procedimiento de emparejamiento. x La batería está vacía. Cambia las baterías de la unidad exterior o carga las baterías del auricular con el cargador. El alcance no es suficiente x Hay muchas estructuras de hierro entre el auricular y la unidad exterior. Coloca el auricular en otro sitio. x La batería está vacía.
ESPECIFICACIONES TÉCNICAS Auricular Alimentación Cargador Consumo Timbre Dimensiones Batería Litio-Ion recargable 800 mAh 3,7 V 5 V 600 mA Stand-by 78 mA Modo de transmisión activo 190 mA Modo de recepción 410 mA como máx. Opciones de aviso audio, visual o de vibración 50 x 142 x 22 mm Hasta 300 m campo libre, hasta 30 m a través de muros y techos Alimentación back-up Batería (3x AAA alcalina, para 3 días de back-up, no suministrada) Adaptador de alimentación 8…12 V DC o AC, min. 500 mA sin portero, 1.
Información medioambiental para clientes de la Unión Europea La Directiva 2002/96/CE de la UE exige que los equipos que lleven este símbolo en el propio aparato y/o en su embalaje no deben eliminarse junto con otros residuos urbanos no seleccionados. El símbolo indica que el producto en cuestión debe separarse de los residuos domésticos convencionales con vistas a su eliminación.
PRECAUZIONI DI SICUREZZA x x x x x ITALIANO x Non esporre i componenti del sistema a temperature eccessivamente alte o a fonti intense di luce. In caso di utilizzo scorretto, di riparazioni o modifiche apportate personalmente decade qualsiasi garanzia. Marmitek declina ogni responsabilità per i danni derivanti da un utilizzo non appropriato del prodotto o da utilizzo diverso da quello per cui il prodotto è stato creato.
INDICE PRECAUZIONI DI SICUREZZA ................................................................... 81 INDICE.......................................................................................................... 82 INTRODUZIONE .......................................................................................... 83 FUNZIONALITÀ ............................................................................................ 83 CONTENUTO DEL KIT............................................................
INTRODUZIONE Congratulazioni per l’acquisto del Sistema Citofonico Senza Fili Digitale. Il DoorPhone 150 è stato prodotto e controllato a seconda dei controlli di qualità più rigorosi per garantire che ogni sistema lascia la fabbrica in condizioni perfette. Nell’improbabile eventualità di avere ancora un difetto o un problema, si prega di contattare il rivenditore. In nessun caso si deve cercare di risolvere il problema se stesso.
CONTENUTO DEL KIT a. b. c. d. e. f. g. h.
INFORMAZIONI DI COMANDO Unità esterna Caricabatterie da tavolo 1. 2. 3. 4. 5. 6. 7. 8. 9. 10. 11. Tasto di chiamata Microfono Altoparlante Spia LED bianca Sensore di luce Lente Tasto di accoppiamento Morsettiera Volume giù/tasto sinistro Volume su/tasto destro Tasto di menu Video DoorPhone 210 ITALIANO Cordless 12. 13. 14. 15. 16. 17. 18. 19. 20.
PER INIZIARE ALIMENTAZIONE Unità esterna Allentare le viti con cui l’unità è stata fissata alla piastra di montaggio con il cacciavite fornito in dotazione. Le viti sono appositamente progettate per scopi antifurto. È pertanto necessario mantenere il cacciavite in un luogo sicuro, per la sostituzione futura delle batterie. L’unità esterna è alimentata da corrente continua da 12V, o corrente alternata da 8 a 12V, spesso disponibile presso l’entrata (trasformatore di campanello).
CORDLESS La batteria Li-Poly fornita in dotazione è già stata installata nel cordless. (Per sostituirla, premere giù il tasto di chiusura e aprire il coperchio del vano batteria. Poi togliere la batteria e scollegare il connettore.) Collocare il cordless ancora disattivato sul caricabatteria. Collegare l’alimentatore a commutazione CA a una presa di corrente e collegare la spina di uscita alla porta USB (21) sul lato posteriore del caricabatterie da tavolo.
ACCOPPIARE IL CORDLESS E L’UNITÀ ESTERNA Questo processo ha lo scopo di accoppiare (pairing) l’unità esterna al cordless, di modo che possano comunicare tra di loro e che altri dispositivi (neanche un modello di citofono identico) non possano causare interferenze. L’unità esterna e il cordless sono già accoppiati nella fabbrica tramite un codice preprogrammato.
un’altra volta, tramite l’opzione "BACK". Non è necessario accoppiare di nuovo l'unità esterna originariamente destinata alla porta anteriore. MONTAGGIO DELL’UNITÀ ESTERNA Inserire i tasselli nei fori (solo Scegliere un posto vicino alla porta, dove la per muri di cemento) superficie non è troppo ruvida. Si consiglia di prima pulire bene la superficie per ottenere una superficie liscia, perché Fori altrimenti non potrebbe possibile montare in modo corretto l’unità esterna.
Sempre aperta Normalmente queste due connessioni forniscono 0V. Durante la comunicazione, quando è stato premuto il tasto di apriporta (13), la tensione salirà temporaneamente a 12V, durante il tempo specificato dalla funzione TRIGGER TIME (tempo di attivazione). In nessun caso si può collegare la tensione CA da 230V direttamente alle morsettiere (8)! Collegamento addizionale Queste due connessioni agiscono come un interruttore e saranno cortocircuitati ad ogni pressione del tasto di chiamata (1).
COMANDO ACCESO / SPENTO Attivare il cordless mantenendo premuto il tasto di accensione (15) più di 3 secondi. (Premere di nuovo questo tasto durante più di 3 secondi per disattivare quest’unità). Ora l’indicatore di alimentazione (20) si illuminerà di blu. Se la batteria Li-Ion è scarica, l’indicatore di alimentazione lampeggerà di blu. Contemporaneamente sullo schermo l’icona della batteria (18) diventa vuota e lampeggerà. Collocare l’unità nel caricabatterie da tavolo per caricare la batteria.
VOLUME Qui si imposta il volume dell’altoparlante dell’unità esterna. Usare i tasti sinistro/destro (9) (10) per scegliere tra i 5 livelli, di cui il livello 1 rappresenta il livello di volume più basso e 5 il livello di volume più alto. Premere brevemente il tasto di menu (11) per confermare l’impostazione. LUMINOSITÀ Qui si imposta la luminosità dell’immagine del visitatore, come visualizzata sullo schermo (18).
chiamata) o (solo vibrare). Premere brevemente il tasto di menu (11) Per confermare la scelta. L’icona relativa è visualizzata nella parte superiore dello schermo (18). Se non si seleziona un’opzione, mancheranno il suono di chiamata o le vibrazioni e solo l'immagine del chiamante sarà visualizzata sullo schermo (18) quando qualcuno suona alla porta. APRIRE SERRATURA DELLA PORTA Qui si attiva o disattiva la serratura del tasto aprire serratura della porta (13).
Assicurarsi che l’unità esterna sia alimentata (12V CC o batterie alcaline). Adesso premere il tasto di chiamata (1), poi si sentirà il suono di chiamata. Fino a quando il suonare sarà risposta da un cordless, il suono di chiamata verrà emesso periodicamente, per ricordare il visitatore di aspettare. Se non vi è alcuna risposta entro 30 secondi, l’unità esterna termina il suonare. Premere il tasto di chiamata (1) per suonare di nuovo.
Questo sistema ha una funzione automatica per terminare le chiamate. Se il residente non parla al visitatore (cioè il tasto parlare/rispondere / (16) non viene utilizzato per più di 60 secondi, la chiamata verrà terminata automaticamente. Una tale funzione è utile per proteggere la vostra privacy in caso si dimentica di terminare la chiamata con il tasto di fine chiamata/accensione (15).
messaggio fuori portata continua a lampeggiare sullo schermo (18) finché il cordless sarà entro la portata dell’unità esterna. Nota! Questo avviso fuori portata si verifica anche quando le batterie dell'unità esterna si scaricano e manca l’alimentazione CC. Se il sensore di luce (5) rileva un’intensità di luce bassa, l’illuminazione a LED bianca (4) si accenderà automaticamente dopo aver premuto il tasto di chiamata (1) per illuminare il volto del visitatore.
PRECAUZIONI x x x x x ITALIANO x Utilizzare solo l’alimentatore CA a commutazione fornita in dotazione per caricare il cordless. L’uso di un’altra alimentatore potrebbe danneggiare il cordless. Non mischiare batterie alcaline vecchie e nuove nell’unità esterna. Quando il videocitofono DoorPhone 210 non viene utilizzato per un lungo periodo di tempo, rimuovere tutte le batterie dal cordless e dall’unità esterna per evitare la perdita delle batterie.
DOMANDE FREQUENTI Il cordless e l’unità esterna non possono comunicare x Il cordless e l’unità esterna hanno codici ID diversi, effettuare la procedura di accoppiamento. x La batteria è scarica. Sostituire le batterie nell’unità esterna o caricare la batteria nel cordless con l’aiuto del caricabatterie da tavolo. La distanza di comunicazione è troppo breve x Ci sono molte strutture di acciaio tra la batteria e l’unità esterna. Collocare il cordless in un luogo diverso. x La batteria è scarica.
DATI TECNICI Cordless Alimentazione batteria Li-Ion ricaricabile 800mAh 3,7V Caricabatterie 5V 600mA Assorbimento di corrente Stand-by 78mA Modo di trasmissione attiva 190mA Modo di ricezione attiva 410mA max. Campanello selezionabile: avviso audio, visuale o vibrazioni Dimensioni 50x142x22mm Fino a 300m campo libero, fino a 30m attraverso pareti e soffitti.
Informazioni relative all’ambiente per i clienti residenti nell’Unione Europea La direttiva europea 2002/96/EC richiede che le apparecchiature contrassegnate con questo simbolo sul prodotto e/o sull’imballaggio non siano smaltite insieme ai rifiuti urbani non differenziati. Il simbolo indica che questo prodotto non deve essere smaltito insieme ai normali rifiuti domestici.
VEILIGHEIDSWAARSCHUWINGEN x x x x x NEDERLANDS x Stel de componenten van uw systeem niet bloot aan extreem hoge temperaturen of sterke lichtbronnen. Bij oneigenlijk gebruik, zelf aangebrachte veranderingen of reparaties, komen alle garantiebepalingen te vervallen. Marmitek aanvaardt geen productaansprakelijkheid bij onjuist gebruik van het product of door gebruik anders dan waarvoor het product is bestemd.
INHOUDSOPGAVE VEILIGHEIDSWAARSCHUWINGEN .......................................................... 101 INHOUDSOPGAVE .................................................................................... 102 INTRODUCTIE ........................................................................................... 103 FUNCTIES .................................................................................................. 103 INHOUD VAN SET .......................................................................
INTRODUCTIE Gefeliciteerd met de aanschaf van de Video DoorPhone 210. Uw Video DoorPhone 210 werd vervaardigd en gecontroleerd volgens de strengste kwaliteitscontroles, om ervoor te zorgen dat elk systeem de fabriek in perfecte staat verlaat. In het onwaarschijnlijke geval dat u toch een defect of een probleem ontdekt, verzoeken wij u contact op te nemen met uw dealer. Probeer het probleem in geen geval zelf te repareren.
BEDIENINGSOVERZICHT Deurunit Oplaadhouder Handsetunit 1. 2. 3. 4. 5. 6. 7. 8. 9. Aanbeltoets Microfoon Luidspreker Witte LED-verlichting Lichtsensor Cameralens Pairingtoets Aansluitblok Volume omlaag/toets links 10. Volume omhoog/toets rechts 104 11. 12. 13. 14. 15. 16. 17. 18. 19. 20. Menutoets Beeldverschuivingtoets Deurslot openen toets Gemiste oproepen toets Ophangen en aan/uit-toets Spreken toets Microfoon TFT-scherm Luidspreker Stroomvoorziening en laag batterijniveau-indicator 21.
AAN DE SLAG VOEDING BUITENUNIT Draai met behulp van het meegeleverde schroevendraaier de schroeven los waarmee de eenheid aan de montageplaat is bevestigd. De schroeven zijn speciaal gemaakt voor anti-diefstal doeleinden. Het is daarom noodzakelijk om de schroevendraaier op een veilige plaats te bewaren, voor het geval u deze later weer nodig heeft om de batterijen te vervangen. De buitenunit wordt gevoed met 12V gelijkstroom, of 8 tot 12V wisselstroom, welke vaak beschikbaar is bij de entree (bel trafo).
HANDSET De meegeleverde Lipolymeer batterij is al geïnstalleerd in de handset. (Om deze te vervangen drukt u de afsluitknop omlaag en schuift u de batterijklep open. Haal vervolgens de batterij er uit en maak de aansluiting los.) Plaats de nog uitgeschakelde handset op de oplader. Sluit de meegeleverde schakelende wisselstroomvoeding aan op een stopcontact en sluit de uitgangsstekker aan op de USB-poort (21) aan de achterkant van de oplaadhouder.
DE HANDSET EN DE BUITENUNIT PAREN Dit proces is bedoeld om de buitenunit te koppelen (paren) aan de handset, zodat ze met elkaar kunnen communiceren en geen andere apparaten (zelfs geen identiek model deurtelefoon) storing kan veroorzaken bij u of de ontvangst van uw signaal. De buitenunit en de handset zijn in de fabriek al gekoppeld via een voorgeprogrammeerde code.
toevoegt aan het systeem (voor gebruik met de achterdeur), het pairingproces nogmaals moet worden uitgevoerd, met als keuze "BACK". De oorspronkelijk voordeurunit hoeft niet nogmaals te worden gekoppeld. MONTAGE VAN BUITENUNIT Plaats de pluggen in de gaten (alleen voor betonnen muur) Kies een locatie dicht bij uw deur, waar het oppervlak niet te ruw is.
Altijd open Deze twee aansluitingen leveren normaal gesproken 0V. Tijdens communicatie zal zodra de deurontgrendelingstoets (13) wordt ingedrukt, deze spanning tijdelijk naar 12V gaan, gedurende de tijd die is gespecificeerd door de TRIGGER TIME-functie. Onder geen beding mag 230V wisselstroomspanning rechtstreeks worden aangesloten op de aansluitblokken (8)! Extra aansluiting Deze twee aansluitingen handelen als een schakelaar en zullen worden kortgesloten zolang de deurbeltoets (1) is ingedrukt.
BEDIENING AAN / UIT Schakel de handset in door de Aan/Uittoets (15) lang (ruim 3 seconden) ingedrukt te houden. (druk nogmaals lang op dezelfde toets als u de unit wilt uitschakelen). De voedingsindicator (20) zal nu blauw oplichten. In het geval dat de Li-ionbatterij leeg is, zal de voedingsindicator blauw gaan knipperen. Tegelijkertijd zal het op het scherm (18) zichtbare batterijpictogram leeg worden en gaan knipperen. Plaats de unit in de oplaadhouder om de batterij op te laden.
BUITENUNIT INSTELLING GATE (DEUR) Dit selecteert de deurunit waarvan u de instellingen wilt wijzigen. Gebruik de links/rechts-toetsen (9) (10) om te kiezen tussen FRONT (voordeur) en BACK (achterdeur) en druk vervolgens kort op de menutoets (11) om de instelling te bevestigen. VOLUME Dit stelt het luidsprekervolume van de deurunit in. Gebruik de links/rechts toetsen (9) (10) om te kiezen tussen de 5 niveaus, waarbij 1 het laagste en 5 het hoogste volume is.
ALARMMODUS Hiermee wordt de waarschuwingsmethode ingesteld voor wanneer een bezoeker aanbelt: een belgeluid, trillen, of beide. Gebruik de links/rechts toetsen (9) (10) om te kiezen tussen (belgeluid en trillen) of (alleen belgeluid) of (alleen trillen). Druk kort op de menutoets (11) om de keus te bevestigen. Het bijbehorende pictogram wordt weergegeven aan de bovenzijde van het scherm (18).
Na het aannemen van een gesprek, toont het scherm (18) het beeld van de bezoeker. Audiocommunicatie met de bezoeker zal echter pas worden gestart als de oproep wordt beantwoord door een korte druk op de spreken toets / (16). Zodra de spreken toets / (16) wordt ingedrukt, kan een gesprek plaatsvinden en is de stem van de bezoeker te horen via de luidspreker (19).
en gebruik vervolgens de links/rechts toetsen (9) (10) om het beeld te verschuiven op het scherm (18). Dit systeem heeft een automatische functie om gesprekken te beëindigen. Als de bewoner niet terugpraat tegen de bezoeker (d.w.z. de spreken toets / (16) langer dan 60 seconden niet gebruikt, zal het gesprek automatisch worden beëindigd. Een dergelijke eigenschap is nuttig om uw privacy te beschermen in het geval u vergeet om de oproep te beëindigen door op de ophangen/aan-uittoets (15) te drukken.
gebruik van een batterij). Zodra de handset weer binnen bereik is, zal het alarm automatisch stoppen. Een korte druk op de ophangen/aan-uittoets (15) kan het alarmgeluid uitzetten, maar de tekst "buiten bereik" blijft knipperen op het scherm (18) totdat de handset weer binnen het bereik van de aanbelunit is. N.B. Deze 'buiten bereik' waarschuwing zal ook plaatsvinden wanneer de batterijen van de aanbelunit leeg raken en er geen gelijkstroomvoeding is.
VOORZORGSMAATREGELEN x x x x x x 116 Gebruik alleen de meegeleverde schakelende wisselstroomvoeding om de handset op te laden. Gebruik van een andere voeding kan de handset beschadigen. Plaats geen mix van oude en nieuwe alkalinebatterijen in de deurunit. Wanneer u de Video DoorPhone 210 gedurende langere tijd niet gebruikt, verwijder dan alle batterijen uit de handset en de deurunit om te voorkomen dat batterijen gaan lekken.
VEELGESTELDE VRAGEN De handset en deurunit kunnen niet communiceren x De handset en deurunit hebben verschillende ID-codes, voer de pairingprocedure uit. x De batterij is leeg. Vervang de batterijen in de deurunit of laad de batterij in de handset op met behulp van de oplaadhouder. De communicatieafstand is te kort x Er bevinden zich veel stalen structuren tussen de handset en de deurunit. Plaats de handset op een andere locatie. x De batterij is leeg.
TECHNISCHE GEGEVENS Handset Voeding Oplader Stroomverbruik Actieve Deurbel Afmetingen Deurunit Bereik Back-up voeding Voedingsadapter Frequentie Stroomverbruik Materiaal Aansluiting Omgevingstemperatuur IP-waarde Camera Afmetingen Oplaadbare lithium-ion batterij 800mAh 3,7V 5V 600mA Stand-by 78mA Transmissiemodus 190mA Ontvangstmodus 410mA max. Selecteerbare audio, visuele of trilwaarschuwing 50x142x22mm Tot 300m vrije veld, tot 30m door muren en plafonds.
Milieu-informatie voor klanten in de Europese Unie De Europese Richtlijn 2002/96/EC schrijft voor dat apparatuur die is voorzien van dit symbool op het product of de verpakking, niet mag worden ingezameld met niet-gescheiden huishoudelijk afval. Dit symbool geeft aan dat het product apart moet worden ingezameld.
DECLARATION OF CONFORMITY Hereby, Marmitek BV, declares that this VIDEO DOORPHONE 210 is in compliance with the essential requirements and other relevant provisions of the following Directives: Directive 1999/5/EC of the European Parliament and of the Council of 9 March 1999 on radio equipment and telecommunications terminal equipment and the mutual recognition of their conformity Directive 2004/108/EC of the European Parliament and of the Council of 15 December 2004 on the approximation of the laws of the
Par la présente Marmitek BV déclare que l'appareil VIDEO DOORPHONE 210 est conforme aux exigences essentielles et aux autres dispositions pertinentes des directives: Directive 1999/5/CE du Parlement européen et du Conseil, du 9 mars 1999, concernant les équipements hertziens et les équipements terminaux de télécommunications et la reconnaissance mutuelle de leur conformité Directive 2004/108/CE du Parlement Européen et du Conseil du 15 décembre 2004 relative au rapprochement des législations des États membr
Con ciò, Marmitek BV, dichiara che il VIDEO DOORPHONE 210 è conforme ai requisiti essenziali ed alter disposizioni relative alla Direttiva : Direttiva 1999/5/CE del Parlamento europeo e del Consiglio, del 9 marzo 1999, riguardante le apparecchiature radio e le apparecchiature terminali di telecomunicazione e il reciproco riconoscimento della loro conformità Direttiva 2004/108/CE del Parlamento Europeo e del Consiglio del 15 dicembre 2004 concernente il ravvicinamento delle legislazioni degli Stati membri re
Video Doorphone 210 123