
User manual
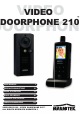


© MARMITEK
10
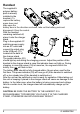
Mounting of door Unit
Select a location near your door entrance
where the surface is not too rough. We
recommend that you do some polishing to
get a plane surface or otherwise the unit
may not be able to mount properly.
It should be noted that the mounting bracket
is not installed on metal screening surfaces
nor in the vicinity of other electronic devices
that may reduce the operating range. Using
the supplied self tap screws, fix the
mounting bracket onto the wall.
Connect the terminals marked of the
12V DC power supply at the back of the
door unit. In addition, there are also
terminals marked and for
connecting to an electric door latch which
can be remotely opened by the handset.
When the DC power supply is connected,
the call button (1) will be illuminated. The
electric door latch opening feature will not
operate when using the backup alkaline
batteries so as to keep long battery life.
CAUTION: When using the DC supply, in case the electric door latch
does not function, reverse the polarity it is connected to and try again.
(The two most common types of electric door latch on the market are either
“always close” or “always open”.)
Always close
These two terminals normally provide a 12V supply. During
communication, once the door lock opening button (13) is pressed, this
voltage will drop to 0V temporarily for duration of time as specified by the
TRIGGER TIME function.
Always open
These two terminals normally provide 0V. During communication, once
the door lock opening button (13) is pressed, the terminals will provide a
12V supply temporarily for duration of time as specified by the TRIGGER
TIME function.
Under no circumstances should AC mains Voltage be directly connected to
the terminal blocks (8)!
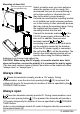
Drilled holes
Insert the plugs into the holes
(for concrete wall only)