
User manual
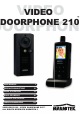


Video DoorPhone 210
9
ENGLISH
Pairing the handset and the door unit
This process is to match the door unit with the handset so that they can
communicate with each other and so that no other devices (even a
doorphone of an identical model) can interfere with your set.
The door unit and handset are already paired when they are shipped from the
factory. However, in case interference still exists, perform pairing again to
achieve better privacy and to avoid false triggering of the door lock from a
nearby doorphone system.
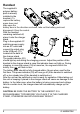
Place the door unit and handset close to each other
within a distance of 1m.
Press and hold the talk/answer button (16), then long
press the power ON/OFF button (15) to switch on
the unit. The screen (18) will show the following:
Use the left/right key (9)(10) to select either
“FRONT” (represent front gate), “BACK” (represent
back gate) or “CLEAR”, then touch the menu key
(11) to confirm. The power indicator (20) should now
flash rapidly, showing the handset has entered pairing
mode.
In case “CLEAR” is selected, all the originally paired
door units will be cleared and you will then need to
perform pairing again.
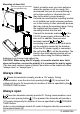
Now install alkaline batteries or connect 12V DC to the
door unit. (If the door unit was already on, do a
powercycle.) Then short press the pairing button (7)
located at the back.
WARNING: The pairing button (7) must be pressed
within 30 sec once you supply power to the door unit, otherwise pairing
will not be successful.
Once the handset and the door unit are successfully paired, the image
captured by the camera lens (6) will be shown in the screen (18) of the
handset. The doorphone is now ready for operation. If the pairing process is
not successful (the screen (18) remains blue), repeat the procedures from
step 2 again. Remember when you add a second door unit to the system (for
back gate use), it is necessary to perform the pairing process and select
“BACK”. The original front gate unit does not need to be paired again.