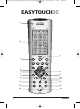
20055_20061108_UG_EasyTouch_35_touchscreen_remote 09-11-2006 10:22 Pagina 1 EASYTOUCH35 ASYTOUCH OWNER’S MANUAL 4 BETRIEBSANLEITUNG 23 MODE D’EMPLOI 42 GEBRUIKSAANWIJZING 61 20055 / 20061108 © ALL RIGHTS RESERVED MARMITEK ®
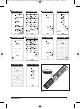
0055_20061108_UG_EasyTouch_35_touchscreen_remote 09-11-2006 10:22 Pagina 2 EASYTOUCH35 1 17 3 2 2 4 7 8 5 6 9 11 10 13 12 15 16 18 14 MARMITEK
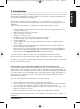
20055_20061108_UG_EasyTouch_35_touchscreen_remote 09-11-2006 10:22 Pagina 3 A EASYTOUCH 35 3
20055_20061108_UG_EasyTouch_35_touchscreen_remote 09-11-2006 10:22 Pagina 4 Contents 1. 2. 3. 4. 5. 6. 7. 8. 9. 10. 11. 12. 13. 14.
20055_20061108_UG_EasyTouch_35_touchscreen_remote 09-11-2006 10:22 Pagina 5 The EASYTOUCHT35 (ET35) is designed to control up to 8 devices (TV, VCR, CD, SAT, CBL, DVD, AUDIO, Marmitek X-10 Home Control). The Marmitek X-10 Home Control key can be used to control lighting and appliances. To allow direct control of all these appliances, in a convenient way, the ET35 has a Touchscreen. The Touchscreen will only display the functions for controlling your specific equipment.
20055_20061108_UG_EasyTouch_35_touchscreen_remote 09-11-2006 10:22 Pagina 6 3 Installing the batteries 1. 2. 3. 4. Open the cover on the back of the ET35 Insert 4 batteries (AAA size alkaline). Make sure the batteries are the same brand and are NEW and observe polarities indicated inside the battery compartment. All the user programmed parameters will be retained indefinitely during battery replacement Remove the plastic protection foil from the Touchscreen.
9: TELETEXT ON: to display Teletext 10: TELETEXT OFF: to turn off Teletext 09-11-2006 10:22 Pagina 7 11: Rew In VCR, DVD or CD mode: This button works the same way as in your original remotes. IN TV mode: Coloured key (Red), control of videotext or special equipment functions. 12: Fast Forward In VCR, DVD or CD mode: This button works the same way as in your original remotes. IN TV mode: Coloured key (Blue), control of videotext or special equipment functions.
20055_20061108_UG_EasyTouch_35_touchscreen_remote 09-11-2006 10:22 Pagina 8 -/--: In connection with the numerical keys this key allows you to directly select channels higher than 9 (depending on the appliance). A/V: Selection of the SCART plug to view or record e.g. DVD, SAT, VCR, … SEARCH: To scan up available program channels or tracks (see chapter 15.
09-11-2006 10:22 Pagina 9 1. The remote must be in TV Mode with the "second" display screen being shown. 2. Press and hold the Touchscreen "SLEEP" Key until the LED remains on (this occurs after approximately 2-3 seconds) and display shows the Sleep Setup Screen. 3. Release the "SLEEP" key. 4. Press and release the numerical keys (01-99) for the time required. The LED will blink off to indicate keypress acceptance and the remote display will return to normal operation. 5. TV Sleep Timer now set.
20055_20061108_UG_EasyTouch_35_touchscreen_remote 09-11-2006 10:22 Pagina 10 SAT, etc.) on the rubber keypad. Note The Brand Search Method is not available for CD/Audio appliance. 7. Display will show the Code Setup Screen. Using the table, press and release the numerical key (0-6) corresponding to desired Manufacturer. Note - pressing "0" carries out a full library search same as normal Code Search Method.
09-11-2006 10:22 Pagina 11 4. Release Setup key. 5. Press and release the Touchscreen "CODE" Key. 6. Display will show the Mode Setup Screen. Press and release desired Mode key (TV, VCR, SAT, etc.) on the rubber keypad. Display will show the Code Setup Screen. Enter the 3 digits of the Device Code from the Library Code Tables. For a valid Code, the LED blinks off after the last digit is entered. For an invalid Code, the LED will flash rapidly three times before going off.
20055_20061108_UG_EasyTouch_35_touchscreen_remote 9. 09-11-2006 10:22 Pagina 12 Repeat this procedure for any other appliance you want to control (TV, VCR, DVD, SAT, CD, CBL, AUDIO and Marmitek X-10 Home Control). 10. The Code Search Method entry is now complete. Press and release the Touchscreen "EXIT" key to return to normal operation. 11. Repeat this procedure for any other appliance you want to control. ATTENTION: the Brand Search method does not work for CD and AUDIO. Notes: a.
20055_20061108_UG_EasyTouch_35_touchscreen_remote 09-11-2006 10:22 Pagina 13 1. Activate your ET35 remote by touching the screen. 2. Press and hold Setup key until the LED remains on (this occurs after approximately 2-3 seconds) and the display shows the Main Setup Screen. 3. Release Setup key. 4. Press and release the Touchscreen "MACRO" Key. 5. The Macro Setup Digit Screen will be shown. Press and release the digit key the Macro is to be stored under. 6.
20055_20061108_UG_EasyTouch_35_touchscreen_remote 09-11-2006 10:22 Pagina 14 To Delete a Macro: 1. Activate your ET35 remote by touching the screen. 2. Press and hold the Setup key until the LED remains on (this occurs after approximately 2-3 seconds) and the display shows Main Setup Screen. 3. Release Setup key. 4. Press and hold either the Touchscreen or rubber MACRO key. The LED will blink off to indicate the keypress acceptance and the Macro Delete Setup Screen will be shown.
09-11-2006 10:22 Pagina 15 8. You can now press up to 3 keys (a minimum of 1 key must be pressed) for the second set of data. Use the "SCREEN" Key to toggle the screen keys displayed – this counts as a keypress. When 3 keys are entered you will automatically continue to Step 8. If less than 3 keys are required then press the Setup key and go directly to Step 8. 9. Display will return to the Main Setup Screen. Channel Toggle "P
20055_20061108_UG_EasyTouch_35_touchscreen_remote 09-11-2006 10:22 Pagina 16 11 Code Learning: The EasyTouch35 offers the possibility to learn IR commands from your original remote. This can be helpful if the necessary codes are not pre-programmed in the EasyTouch35. It is possible to learn up to 40 keys per mode. Tips On Learning: • Always use of new batteries for the ET35 and original remote • It is recommended that you carry out a Master Clear before using the learn function for the first time.
09-11-2006 10:22 Pagina 17 6. Display will show the Learn Setup Screen. This screen comprises the current labels for the Mode along with the SETUP and LEARN Touchscreen labels. Press and release the ET35 remote key (rubber or Touchscreen) to be taught with the original remote key code. Use the Touchscreen "SCREEN" Key to toggle the screen keys displayed. 7.
20055_20061108_UG_EasyTouch_35_touchscreen_remote 09-11-2006 10:22 Pagina 18 To switch on/ off an appliance plugged into an home control module: Press the key (2), then press the unit code of the home control module on the Touchscreen display and then press CHAN+ / - (8). To dim/bright a light plugged into a home control module: press its unit code on the Touchscreen display and then press VOL+ / - (4). To turn ON all the home control Lamp modules: Press the Power key (3).
09-11-2006 10:22 Pagina 19 6. Display will show the Code Setup Screen. Enter 821. 7. Press and release the Touchscreen "EXIT" key to return to normal operation. To program the ENGLISH 20055_20061108_UG_EasyTouch_35_touchscreen_remote key to send radio signals, proceed as follow 1. Activate your ET35 remote by touching the screen 2. Press and hold the Setup key until the LED remains on (this occurs after approximately 2-3 seconds) and display shows the Main Setup Screen. 3. Release Setup key.
055_20061108_UG_EasyTouch_35_touchscreen_remote • 09-11-2006 10:22 Pagina 20 Operate your audio/video equipment that is hidden in the wardrobe; The RF signal travels through walls, ceilings and cupboard doors. Simply connect the receiver to a wall socket within sight of your equipment: it could not be easier. Article numbers 09665 (E), for use in European countries except England, 09673 (U), for use in England Ask your dealer about the possibilities or go to our web site www.marmitek.
20055_20061108_UG_EasyTouch_35_touchscreen_remote 09-11-2006 10:22 Pagina 21 1. Activate your ET35 remote by touching the screen. 2. Press and hold Setup key until the LED remains on and display shows the Main Setup Screen. 3. Release Setup key. 4. Press and hold the Setup key for approximately 5 seconds until the LED blinks on then turns off. 5. Default Reset now complete and remote will be in normal TV Mode. 4.
20055_20061108_UG_EasyTouch_35_touchscreen_remote 09-11-2006 10:22 Pagina 22 4. Press and hold the Mute key for approximately 5 seconds. The LED will blink, and stay off for the 5 second period then blink once more to indicate volume toggle acceptance. The display will return to the main Setup Screen. 5. Remote Volume default is now set.
20055_20061108_UG_EasyTouch_35_touchscreen_remote 09-11-2006 10:22 Pagina 23 1. 2. 3. 4. 5. 6. 7. 8. 9. 10. 11. 12. 13. 14.
20055_20061108_UG_EasyTouch_35_touchscreen_remote 09-11-2006 10:22 Pagina 24 2 Einleitung Die ET35 kann bis zu 8 Geräte ansteuern (TV, VCR, CD, SAT, CBL, DVD, AUDIO, Marmitek X-10 Home Automation). Die Marmitek X-10 Home Control-Taste kann genutzt werden, um Geräte und Beleuchtung ein-/auszuschalten und zu dämpfen. Zur einfachen und direkten Steuerung all dieser Geräte hat die ET35 einen Touchscreen.
20055_20061108_UG_EasyTouch_35_touchscreen_remote 09-11-2006 10:22 Pagina 25 3 Batterien einlegen und die Schutzfolie entfernen 1. 2. 3. 4. Öffnen Sie die Abdeckung auf der Rückseite der ET35 Legen Sie 4 Batterien ein (AAA, Alkaline). Vergewissern Sie sich, dass die Batterien die gleiche Marke haben und dass sie NEU sind und beachten Sie die Polarität, die auf der Innenseite des Batteriefaches angegeben ist. Alle benutzerprogrammierten Parameter bleiben während des Batterie-wechsels erhalten.
20055_20061108_UG_EasyTouch_35_touchscreen_remote 8. 09-11-2006 10:22 Pagina 26 CHAN +/-: Zum Anwählen des nächsten oder vorherigen Kanals Modus: Schaltet das aisgewählte Haustechnikmodul ein oder aus. 9. TELETEXT ON: Zum Anzeigen des Teletextes 10. TELETEXT OFF: Zum Abschalten des Teletextes 11. Rücklauf Im Videorecorder-, DVD- oder CD-Modus: Diese Schaltfläche funktioniert auf dieselbe Weise wie bei Ihrer Original-Fernbedienung.
20055_20061108_UG_EasyTouch_35_touchscreen_remote 09-11-2006 10:22 Pagina 27 5 Beschreibung der ET35 "Touchscreen" Tasten Wenn die Fernbedienung nicht in Betrieb ist, zeigt das Display nichts an. Durch Drücken der Setup Taste, irgendeiner Modus Taste, der Macro Taste oder irgendeiner Touchscreen Taste schaltet sich das Display ein. Die übrigen Plastiktasten aktivieren das Display nicht. Alle Anwendungen können durch 2 Touchscreen Anzeigen bedient werden.
20055_20061108_UG_EasyTouch_35_touchscreen_remote 09-11-2006 10:22 Pagina 28 REPEAT: (DVD) zur Wiederholung der Wiedergabe der DVD entweder komplett oder von 2 durch den Anwender bestimmten Punkten (Repeat A-B).
20055_20061108_UG_EasyTouch_35_touchscreen_remote 09-11-2006 10:22 Pagina 29 einem Piepen bestätigt. 3 LED Blinker und Pieper zeigen eine falsche oder ungültige Eingabe an. Methode A: Programmierung mittels Markensuchlauf 1. Vergewissern Sie sich, dass das Gerät eingeschalten ist. Falls nicht, schalten Sie es manuell ein. 2. 3. Aktivieren Sie Ihre ET35-Fernbedienung durch Antippen des Bildschirms. Halten Sie die SETUP Taste gedrückt bis die LED Anzeige an bleibt (nach ca.
20055_20061108_UG_EasyTouch_35_touchscreen_remote 09-11-2006 10:22 Pagina 30 Hinweise: a. b. Wenn alle Codes einer Marke durchsucht worden sind, blinkt die LED Anzeige wie bei einem Fehler und zeigt das Ende der Suche an. Der Main Setup Screen wird wieder angezeigt. Der oben genannte Suchvorgang geht davon aus, dass Sie VCR Codes auf einer VCR Taste, Kabelcodes auf einer CBL Taste usw. speichern möchten. Wenn Sie z. B.
20055_20061108_UG_EasyTouch_35_touchscreen_remote 09-11-2006 10:22 Pagina 31 Methode C: Programmierung mittels Code-Suchlauf Falls Sie nicht in der Lage sind, Ihren Code entweder in der Code Tabelle oder durch den Markensuchlauf zu finden, können Sie alle verfügbaren Codes für das Gerät mit der manuellen Code Suche ausprobieren. 1. 2. Vergewissern Sie sich, dass Ihr Gerät angeschalten ist. Falls nicht, schalten Sie es manuell ein. Aktivieren Sie Ihre ET35-Fernbedienung durch Antippen des Bildschirms.
20055_20061108_UG_EasyTouch_35_touchscreen_remote 09-11-2006 10:22 Pagina 32 7 Identifizierung der bei den Suchläufen gefundenen Codes 1. Aktivieren Sie Ihre ET35-Fernbedienung durch Antippen des Bildschirms. 2. Halten Sie die SETUP Taste gedrückt bis die LED Anzeige an bleibt (nach ca. 2 – 3 Sekunden) und das Display den Main Setup Screen zeigt. 3. Lassen Sie die Setup Taste wieder los. 4. Drücken Sie kurz die Touchscreen "CODE" Taste. 5. Das Display zeigt den Mode Setup Screen.
20055_20061108_UG_EasyTouch_35_touchscreen_remote 09-11-2006 10:22 Pagina 33 8. Um das Macro zu speichern, drücken Sie kurz die Plastik"MACRO" Taste. Das Display kehrt zum Main Setup Screen zurück. Hinweis: Wenn Sie das Maximum von 20 Tasten programmieren, wird das Macro automatisch auf dem 20. Tastendruck gespeichert. 9. Das Einprogrammieren von Macro Tasten ist jetzt beendet. Drücken Sie kurz die Touchscreen "EXIT" Taste um zum Normalbetrieb zurückzukehren. Macro Hinweise: 1.
20055_20061108_UG_EasyTouch_35_touchscreen_remote 09-11-2006 10:22 Pagina 34 9 Programmumschalttaste Die Kanalwechseltaste "P
1. 2. 3. 4. 5. 6. 7. 09-11-2006 10:22 Pagina 35 Aktivieren Sie Ihre ET35-Fernbedienung durch Antippen des Bildschirms. Halten Sie die SETUP Taste gedrückt bis die LED Anzeige an bleibt (nach ca. 2 – 3 Sekunden) und das Display den Main Setup Screen zeigt. Lassen Sie die Setup Taste wieder los. Drücken Sie kurz die Touchscreen "SCREEN" Taste: Das Display zeigt den Mode Setup Screen. Drücken Sie kurz die gewünschte Modus Taste (TV, VCR, SAT, etc.) auf dem Plastiktastenfeld.
20055_20061108_UG_EasyTouch_35_touchscreen_remote • • • 09-11-2006 10:22 Pagina 36 Unter folgenden Knoepfen koennen keine Funktionen eingelernt werden: Touchscreen SCREEN, LIGHT, SLEEP, P
20055_20061108_UG_EasyTouch_35_touchscreen_remote 5. 09-11-2006 10:22 Pagina 37 Display zeigt die Learn Setup Anzeige. Druecken Sie den SETUP Knopf bis die Main Setup Anzeige erscheint. Alle unter diesem Modus erlernten Kommandos sind jetzt geloescht. Die ET35 Fernbedienung ermöglicht Ihnen die Bedienung aller elektrischen Anwendungen, die Sie in Ihrem Haus haben.
20055_20061108_UG_EasyTouch_35_touchscreen_remote 09-11-2006 10:22 Pagina 38 (über eine Infrarot Ministeuerung IR7243) oder Funksignalen (über ein Transceiver-Modul TM13) steuern. Die -Taste wurde fabrikseitig auf Funksignalmodus eingestellt. Um die -Taste zu programmieren, ein Infrarotsignal auszusenden, gehen Sie folgendermaßen vor 1. 2. 3. 4. 5. 6. 7. 8. Aktivieren Sie Ihre ET35-Fernbedienung durch Antippen des Bildschirms.
20055_20061108_UG_EasyTouch_35_touchscreen_remote 09-11-2006 10:22 Pagina 39 Artikelnummern 09665 (E), für Betrieb in Europa, ausgenommen England, 09673 (U), für Betrieb in England]] Erkundigen Sie sich bei Ihrem Händler über die Möglichkeiten oder klicken Sie sich für weitere Informationen über Marmitek X-10 Home Control und alle erhältlichen Module ins Internet unter www.marmitek.com. 13. ZUSATZFUNKTIONEN: 1.
20055_20061108_UG_EasyTouch_35_touchscreen_remote 09-11-2006 10:22 Pagina 40 3. Bediener Master Reset: Um die Fabrikeinstellungen wieder herzustellen 1. 2. 3. 4. 5. Aktivieren Sie Ihre ET35-Fernbedienung durch Antippen des Bildschirms. Halten Sie den Setup Knopf solange gedrueckt bis die LED Anzeige anbleibt (ca 2-3 Sekunden) und das Main Setup Display angezeigt wird. Lassen Sie den Setup Knopf dann los. Halten Sie den Setup Knopf fuer ca 5 Sekunden gedrueckt bis die LED blinkt und dann erlischt.
20055_20061108_UG_EasyTouch_35_touchscreen_remote 09-11-2006 10:22 Pagina 41 Die Fernbedienung funktioniert nicht oder „vergisst" eingegebene Codes. • Vergewissern Sie sich mit der original Fernbedienung, dass das Gerät funktioniert. • Vergewissern Sie sich, dass Sie die entsprechende Modus Taste des Gerätes, das Sie bedienen wollen, gedrückt haben. • Wenn der angegebene Code nicht funktioniert, versuchen Sie Autosearch oder geben Sie den nächsten Code dieser Marke ein.
20055_20061108_UG_EasyTouch_35_touchscreen_remote 09-11-2006 10:22 Pagina 42 Sommaire 1. 2. 3. 4. 5. 6. 7. 8. 9. 10. 11. 12. 13. 14.
20055_20061108_UG_EasyTouch_35_touchscreen_remote 09-11-2006 10:22 Pagina 43 Cet écran n’affiche que les fonctions de contrôle d’un équipement spécifique. La ET35 a de grandes capacités de stockage et des caractéristiques uniques: • • • • • • • • • l’option "macro": un total de 20 touches peut être sauvegardé sous chacune des 9 touches Macro disponibles.
20055_20061108_UG_EasyTouch_35_touchscreen_remote 09-11-2006 10:22 Pagina 44 3. Insérer les piles et enlever le film de protection 1. 2. 3. 4. Ouvrer le couvercle situé à l’arrière de la ET35 Insérez 4 piles (LR03 alcaline). Assurez-vous que les piles soient neuves et de marque identique. Respectez la polarité indiquée dans le compartiment à piles.
20055_20061108_UG_EasyTouch_35_touchscreen_remote 09-11-2006 10:22 Pagina 45 Avance rapide. En mode VCR, DVD ou CD: elle fonctionne de la même manière que celle de vos télécommandes d'origine.
20055_20061108_UG_EasyTouch_35_touchscreen_remote 09-11-2006 10:22 Pagina 46 -/--: Permet de sélectionner directement des chaînes supérieures à 9. A/V: Sélection de l’entrée vidéo pour voir le DVD, le SAT, le VCR, … sur votre écran TV. SEARCH: Pour dérouler les chaînes ou les séquences (voir le chapitre 15.
20055_20061108_UG_EasyTouch_35_touchscreen_remote 09-11-2006 10:22 Pagina 47 compris entre1 et 99 minutes. Pour mettre votre TV en veille, suivez la procédure suivante: 1. 2. 3. 4. 5. La télécommande doit être en mode TV et le 2eme écran Touchscreen affiché. Appuyez et maintenez la touche Touchscreen "SLEEP" jusqu’à ce que la LED demeure allumée et que l’écran « SLEEP » s’affiche. Relâchez la touche "SLEEP" . Choisissez avec les touches numériques Touchscreen le temps désiré (01 à 99).
20055_20061108_UG_EasyTouch_35_touchscreen_remote 09-11-2006 10:22 Pagina 48 6. L’écran « MODE » s’affiche. Appuyez sur la touche mode désirée (TV, VCR, SAT...) du clavier (2). La méthode de recherche par marque n'est pas disponible pour les modes CD/AUDIO 7. L’écran « CODE » s’affiche. En fonction du tableau ci-dessous, appuyez sur la touche numérique (0-6) correspondant à la marque désirée. N.B.
20055_20061108_UG_EasyTouch_35_touchscreen_remote 09-11-2006 10:22 Pagina 49 Activez votre télécommande ET35 en touchant l’écran 3. Appuyez et maintenez enfoncée la touche Setup du clavier (6) jusqu’à ce que la LED reste allumée (2-3 secs) et que s’affiche l’écran « Main ». 4. Relâchez la touche Setup 5. Appuyez sur la touche Touchscreen "CODE". 6. L’écran « MODE » s’affiche. Appuyez sur la touche mode désirée (TV, VCR, SAT...) du clavier (2). 7. L’écran « CODE » s’affiche.
20055_20061108_UG_EasyTouch_35_touchscreen_remote 09-11-2006 10:22 Pagina 50 du clavier) continuellement jusqu’à ce que l’appareil change de chaîne. Vous pouvez également utiliser la touche CHAN+. Appuyez sur la touche Touchscreen « OK » (ou Mute) pour installer le code. L’écran « Main » s’affiche. Si vous ratez accidentellement votre code lors d’une recherche automatique, vous pouvez effectuer un retour en arrière en appuyant sur les touches Touchscreen 6 ou CHAN-.
20055_20061108_UG_EasyTouch_35_touchscreen_remote 09-11-2006 10:22 Pagina 51 8 Programmation d’une Macro 1. Activez votre télécommande ET35 en touchant l’écran. 2. Appuyez et maintenez enfoncée la touche Setup (6) jusqu’à ce que la LED reste allumée ( 2-3 secs) et que s’affiche l’écran « MAIN ». 3. Relâcher la touche Setup. 4. Appuyez sur la touche Touchscreen "Macro". 5. L’écran « MACRO » s’affiche. Appuyez sur la touche sous laquelle la séquence Macro sera enregistrée. 6.
20055_20061108_UG_EasyTouch_35_touchscreen_remote 09-11-2006 10:22 Pagina 52 4. Appuyer 2 fois sur la touche Setup stoppe l’enregistrement de la Macro en cours. La 1ere pression affiche l’écran « MACRO DELAY » et la seconde entraîne la sortie du mode Macro. 5. Il est impossible d’inclure une Macro dans une Macro. Effacer une Macro: 1. Activez votre télécommande ET35 en touchant l’écran. 2.
20055_20061108_UG_EasyTouch_35_touchscreen_remote 09-11-2006 10:22 Pagina 53 vous souhaitez enregistrer (maximum 3, minimum 1). Utilisez la touche Touchscreen "Screen" pour accéder au 2ème écran (cela compte comme 1 touche). Lorsque 3 touches sont entrées vous passerez automatiquement à l’étape 6. Si moins de 3 touches sont nécessaires, enfoncez la touche Mode et vous passerez ainsi directement à l’étape 7. 7. Pour entrer la 2eme série d’information appuyez sur le mode désiré (TV, VCR, SAT, etc.
20055_20061108_UG_EasyTouch_35_touchscreen_remote 09-11-2006 10:22 Pagina 54 N.B.: 1. Pour annuler votre personnalisation d’écran et retourner à l’écran défini par défault, pressez et maintenez enfoncée la touche du Mode concerné pendant environ 3 secondes selon l’étape 4 ci-dessus jusqu’à ce que l’écran "MAIN" s’affiche. 2. Les touches suivantes ne peuvent pas faire l’objet d’une personnalisation– "SLEEP", "SETUP", "MACRO", "LEARN", "P
09-11-2006 10:22 Pagina 55 2. Appuyez et maintenez enfoncée la touche Setup jusqu’à ce que la LED reste allumée (2-3 secs) et que s’affiche l’écran « MAIN ». 3. Relâchez la touche Setup. 4. Pressez la touche Touchscreen "LEARN" . 5. L’écran "MODE" s’affiche. Appuyez sur la touche Mode désirée (TV, VCR, SAT, etc.) du clavier. 6. L’écran "LEARN" s‘affiche. Cet écran comprend les touches Touchscreen du mode sélectionné ainsi que les touches "Setup" et « Learn ».
20055_20061108_UG_EasyTouch_35_touchscreen_remote • • • 09-11-2006 10:22 Pagina 56 Allumer, éteindre ou faire varier la luminosité de votre éclairage pendant que vous regardez la télévision. Allumer les lumières durant la nuit, pour faire fuir les rôdeurs, si vous entendez un bruit suspect Allumez votre couverture chauffante avant la fin du film, pour que votre lit soit chaud au moment où vous allez vous coucher.
20055_20061108_UG_EasyTouch_35_touchscreen_remote 09-11-2006 10:22 Pagina 57 1. Activez votre télécommande ET35 en touchant l’écran. 2. Appuyez et maintenez enfoncée la touche Setup du clavier jusqu’à ce que la LED reste allumée (2-3 secs) et que s’affiche l’écran « Main ». 3. Relâchez la touche Setup 4. Appuyez sur la touche Touchscreen "CODE". 5. L’écran « MODE » s’affiche. Appuyez sur la touche Marmitek X-10 6. L’écran « CODE » s’affiche. Entrez 821. 7.
20055_20061108_UG_EasyTouch_35_touchscreen_remote 09-11-2006 10:22 Pagina 58 dans la maison. La EasyTouch 35 envoie un signal RF au module Control Anywhere qui le convertit ensuite en un signal IR qui est envoyé à votre équipement. Quelques exemples de l’application du Control Anywhere: • Commander le lecteur DVD et le récepteur satellite depuis la chambre à coucher, sans être obligé de poser des câbles supplémentaires.
20055_20061108_UG_EasyTouch_35_touchscreen_remote 09-11-2006 10:22 Pagina 59 4. Pressez la touche Setup. La LED clignote pour indiquer la prise en compte de cette pression et l’écran numérique à 9 touches s’affiche alors. 5. Pressez une touche numérique de 1 à 9 (1=10 secondes, 2=20secondes, etc), et ensuite sur Enter. L’écran "MAIN" se réaffiche alors. 6. Le délai d’éclairage est maintenant accompli. 7. Appuyez sur la touche Touchscreen EXIT pour revenir en fonctionnement normal. 2.
20055_20061108_UG_EasyTouch_35_touchscreen_remote 09-11-2006 10:22 Pagina 60 8. Contrôle du volume du CBL/SAT: Certains décodeur Câbles ou Satellites ne possédant pas de contrôle de volume, la ET35 permet par défaut de contrôler le volume de la TV même lorsque la télécommande est en mode SAT ou CBL. Pour les décodeurs satellites et câbles possédant un contrôle du volume, il est possible de choisir l'appareil que les touches Mute et Vol vont contrôler dans ces modes. Pour cela procéder comme ainsi: 1.
20055_20061108_UG_EasyTouch_35_touchscreen_remote 09-11-2006 10:22 Pagina 61 Inhoud 1. 2. 3. 4. 5. 6. 7. 8. 9. 10. 11. 12. 13. 14.
20055_20061108_UG_EasyTouch_35_touchscreen_remote 09-11-2006 10:22 Pagina 62 Touchscreen laat alleen de functies zien die u op een bepaald moment nodig hebt, bijvoorbeeld tijdens besturen van een A/V-apparaat. De ET35 heeft unieke functies, gecombineerd met een grote opslagcapaciteit, zoals: • • • • • • • • • • een ‘Macro’-optie, om meerdere commando’s onder één toets op te slaan: onder elk van de 9 Macro-knoppen kunnen tot maximaal 20 knopkeuzes worden opgeslagen.
20055_20061108_UG_EasyTouch_35_touchscreen_remote 09-11-2006 10:22 Pagina 63 4 Omschrijving van de ‘rubberen’ knopjes van de ET35 Active Source Indicator De Easytouch 35 zal bij elke toetsdruk in het touchscreen laten zien welke mode actief is op dat moment. Dit noemen we Active Source Indicator en zo kunt u zien in welke modus de afstandsbediening op dat moment staat.
20055_20061108_UG_EasyTouch_35_touchscreen_remote 09-11-2006 10:22 Pagina 64 13: Play In VCR-, DVD- of CD-modus: deze knop werkt net zoals die op uw eigen afstandsbediening. In TV-modus: gekleurde knop (geel), controle-, videotekst- of andere apparaatfuncties. 14: Stop In VCR-, DVD- of CD-modus: deze knop werkt net zoals die op uw eigen afstandsbediening. In TV-modus: gekleurde knop (groen), controle-, videotekst- of andere apparaatfuncties.
20055_20061108_UG_EasyTouch_35_touchscreen_remote 09-11-2006 10:22 Pagina 65 SCREEN: om heen en weer te schakelen tussen het eerste en tweede modusvenster. Pijltjestoetsen: navigatieknoppen voor het menu. MENU: geeft het menu weer. OK: bevestigt de menuselectie. EXIT: schakelt het menu uit. : Info-knop: geeft het programmakanaal, titelinformatie enzovoort weer. Andere handige Touchscreen-knoppen: : Teletext Mix: (TV, CBL & SAT) geeft zowel teletekst als het beeld van het geselecteerde kanaal weer.
20055_20061108_UG_EasyTouch_35_touchscreen_remote 5. 09-11-2006 10:22 Pagina 66 De slaaptimer van de tv is nu ingesteld. Zorg ervoor dat de afstandsbediening op de tv gericht blijft. Om de sleeptimer uit te zetten drukt u in TV-modus op de POWERknop of houdt u de SLEEP-knop ingedrukt totdat de afstandsbediening twee keer piept. 6 De Easytouch35 programmeren U kunt de EasyTouch35 op diverse manieren programmeren.
20055_20061108_UG_EasyTouch_35_touchscreen_remote 09-11-2006 10:22 Pagina 67 MERK CODE Philips/Radiola/Aristona/Erres 1 Sony/Panasonic/JVC/Sharp Akai/Toshiba/Daewoo 2 Thomson/Brandt 3 Telefunken/Saba/Nordmende 4 Grundig/Blaupunkt 5 Nokia/ ITT 6 8. Druk op de SEARCH-knop op het scherm. Op het scherm wordt nu het Search Setup Screen weergegeven. Druk herhaaldelijk op de UP-knop op het scherm (of POWER of PLAY) totdat het apparaat van kanaal verspringt.
20055_20061108_UG_EasyTouch_35_touchscreen_remote 09-11-2006 10:22 Pagina 68 apparaatcode in uit de codetabel. Het LED-lampje gaat uit en weer aan wanneer een geldige code is ingevoerd. Wordt een ongeldige code ingevoerd, dan knippert het LED-lampje drie keer. In beide gevallen wordt nu het Main Setup Screen weergegeven. 8. Druk op de EXIT-knop op het Touchscreen om terug te gaan naar normale weergave. 9. Richt de afstandsbediening op de tv en druk op de POWER-knop.
20055_20061108_UG_EasyTouch_35_touchscreen_remote 09-11-2006 10:22 Pagina 69 10. De code is nu ingevoerd. Druk op de EXIT-knop op het Touchscreen om terug te gaan naar normale weergave. Opmerkingen: a. Wanneer alle codes zijn doorzocht, knippert het LED-lampje om aan te geven dat de zoekactie is voltooid en wordt het Main Setup Screen weergegeven. b. De bovenstaande zoekprocedure gaat ervan uit dat u videocodes onder de VCR-knop opslaat, kabelcodes onder CBL enzovoort.
20055_20061108_UG_EasyTouch_35_touchscreen_remote 09-11-2006 10:22 Pagina 70 2. Druk op SETUP en wacht tot het LED-lampje gaat branden (na 2-3 seconden) en op het scherm het Main Setup Screen wordt weergegeven. 3. Laat de SETUP-knop los. 4. Druk op de MACRO-knop op het scherm. 5. Het Macro Setup Digit Screen wordt weergegeven. Druk op de cijfertoets waaronder u de macro wilt opslaan. 6. Het Macro Mode Setup Screen wordt weergegeven. De eerste knop onder een macro moet altijd een MODE-knop zijn.
20055_20061108_UG_EasyTouch_35_touchscreen_remote 09-11-2006 10:22 Pagina 71 2. Druk op SETUP en wacht tot het LED-lampje gaat branden (na 2-3 seconden) en op het scherm het Main Setup Screen wordt weergegeven. 3. Laat de SETUP-knop los. 4. Druk op MACRO (rubberen knop of knop op Touchscreen) en houd deze vast. Het Macro Delete Setup Screen wordt weergegeven. Alleen de ingestelde macro’s worden weergegeven. 5. Druk op het getal van de macro die u wilt verwijderen.
20055_20061108_UG_EasyTouch_35_touchscreen_remote 9. 09-11-2006 10:22 Pagina 72 Het Main Setup Screen wordt weer weergegeven. Het instellen van de kanaalwissel functie is nu voltooid. Druk op de EXIT-knop op het Touchscreen om terug te gaan naar normale weergave. 10. Om de kanaalwisselfunctie te activeren drukt u herhaaldelijk op de P
20055_20061108_UG_EasyTouch_35_touchscreen_remote 09-11-2006 10:22 Pagina 73 Tips over leren: • Gebruik altijd nieuwe batterijen voor de ET35 en de originele afstandsbediening. • Het is verstandig om vóórdat u de leerfuntie voor het eerst uitvoert, een Master Clear uit te voeren. U vindt de methode hieronder. • Leg de originele afstandsbediening in lijn met de onderzijde van de ET35 (zie afbeelding A op pag.
20055_20061108_UG_EasyTouch_35_touchscreen_remote 09-11-2006 10:22 Pagina 74 6. Op het scherm wordt nu het Learn Screen weergegeven. Dit scherm bevat de huidige knoppen voor de modus en de knoppen SETUP en LEARN. Druk op de knop (rubber of Touchscreen) op de ET35 afstandsbediening waaronder u de knop van uw originele afstandsbediening wilt leren. Met SCREEN kunt u instellen welke knoppen worden weergegeven. 7.
20055_20061108_UG_EasyTouch_35_touchscreen_remote 09-11-2006 10:22 Pagina 75 Voor het besturen van lampen en elektrische apparatuur hebt u extra Home Control modules nodig. Deze modules plugt u in in het stopcontact. U hebt geen extra bedrading nodig. Zie op www.marmitek.com voor meer informatie. Marmitek Home Control Modules HomeControl Om uw verlichting en apparaten te kunnen besturen heeft u naast TM13 de EasyTouch 35 ook Marmitek X-10 Home Control Modules nodig, die u in het stopcontact steekt.
20055_20061108_UG_EasyTouch_35_touchscreen_remote 09-11-2006 10:22 Pagina 76 12.1 De HuisCode voor Home Control wijzigen De vaste HuisCode is A. In de meeste gevallen hoeft u deze code niet te wijzigen, tenzij u last hebt van storing door signalen van andere Marmitek X-10-systemen. In dat geval: 1. Druk op de Marmitek X-10 Home Control-knop . 2. Druk op SETUP en houd deze knop ingedrukt totdat het LED-lampje continu brandt. 3. Laat SETUP los. 4. Druk nogmaals op SETUP. 5.
20055_20061108_UG_EasyTouch_35_touchscreen_remote 09-11-2006 10:22 Pagina 77 5. Op het scherm wordt nu het Mode Setup Screen weergegeven. Druk op de Marmitek X-10 Home Control-knop . 6. Op het scherm wordt nu het Code Setup Screen weergegeven. Voer 820 in. 7. Druk op de EXIT-knop op het Touchscreen om terug te gaan naar normale weergave. 13 EXTRA FUNCTIES 1. Activeer uw ET35-afstandsbediening door het scherm aan te raken. 2.
20055_20061108_UG_EasyTouch_35_touchscreen_remote 09-11-2006 10:22 Pagina 78 2. Druk op SETUP en houd de knop ingedrukt totdat het LED-lampje blijft branden en het Main Setup Screen wordt weergegeven. 3. Laat de SETUP-knop los. 4. Houd SETUP ongeveer 5 seconden ingedrukt totdat het LED-lampje gaat knipperen en uitgaat. 5. De instellingen zijn nu gereset. De afstandsbediening is in de normale TV-modus.
20055_20061108_UG_EasyTouch_35_touchscreen_remote 5. 09-11-2006 10:22 Pagina 79 Het standaardvolume voor de afstandsbediening is nu ingesteld. 14 Problemen oplossen De • • • • • • • afstandsbediening werkt niet of de codes worden niet opgeslagen. Controleer met uw oude afstandsbediening of de apparatuur goed werkt. Controleer dat u op de juiste modusknop hebt gedrukt voor het te besturen apparaat.
20055_20061108_UG_EasyTouch_35_touchscreen_remote 09-11-2006 10:22 Pagina 80 DECLARATION OF CONFORMITY Hereby, Marmitek BV, declares that this EASYTOUCH35™ is in compliance with the essential requirements and other relevant provisions of the following Directives: Directive 1999/5/EC of the European Parliament and of the Council of 9 March 1999 on radio equipment and telecommunications terminal equipment and the mutual recognition of their conformity Council Directive 89/336/EEC of 3 May 1989 on the appr