
User manual
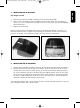
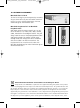


5. INSTALLING THE IR RECEIVER.
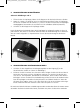
See images 3 and 4.
1. Open the IR receiver by sliding the battery lid on the back downwards.
2. Insert 2 AAA 1.5V batteries (not included) in the IR receiver. Make sure the polarity is
correct (+/-). This is indicated on the inside of the IR receiver. (Only use non-rechargeable
(alkaline) batteries.)
3. Replace the battery flap.
Because of the wireless technology the IR receiver can be placed wherever you want. It is
however important that it is within view and range of the remote control of the A/V device
you want to control. Check different positions to check which one works best.
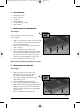
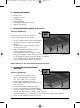
6. INSTALLING THE IR EXTENDER.
1.
Connect the IR extender included to the IN [F] on the side of the transmitter (see image 1)
.
2. Remove the protective layer of one of the IR LEDs. Place this IR LED on the IR screen of
the A/V device you want to control. Do not yet attach it permanently. Before pushing it
on, check whether the IR LED is working. Aim your original remote control at the screen
on the front of the separate IR receiver and select some channels. If the A/V device does
not react, it might be because the IR LED is not in the correct place. With some devices
the IR LED needs to be attached to a specific spot.
The second and third IR LEDs can be used to control a second and third A/V device. If you are
not using these IR LEDs, don’t remove them!
5INVISIBLE SCART 200™
ENGLISH
Image 4Image 3
20128_20060815_UG_scart200 26-09-2006 10:41 Pagina 5