EASY TOUCH PANEL 10™ USER MANUAL 1 GEBRAUCHSANLEITUNG 11 GUIDE UTILISATEUR 21 MODO DE EMPLEO 31 MANUALE D’ISTRUZIONE 41 GEBRUIKSAANWIJZING 51 20267/20080916 • EasyTouch Panel 10™ ALL RIGHTS RESERVED MARMITEK ©
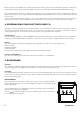
SELECT USING ADD NEW BUTTON? REMOVE BUTTON? REMOVE ALL? ARE YOU SURE? TOUCH BUTTON NOW BUTTON REMOVED BUTTON SIZE…> NO BUTTON FOUND CANCELLED LARGE (25X25MM) SMALL (15X15MM) HOUSE CODE: A HOUSE CODE: B - O QUIT NO CHANGES MACRO 4 MACRO 2 - 3 MACRO 1 <-MACRO, HOUSE-> SET FUNCTION UNIT 1 TOUCH SCREEN NOW UNIT 2 - 15 STORED TOUCH KEY:1 NOW MACRO STORED TOUCH KEY:2 NOW MACRO STORED TOUCH KEY:3 NOW MACRO STORED TOUCH KEY:4 NOW MACRO STORED BUTTON: ON TOUCH SCREEN NOW STORED BUT
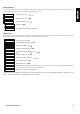
FACTORY RESET? CHANGE MEMORY? QUIT, NO CHANGES USE MEMORY 1? QUIT NO CHANGES < MEMORY 1 > CANCELLED USE MEMORY 2? < MEMORY 2 > ARE YOU SURE? YES ALL REMOVED MEDIUM (25X15MM) QUIT NO CHANGES CANCELLED YES NO QUIT NO CHANGES FACTORY RESET CANCELLED CANCELLED NO QUIT NO CHANGES CANCELLED CANCELLED QUIT NO CHANGES CANCELLED HOUSE CODE: P QUIT NO CHANGES CANCELLED UNIT 16 ALL LIGHTS ON ALL UNITS OFF DIM UP DIM DOWN QUIT NO CHANGES CANCELLED BUTTON: TOGGLE 20298_20090227
SAFETY WARNINGS • To prevent short circuits, this product should only be used inside and only in dry spaces. Do not expose the components to rain or moisture. Do not use the product close to a bath, swimming pool etc. • Do not expose the components of your systems to extremely high temperatures or bright light sources. • In case of improper usage or if you have altered and repaired the product yourself, all guarantees expire.
SIGNAL RANGE Range of Marmitek X-10 signals over the Power Line and how to increase the range. The Marmitek X-10 System is based on power line communication. The range of the Marmitek X-10 signals very much depends on the local circumstances. On average the range is a cable length of 80 meters. If you have difficulties with the range of your Marmitek X-10 signals, please pay attention to the following facts: 1.
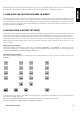
Marmitek products are manufactured with great care and are of the highest quality. Please read this manual carefully and follow the instructions to ensure you make the most of the opportunities offered by this product. 2. HOW DOES THE EASYTOUCH PANEL 10 WORK? The way the EasyTouch Panel 10 works can be compared to an X-10 remote control. With this product, however, instead of the fixed keys on a remote control, you can easily choose and define the position, size and role of each button yourself.
Below, there are three examples of so-called macro buttons. A macro carries out the commands of between 1 and 4 other buttons. By pressing on the macro button, bottom left, you can send A1 ON, A2 ON, A3 ON and A4 ON successively. The 2nd macro button will switch on modules A5 to A8 one by one. The 3rd macro will switch off modules A5 to A8 one by one. The button on the far right sends the ‘ALL UNITS OF’” command and all units on house code A will be switched off as a result.
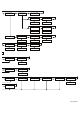
Deleting buttons If you wish to define your own configuration, you must first delete the existing buttons. In this way, you delete all the existing buttons in the active configuration (configuration 1 or 2): SELECT USING ‘>’ choose by pressing ‘ , , ’. REMOVE ALL? REMOVE ALL?, press ‘OK’ ARE YOU SURE? ARE YOU SURE?, press ‘ ’ YES YES, press ‘OK’ ALL REMOVED ALL BUTTONS HAVE BEEN DELETED. Add buttons You are free to choose the position, size and function of the buttons.
Adding macros It is also possible to define a button which will carry out the functions of between 1 and 4 other buttons. This is known as a macro function. You first programme the individual buttons. If you use the macro button once this has been programmed, the commands which you have selected under the programmed button will be carried out one by one.
6. PROGRAMMING SUMMARY Adding a macro button Adding a function button SELECT USING ‘>’ Make your choice SELECT USING ‘>’ Make your choice ADD NEW BUTTON? Add new button ADD NEW BUTTON? Add new button BUTTON SIZE... Button size BUTTON SIZE...
Delete a button Change memory SELECT USING ‘>’ Make your choice SELECT USING ‘>’ Make your choice REMOVE BUTTON? Delete button CHANGE MEMORY? Change memory? TOUCH BUTTON NOW Touch the button BUTTON REMOVED Button deleted USE MEMORY 1? < MEMORY 1 > USE MEMORY 2 < MEMORY 2 > Delete all buttons SELECT USING ‘>’ Make your choice REMOVE ALL? Delete all buttons? ARE YOU SURE? Are you sure? YES YES ALL REMOVED All buttons deleted NO NO CANCELLED Cancelled Use memory 1 Memory 1 is in us
7. FREQUENTLY ASKED QUESTIONS What is the reason for modules to switch on/off spontaneously? It is possible that a Marmitek X-10 System is installed at one of your neighbours using the same House Code. To solve this problem try to change the House Code of your system, or have FD10 Phase Coupler/Filter installed at your incoming mains. My modules will not respond to my controller. Make sure that the House Code on all Modules and Controllers are set to the same House Code (A .. P).
8.
SICHERHEITSHINWEISE • Um Kurzschluss vorzubeugen, dieses Produkt bitte ausschließlich innerhalb des Hauses und nur in trockenen Räumen nutzen. Setzen Sie die Komponenten nicht Regen oder Feuchtigkeit aus. Nicht neben oder nahe eines Bades, Schwimmbades usw. verwenden. • Setzen Sie die Komponente Ihres Systems nicht extrem hohen Temperaturen oder starken Lichtquellen aus.
ADRESSIERUNG Sie können maximal bis zu 256 verschiedene Adressen einstellen. Diese sind aufgegliedert in einen so genannten HausCode (A bis einschl. P) und einen UnitCode (1 bis einschl. 16). Der HausCode kann auch an den Reglern eingestellt werden, sodass Regler und Module zum selben System gehören werden. Die Adresse kann mithilfe von Kodierscheiben oder durch Tastenbedienung eingestellt werden. Dies hängt vom Modultyp ab.
1. EINFÜHRUNG Herzlichen Glückwunsch zum Erwerb des Marmitek EasyTouch Panel 10! Diese Touchscreen Bedienungseinheit ermöglicht es Ihnen, Ihre gesamten Marmitek X-10 Module einfach zu bedienen. Mit dem mitgelieferten Hintergrund können Sie direkt die regulären Funktionen Ihres EasyTouch Panel 10 ausprobieren. Sie können den Hintergrund ganz nach Belieben mit jeder willkürlichen Abbildung auswechseln. Daraufhin können Sie die Einheit sowohl in als an der Wand befestigen.
Wenn Sie auf die erste Taste drücken, so wird also die Adresse A1 EIN, versendet werden. Alle bei dieser Adresse (A1) angemeldeten Geräte und Lampen werden also EINgeschaltet werden. Und so weiter. Mit der BRIGHT und DIM- Taste können Sie die zuletzt bediente Lampe dimmen oder heller einstellen. Achtung: Selbstverständlich nur, wenn eine Lampe (Beleuchtungsmodul) auf dieser Adresse installiert ist. Unten in der Abbildung sehen Sie 3 Beispiele so genannter Makro Drucktasten.