IPTV Coax Pro PTV Coax Pro ™ USER MANUAL 3 GEBRAUCHSANLEITUNG 13 GUIDE UTILISATEUR 23 MODO DE EMPLEO 33 MANUALE D’ISTRUZIONI 43 GEBRUIKSAANWIJZING 53 20584/ 20131021 • IPTV Coax Pro ™ ALL RIGHTS RESERVED MARMITEK ©
x x x x x x To prevent short circuits, this product should only be used inside and only in dry spaces. Do not expose the components to rain or moisture. Do not use the product close to a bath, swimming pool etc. Do not expose the components of your systems to extremely high temperatures or bright light sources. In case of improper usage or if you have altered and repaired the product yourself, all guarantees expire.
3. OPERATION Position the IPTV Coax Pro™ 1P-node where your internet and coaxial cable enters the house. The 1P-node combines the two signals and distributes them across your entire coaxial network. Position an IPTV Coax Pro™ 4P-node at the location where you require a network connection to connect your devices to the internet/IP. This allows you to easily add an internet signal to your existing coaxial network, while maintaining your coaxial signals.
Within your coaxial network you may encounter two types of connectors, the F-connector and the IEC-connector. F-connector IEC-connector Older systems generally still use IEC-connectors, while newer installations use F-connectors. The use of F-connectors within your coaxial network is recommended because of the quality of the connection. Compared to an IEC connector, the F-connector has lower signal loss. To avoid/reduce signal loss, IPTV Coax Pro™ nodes use an F-connector socket.
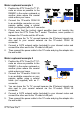
4. INSTALLATION When installing the IPTV Coax Pro™ nodes, use as few splitters, connectors, converters, amplifiers and other connections as possible. Each component that is added to the coaxial network will weaken the coaxial signals to some extent. 4.3 Connecting the 1P-node (in the meter cupboard) With the exception of the built-in 4-port Ethernet Switch, there are no technical differences between the IPTV Coax Pro™ 1P-node and the 4Pnode.
1. 2. 3. 4. 5. 6. Position the IPTV Coax Pro™ 1Pnode as close as possible to the DMARC in the meter cupboard or another place where the coaxial cable enters your home. Connect the 1P-node's COAX IN to an available connector on your passive splitter using a coaxial cable (not supplied) with an F-connector. Please note that the (active) signal amplifier does not transfer the signal from the IPTV Coax Pro™ nodes. Therefore, never position it between the 1P-node and the 4P-node.
TIP: After installation, use a spanner to check if the F-connectors are sufficiently tightened until finger tight. 4.4 Connecting the 4P-node (living room) Now create a network connection (IP/internet) on your existing coaxial network in a room that has a coaxial connection. This may be a wall outlet, splitter, or the end of a coaxial cable. 1. 2. 3. 4. 5. Disconnect your TV’s (or other device’s) coaxial cable from the existing coaxial connection.
To verify correct installation, a number of checks need to be performed on both the 1P-node and the 4P-node. 1. 2. 3. 4. Check that the POWER lamp is lit, indicating the node is powered. Check that the LINK light is lit, indicating the 1P-node is connected correctly to the 4P-node. Check that the SIGNAL QUALITY light turns green, indicating the signal quality between the 1P-node and the 4P-node is very good.
5. FREQUENTLY ASKED QUESTIONS Link and Signal Quality lights are not lit The IPTV Coax Pro™ node is unable to make a proper connection with another node on the coaxial network. x Make sure the POWER light is lit on all IPTV Coax Pro™ nodes. x The signal between the two IPTV Coax Pro™ nodes may be too weak to establish a connection. This may be caused by bad connections or poor quality jacks (splitters, cables, connectors). Use high-quality Fconnector jacks, cables and splitters wherever possible.
IPTV Coax Pro™ node Power adapter: Range: Coaxial input: Coaxial output: RF output level: Status indication: Dimensions: 100~240VAC@50/60Hz, 5VDC 2A max.
7. OPTIONALLY AVAILABLE Additional IPTV Coax Pro™ 4P-node (art. nr. 08185 / 08186) Use your coaxial network to create additional network connections (IP/internet) in multiple rooms of the house (living room, bedroom, office, loft). You can connect up to 16 additional 4P-nodes to your coaxial network. Please refer to the Additional 4P-node's datasheet at www.marmitek.
x x x x x x Um Kurzschluss vorzubeugen, dieses Produkt bitte ausschließlich innerhalb des Hauses und nur in trockenen Räumen nutzen. Setzen Sie die Komponenten nicht Regen oder Feuchtigkeit aus. Nicht neben oder nahe eines Bades, Schwimmbades usw. verwenden. Setzen Sie die Komponente Ihres Systems nicht extrem hohen Temperaturen oder starken Lichtquellen aus. Bei einer zweckwidrigen Verwendung, selbst angebrachten Veränderungen oder selbst ausgeführten Reparaturen verfallen alle Garantiebestimmungen.
2. INHALT 1 x IPTV Coax Pro™ 1P-Knoten (mit 1 Ethernet Anschluss) 1 x IPTV Coax Pro™ 4P-Knoten (mit 4 Ethernet Anschlüssen) 2 x RJ45 Netzwerkkabel CAT5 4 x F-Anschluss für Koaxialkabel 1 x Adapter F-Anschluss mit IEC-Stecker, male 1 x Adapter F-Anschluss mit IEC-Stecker, female 1 x LPF-1000 Koaxialfilter 3. ARBEITSWEISE Installieren Sie den IPTV Coax Pro™ 1P-Knoten dort, wo Ihr Internet und Koaxialkabel ins Haus gelangen.
4. VORBEREITUNG 4.1 F-Steckeranschlüsse Sie können innerhalb Ihres Koaxialnetzwerks begegnen: der F- und der IEC-Steckverbindung . 2 Verbindungsarten F-Steckverbindung IEC-Steckverbindung Ältere Geräte nutzen im Allgemeinen noch IEC Steckverbindungen und neuere F-Steckverbindungen. Aufgrund der Qualität der Verbindung wird die Verwendung von F-Steckverbindungen für Ihr Koaxialnetzwerk empfohlen. Der Signalverlust der F-Steckverbindung ist im Vergleich zu einer IEC Steckverbindung geringer.
4. INSTALLATION Verwenden Sie für die Installation der IPTV Coax Pro Knoten möglichst wenig Splitter, Anschlüsse, Umformer, Verstärker und andere Anschlüsse. Jedes an das Koaxialnetzwerk hinzugefügte Teil wird die Koaxialsignale in bestimmtem Maße abschwächen. 4.3 1P-Knoten anschließen (im Zählerschrank) Der IPTV Coax Pro™ 1P-Knoten und 4P-Knoten unterscheidet sich bis auf den eingebauten 4-Port Ethernet nicht voneinander.
1. 2. 3. 4. 5. 6. Legen sie den IPTV Coax Pro™ 1P-Knoten möglichst nahe am Anschlusspunkt (APL) im Zählerschrank oder an dem Ort, an dem Ihr Koaxialkabel in die Wohnung gelangt, an. Schließen Sie COAX IN des 1PKnoten mit einem Koaxialkabel mit F-Steckverbindung (nicht enthalten) an einen noch freien Anschluss Ihres passives Splitters an. Achtung: der (aktive) Signalverstärker leitet das Signal der IPTV Coax Pro™ Knoten nicht weiter. Legen Sie diese also niemals zwischen dem 1P und dem 4P Knoten an.
5. Schließen Sie daraufhin das Speisungskabel an den IP Knoten an und stecken Sie den Adapter in die Steckdose. Tipp: Überprüfen Sie nach der Installation mithilfe eines Gabelschlüssels, ob die F-Steckverbindungen gut festgedreht sind. 4.4 Den 4P-Knoten anschließen (Wohnzimmer) Gestalten Sie jetzt einen Netzwerkanschluss (IP/ Internet) an Ihrem vorhandenen Koaxialnetzwerk in einem Raum, der über einen Koaxialanschluss verfügt.
4.5 Überprüfung der Installation 1. 2. 3. 4. Überprüfen Sie, ob die POWER Leuchte aufleuchtet, der Knoten also Strom bekommt. Überprüfen Sie, ob die LINK Leuchte aufleuchtet, also ob der 1P Knoten richtig mit dem 4P Knoten verbunden ist. Überprüfen Sie, ob die SIGNAL QUALITY Leuchte grün aufleuchtet: Die Signalqualität zwischen dem 1P und dem 4P Knoten ist ausgezeichnet. Überprüfen Sie, ob die LAN Leuchte aufleuchtet oder blinkt.
5. HÄUFIG GESTELLTE FRAGEN Link und Signal Quality Lämpchen leuchten nicht. Der IPTV Coax Pro™ Knoten kann keine gute Verbindung mit einem anderen Knoten im Koaxialnetzwerk herstellen. x Überprüfen Sie, ob an allen IPTV Coax Pro™ Knoten die POWER Lämpchen leuchten. x Möglicherweise ist das Signal zwischen den zwei IPTV Coax Pro™ Knoten zu schwach, um eine Verbindung herzustellen. Möglicherweise sind Verbindungen schlecht oder sind Anschlüsse (Splitter, Kabel, Anschlüsse) von schlechter Qualität.
IPTV Coax Pro™ Knoten Speisungsadapter: Reichweite: Koaxialeingang: Koaxialausgang: RF Ausgangsniveau: Statusanzeige: Maße: 100~240VAC@50/60Hz, 5VDC 2A Max.
7. OPTIONAL ERHÄLTLICH Zusätzlicher IPTV Coax Pro™ 4P-Knoten (Art.-Nr. 08185 / 08186) Schaffen sie an mehreren Stellen im Haus (Wohnzimmer, Schlafzimmer, Arbeitszimmer, Dachkammer) zusätzliche Netzwerkanschlüsse (IP/Internet) über Ihr Koaxialnetzwerk. Sie können bis zu maximal 16 zusätzliche 4P-Knoten an Ihr Koaxialnetzwerk anschließen. Sehen Sie das Datenblatt des Extra-4P-Knoten unter www.marmitek.com.
x x x x x x Afin d'éviter un court-circuit, ce produit ne doit être utilisé qu'à l'intérieur et uniquement dans des endroits secs. Ne pas exposer les composants à la pluie ou à l'humidité. Ne pas utiliser à côté ou à proximité d'une baignoire, piscine, etc. Ne pas exposer les composants de votre système à des températures extrêmement élevées ou à des sources de lumière trop fortes.
2. CONTENU 1 x nœud 1P IPTV Coax Pro™ (avec 1 port Ethernet) 1 x nœud 4P IPTV Coax Pro™ (avec 4 ports Ethernet) 2 x câble de réseau CAT5 RJ45 4 x Connecteur F pour câble coaxial 1 x Adaptateur de connecteur F vers IEC mâle 1 x Adaptateur de connecteur F vers IEC femelle 1 x Filtre coaxial LPF-1000 3. FONCTIONNEMENT Installez le nœud 1P IPTV Coax Pro™ à l'endroit où internet et le câble coaxial pénètrent dans votre domicile. Il réunit les deux signaux et les distribue sur l'ensemble de votre réseau coaxial.
4. PRÉPARATION La pièce dans laquelle vous souhaitez créer une connexion de réseau (IP/internet) doit disposer d'une prise coaxiale. Cela peut être une prise de courant murale, un répartiteur ou l'extrémité d'un câble coaxial. Assurezvous que cette prise coaxiale ait une bonne réception du signal de télévision analogue et/ou numérique. Si cela n'est pas le cas, cela peut provoquer une mauvaise connexion entre les deux nœuds IPTV Coax Pro™. 4.
4. INSTALLATION Lors de l'installation des nœuds IPTV coaxiale Pro™ utilisez le moins possible de répartiteurs, de connecteurs, de convertisseur, d'amplificateur et autres fiches de connexion. Chaque élément qui est ajouté au réseau coaxial atténuera dans une certaine mesure les signaux coaxiaux. 4.3 Connexion du nœud 1P (dans le placard à compteurs) A l'exception du Commutateur 4 ports Ethernet intégré il n'y a aucune différence technique entre le nœud 1P et le nœud 4P IPTV Coax Pro™.
1. 2. 3. 4. 5. 6. Installez le nœud 1P IPTV Coax Pro™ le plus près possible du Point de Raccordement du Réseau dans le placard à compteurs ou à l'endroit où le câble coaxial pénètre dans votre domicile. Connectez la COAX IN (entrée coaxiale) du nœud 1P à une prise de connexion sur votre répartiteur passif qui est encore vacante avec un câble coaxial (non fourni) doté d'un connecteur F. Attention, l'amplificateur de signal (actif) ne transmet pas le signal des nœuds IPTV Coax Pro™.
5. Connectez ensuite le câble d'alimentation au nœud 1P et branchez l'adaptateur dans la prise de courant. CONSEIL : Après l'installation vérifiez avec une clé plate si les connecteurs F sont bien serrés (à la main). 4.4 Connexion du nœud 4P (Séjour) Créez maintenant une connexion de réseau (IP/ Internet) sur votre réseau coaxial existant dans une pièce qui dispose d'une connexion coaxiale. Cela peut être une prise de courant murale, un répartiteur ou l'extrémité d'un câble coaxial. 1. 2. 3. 4. 5.
4.5 Contrôle de l'installation 1. 2. 3. 4. Vérifiez si le témoin POWER (alimentation) s'allume ; le nœud est sous tension. Vérifiez si le témoin LINK (lien) s'allume ; le nœud 1p est relié correctement au nœud 4P. Vérifiez si le témoin SIGNAL QUALITY (qualité de signal) s'allume en vert ; la qualité de signal entre le nœud 1p et le nœud 4P est excellente.
5. FOIRE AUX QUESTIONS Les témoins Link et Signal Quality ne s'allument pas Le nœud IPTV Coax Pro™ ne peut pas établir une bonne connexion avec un autre nœud sur le réseau coaxial. x Vérifiez sur tous les nœuds IPTV Coax Pro™ que le témoin POWER soit bien allumé. x Il se peut que le signal entre les deux nœuds IPTV Coax Pro™ soit trop faible pour établir une connexion.
Nœud IPTV Coax Pro™ Adaptateur secteur : Portée : Entrée coaxiale : Sortie coaxiale : Niveau de sortie RF : Témoins de statut : Dimensions : 100~240VAC@50/60Hz, 5VDC 2A max.
7. DISPONIBLE EN OPTION Nœud 4P Supplémentaire IPTV Coax Pro™ (Réf. 08185 / 08186) Créez à plusieurs endroits dans votre domicile (séjour, chambre à coucher, bureau, grenier) des connexions de réseau (IP/internet) supplémentaires par le biais de votre réseau coaxial. Vous pouvez connecter à votre réseau coaxial au maximum 16 nœuds 4P supplémentaires. Voir la fiche technique du nœud 4P Supplémentaire sur le site internet www.marmitek.
AVISOS DE SEGURIDAD x x x x x Para evitar un cortocircuito, este producto solamente se usa en casa y en habitaciones secas. No exponga los componentes del sistema a la lluvia o a la humedad. No se use cerca de una bañera, una piscina, etc. No exponga los componentes del sistema a temperaturas extremamente altas o a focos de luz fuertes. En caso de uso indebido o modificaciones y reparaciones montados por su mismo, la garantía se caducará.
3. FUNCIONAMIENTO Coloca el IPTV Coax Pro™ 1P-node en el lugar donde el internet y el cable coaxial entran la casa. El aparato empalma las dos señales y las distribuye por la red coaxial entera. Coloca un IPTV Coax Pro™ 4P-node en el lugar en lo que desea establecer una conexión de red para conectar los dispositivos al internet/IP. De esta manera establece fácilmente una señal internet adicional a la red coaxial presente.
4.2 Conexiones con conector F En la red coaxial pueden existir dos tipos de conexiones: el conector F y el conector IEC. Conector IEC Las instalaciones más viejas normalmente usan los conectores IEC, las más modernas suelen emplear conectores F. Se recomienda el empleo de conectores F para las redes coaxiales porque garantizan una calidad de conexión más alta. En comparación con el conector IEC el conector F conoce una pérdida de señal inferior.
4. INSTALACIÓN Para la instalación de los nodos IPTV Coax Pro™ se recomienda usar pocos splitters, conectores, adaptadores, amplificadores y otras conexiones. Cada elemento incorporado en la red debilita las señales coaxiales. 4.3 Conectar el 1P-node (dentro de la caja del contador) Con excepción del Switch Ethernet de 4 puertos no hay diferencia técnica entre el IPTV Coax Pro™ 1P-node y el 4P-node.
Caja de contador ejemplo 1 1. 2. 3. 4. 5. 6. Coloca el IPTV Coax Pro™ 1Pnode cerca del punto en lo que el cable coaxial y la conexión de internet llegan al hogar (dentro de la caja de contador o en otro sitio de la casa). Conecta la entrada COAX IN del 1P-node a un conector libre del splitter pasivo usando un cable coaxial (no suministrado) con conector F. Atención, el amplificador de señal (activo) no transmite la señal de los nodos IPTV Coax Pro™.
4.4 Conectar el 4P-node (en la sala de estar) Crea una conexión de red (IP/ internet) con la red coaxial establecida en una habitación que dispone de una conexión coaxial como un enchufe, un splitter o el extremo de un cable coaxial. 1. 2. 3. 4. 5. Quita el cable coaxial del televisor (o de otro dispositivo) de la conexión coaxial establecida. Coloca un cable coaxial con conector F (no suministrado) en el conector libre y conéctalo a la entrada COAX IN del 4P-node.
4.5 Controlar la instalación Para comprobar si la instalación se ha realizado correctamente, ha de controlar algunos puntos del 1P-node tanto como del 4P-node. 1. 2. 3. 4. Controla si la luz de indicación POWER resplandece para comprobar si el nodo está conectado a la alimentación eléctrica. Controla si la luz de indicación LINK resplandece para comprobar si el 1P-node está conectado correctamente al 4P-node.
5. PREGUNTAS FRECUENTES Las luces de indicación LINK y SIGNAL QUALITY están apagadas El nodo IPTV Coax Pro™ no puede establecer una buena conexión con otro nodo en la red coaxial. x Controla si la luz de indicación de POWER esté encendida en todos los nodos IPTV Coax Pro™. x Posiblemente la señal entre los dos nodos IPTV Coax Pro™ esté demasiado débil para establecer una conexión. Esto puede ser causado por conexiones o conectores (splitters, cables etc.) de mala calidad.
6. DATOS TÉCNICOS Nodo IPTV Coax Pro™ Adaptador de alimentación:100~240VAC@50/60Hz, 5VDC 2A Alcance: 100m como máx.
7. OPCIONALMENTE ASEQUIBLE Nodo IPTV Coax Pro™ 4P adicional (Artnr. 08185 / 08186) Crea conexiones de red adicionales (IP/internet) en varios lugares de la casa (sala de star, dormitorio, desván) incorporados en la red coaxial establecida. Puede conectar hasta 16 nodos 4P adicionales a la red coaxial. Vea el folleto técnico del 4P-node adicional en www.marmitek.
PRECAUZIONI DI SICUREZZA x x x x x x Per evitare il pericolo di cortocircuito utilizzare questo prodotto esclusivamente al coperto e in luoghi asciutti. Non esporre i componenti di questo prodotto a pioggia o umidità. Non utilizzare vicino alla vasca da bagno, piscina, ecc. Non esporre i componenti del sistema a temperature eccessivamente alte o a fonti intense di luce. In caso di utilizzo scorretto, di riparazioni o modifiche apportate personalmente decade qualsiasi garanzia.
3. FUNZIONAMENTO Installare il nodo 1P IPTV Coax Pro™ dove il cavo internet e il cavo coassiale entrano la casa, per unire i due segnali e distribuirli su tutta la rete coassiale. Installare un nodo 4P IPTV Coax Pro™ nella posizione in cui si desidera avere una connessione di rete per collegare vari dispositivi all’internet / IP. In tal modo è facile aggiungere un segnale di Internet alla rete coassiale esistente, pur mantenendo i segnali coassiali.
4.2 Connessioni connettore F Ci sono possibili due tipi di collegamento nella vostra rete coassiale; il connettore F e il connettore IEC. connettore F connettore IEC In generale gli impianti più vecchi sono dotati di connettori IEC, mentre quelli più recenti di connettori F. Per la qualità del collegamento si consiglia l’uso dei connettori F nella rete coassiale. Il connettore F ha una ridotta perdita del signale a paragone del connettore IEC.
4. INSTALLAZIONE Per l’installazione dei nodi IPTV Coax Pro™ applicare il meno possibile splitter, connettori, convertitori, amplificatori e altre connessioni. Ogni parte che è aggiunta alla rete coassiale, indebolisce in una certa misura i segnali coassiali. 4.3 Collegamento del nodo 1P (nell’armadietto dei contatori) Ad eccezione dell’Ethernet Switch a 4 porte non esiste nessuna differenza tecnica tra il nodo 1P IPTV Coax Pro™ e nodo 4P IPTV Coax Pro™.
Armadietto dei contatori, esempio 1 1. 2. 3. 4. 5. 6. Installare il nodo 1P IPTV Coax Pro™ il più vicino possibile presso il punto di entrata internet nell’armadietto dei contatori o in un altro luogo dove il cavo coassiale entra la casa. Collegare il COAX IN del nodo 1P ad una connessione non utilizzata sullo splitter passivo, tramite un cavo coassiale (non fornito) con connettore F. Attenzione: l’amplificatore del segnale (attivo) non trasferisce il segnale dei nodi IPTV Coax Pro™.
CONSIGLIO: dopo l’installazione controllare se i connettori F sono ben avvitati (a mano) tramite una chiave fissa. 4.4 Collegamento del nodo 4P (soggiorno) Adesso si può creare una connessione di rete (IP / internet) alla rete coassiale esistente in una stanza dotata di una connessione coassiale. Può essere una presa di corrente, uno splitter o l’estremità di un cavo caossiale. 1. 2. 3. 4. 5. Scollegare il cavo coassiale dal televisore (o altro dispositivo) dalla connessione coassiale esistente.
4.5 Controllo dell’impianto Per verificare se l’installazione è stata eseguita correttamente, si deve controllare sia sul nodo 1P che sul nodo 4P i seguenti punti. 1. 2. 3. 4. Controllare se si illumina la spia POWER, il nodo è alimentato. Controllare se si illumina la spia LINK, il nodo 1P è correttamente collegato al nodo 4P. Controllare se si illumina di verde la spia SIGNAL QUALITY, la qualità del segnale tra il nodo 1P e il nodo 4P è eccellente.
5. DOMANDE FREQUENTI Non si illuminano le spie Link e Signal Quality Il nodo IPTV Coax Pro™ non è in grado di fare una buona connessione ad un altro nodo sulla rete coassiale. x Controllare se su tutti i nodi IPTV Coax Pro™ è accesa la spia POWER. x Forse il segnale tra i due nodi IPTV Coax Pro™ è troppo debole per realizzare una connessione a causa di connessioni o collegamenti difettosi (splitter, cavi, prese) di qualità cattica.
6. DATI TECNICI Nodo IPTV Coax Pro™ Adattatore d’alimentazione:100~240VCA@50/60Hz, 5VCC 2A Portata: max.
7. DISPONIBILE OPZIONALMENTE Nodo 4P IPTV Coax Pro™ addizionale (no. art. 08185 / 08186) Per creare ulteriori connessioni (IP / internet) in più luoghi nella casa (soggiorno, camera da letto, camera di lavoro, mansarda) via la rete coassiale. È possibile collegare alla vostra rete coassiale fino a 16 nodi 4P addizionali. Vedere il foglio dati del nodo 4P addizionale sul sito web www.marmitek.com.
VEILIGHEIDSWAARSCHUWINGEN x x x x x x Om kortsluiting te voorkomen, dient dit product uitsluitend binnenshuis gebruikt te worden, en alleen in droge ruimten. Stel de componenten niet bloot aan regen of vocht. Niet naast of vlakbij een bad, zwembad, etc. gebruiken. Stel de componenten van uw systeem niet bloot aan extreem hoge temperaturen of sterke lichtbronnen. Bij oneigenlijk gebruik, zelf aangebrachte veranderingen of reparaties, komen alle garantiebepalingen te vervallen.
3. WERKING Plaats de IPTV Coax Pro™ 1P-node waar uw internet en coaxkabel de woning binnenkomen. Deze voegt beide signalen samen en distribueert deze over uw gehele coaxnetwerk. Plaats een IPTV Coax Pro™ 4P-node op de plaats waar u wilt beschikken over een netwerkaansluiting om uw apparaten met internet/IP te kunnen verbinden. Op deze manier kunt u eenvoudig met behoud van uw coaxsignalen een internet signaal toevoegen aan uw bestaande coaxnetwerk.
4.2 F-connector aansluitingen Binnen uw coaxnetwerk kunt 2 soorten verbindingen tegen komen; de Fconnector en de IEC-connector. F-connector IEC-connector Oudere installaties maken over het algemeen nog gebruik van IEC aansluitingen en nieuwere installaties van F-connectoren. Het gebruik van F-connectoren binnen uw coaxnetwerk wordt aanbevolen vanwege de kwaliteit van de verbinding. De F-connector heeft een lager signaal verlies in vergelijking met een IEC-connector.
4. INSTALLATIE Gebruik bij installatie van de IPTV Coax Pro™ nodes zo min mogelijk splitters, connectors, converters, versterkers en andere aansluitingen. Ieder onderdeel wat toegevoegd wordt aan het coaxnetwerk zal in bepaalde mate de coaxsignalen verzwakken. 4.3 Aansluiten van de 1P-node (in de meterkast) Met uitzondering van de ingebouwde 4-poort Ethernet Switch is er geen technisch verschil tussen de IPTV Coax Pro™ 1P-node en 4P-node.
Meterkast voorbeeld 1 1. 2. 3. 4. 5. 6. Plaats de IPTV Coax Pro™ 1Pnode zo dicht mogelijk bij het AOP in de meterkast of andere plaats waar de coaxkabel uw woning binnenkomt. Sluit de COAX IN van de 1P-node aan op een aansluiting die nog vrij is op uw passieve splitter doormiddel van een coaxkabel(niet meegeleverd) met F-Connector. Let op, de (actieve) signaalversterker geeft het signaal van de IPTV Coax Pro™ nodes niet door. Plaats deze dus nooit tussen de 1P-node en 4P-node in.
TIP: Controleer na installatie of de F-connectoren goed aangedraaid zijn met behulp van een steeksleutel (handvast). 4.4 Aansluiten van de 4P-node (Huiskamer) Creëer nu een netwerkaansluiting (IP/ internet) op uw bestaande coaxnetwerk in een ruimte die beschikt over een coaxaansluiting. Dit kan een wandcontactdoos, spitter of einde van een coaxkabel zijn. 1. 2. 3. 4. 5. Maak de coaxkabel van uw TV (of ander apparaat) los van de bestaande coaxaansluiting.
4.5 Controle van de installatie Om te controleren of u de installatie juist heeft uitgevoerd dient op zowel de 1P-node als de 4P-node een aantal punten te controleren. 1. 2. 3. 4. Controleer of het POWER lampje oplicht, de node is van stroom voorzien. Controleer of het LINK lampje oplicht, de 1P-node is op de juiste manier verbonden met de 4P-node. Controleer of SIGNAL QUALITY lampje groen oplicht, de signaalkwaliteit tussen de 1P-node en 4P-node is zeer goed.
5. VEEL GESTELDE VRAGEN Link en Signal Quality lampjes branden niet De IPTV Coax Pro™ node is kan geen goede verbinding maken met een andere node op het coaxnetwerk. x Controleer of op alle IPTV Coax Pro™ nodes het POWER lampje brandt. x Mogelijk is het signaal tussen de twee IPTV Coax Pro™ nodes te zwak om een verbinding tot stand te kunnen brengen. Dat kan veroorzaakt worden door slecht verbindingen of aansluitingen (splitters, kabels, aansluitingen) van een slechte kwaliteit.
6. TECHNISCHE GEGEVENS IPTV Coax Pro™ node Voedingsadapter: Bereik: Coax ingang: Coax uitgang: RF uitgangsniveau: Status indicatie: Afmetingen: 100~240VAC@50/60Hz, 5VDC 2A max.
7. OPTIONEEL VERKRIJGBAAR Extra IPTV Coax Pro™ 4P-node (Artnr. 08185 / 08186) Creëer op meerdere plaatsen in huis (woonkamer, slaapkamer, werkkamer, zolder) via uw coaxnetwerk extra netwerkaansluitingen (IP/internet). U kunt tot maximaal 16 extra 4P-nodes op uw coaxnetwerk aansluiten. Zie datasheet van de Extra 4P-node op www.marmitek.
IPTV Coax Pro™ 63
DECLARATION OF CONFORMITY Hereby, Marmitek BV, declares that this IPTV Coax Pro™ is in compliance with the essential requirements and other relevant provisions of the following Directives: Directive 2004/108/ec of the european parliament and of the council of 15 December 2004 on the approximation of the laws of the Member States relating to electromagnetic compatibility Directive 2006/95/EC of the European Parliament and of the Council of 12 December 2006 on the harmonisation of the laws of Member States re
Marmitek BV declara que este IPTV Coax Pro™ cumple con las exigencias esenciales y con las demás reglas relevantes de la directriz: Directiva 2004/108/ce del parlamento europeo y del consejo de 15 de diciembre de 2004 relativa a la aproximación de las legislaciones de los Estados miembros en materia de compatibilidad electromagnética Directiva 2006/95/CE del Parlamento Europeo y del Consejo de 12 de diciembre de 2006 relativa a la aproximación de las legislaciones de los Estados miembros sobre el material e
© MARMITEK
IPTV Coax Pro™ 67