® MCD-KIT7 OWNER’S MANUAL Mobile Video System • Digital Audio Out-Coaxial • Multi-subtitle Languages Function • Multi-audio Languages Function • Multi-angle Function • Parental Control • Remote Control • Multi Color TFT Monitor 022492 022477
Use Authorized Service Centers Do not attempt to disassemble or adjust this precision product. Please refer to the Service Center list included with this product for service assistance. Features Compatible with PAL DVD (Video CD) and NTSC DVD (Video CD) This player can play discs recorded in either PAL or NTSC format. For Installation The unit should be installed in a horizontal position with the front end up at a convenient angle, but not more than 30˚.
CONTENTS Safety Information ......................................................................................................4 Disc Notes ..................................................................................................................5 The Player ..................................................................................................................6 Front View..............................................................................................................
SAFETY INFORMATION CAUTION: Region Management Information MOBILE DVD PLAYER IS A CLASS I LASER PRODUCT. HOWEVER THIS MOBILE DVD PLAYER USES A VISIBLE/INVISIBLE LASER BEAM WHICH COULD CAUSE HAZARDOUS RADIATION EXPOSURE IF DIRECTED. BE SURE TO OPERATE THE MOBILE DVD PLAYER CORRECTLY AS INSTRUCTED. USE OF CONTROLS OR ADJUSTMENTS OR PERFORMANCE OF PROCEDURES OTHER THAN THOSE SPECIFIED HEREIN MAY RESULT IN HAZARDOUS RADIATION EXPOSURE. DO NOT OPEN COVERS AND - DO NOT REPAIR YOURSELF.
DISC NOTES in the usage environment. Note these scratches are not an indication of any problem with the player.
THE PLAYER FRONT VIEW 1 18 1. 2. 3. 4. 5. 6. 7. 8. 9. 10. 11. 6 19 Power ( ) EJECT( ) SETUP AUDIO SOURCE Disc Slot PLAY/PAUSE ( STOP ( ) PREVIOUS( ) NEXT( ) VOLUME 20 4 7 11 8 12 10 14 2 5 15 16 17 3 22 12. 13. 14. 15. 16. 17. 18. 19. 20. 21. 22. ) 9 21 VOLUME / , / cursor buttons ENTER Indicator Light for DVD Indicator Light for AV INPUT 1 Indicator Light for AV INPUT 2 VIDEO IN 1 AUDIO IN 1 L AUDIO IN 1 R IR Reset button BACK VIEW 23 23. 24. 25. 26. 27.
INSTALLATION This unit is designed for home-use and car-use. When installed on the car, please follow the installation instruction below. SCREW M5x25 SCREWS LOCKED THE UNIT CORE SCREW M4x5 SCREW M4x5 3 1 3 2 1 4 2 Note: 1. First remove the two screws that locket the unit core, then attach the brackets on both sides of unit with screws (M4x5), last install the unit with screws (M5x25). 2. When fix the unit, you can slide the screw (M5x25) to left side or right side to meet your needed position.
ELECTRICAL CONNECTION DVD PLAYER DC 12V IN INPUT OUTPUT A/V 2 INPUT REMOTE VIDEO L/R DIGITAL AUDIO A/V OUTPUT VIDEO 1 L/R VIDEO 2 YELLOW VIDEO 2 OUT (OPTIONAL) YELLOW VIDEO 1 OUT AC/DC ADAPTOR RED AUDIO R OUT (OPTIONAL) WHITE AUDIO L OUT (OPTIONAL) DIGITAL AUDIO YELLOW VIDEO 2 IN RED AUDIO 2 R IN WHITE AUDIO 2 L IN REMOTE CONTROL RECEIVER CIGARETTE LIGHTER 8
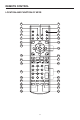
REMOTE CONTROL LOCATION AND FUNCTION OF KEYS 8 9 4 5 1 2 3 6 7 10 11 12 14 13 15 16 18 17 19 20 21 24 23 22 25 28 29 32 26 27 30 31 9
REMOTE CONTROL 1. 2. 3. 4. POWER EJECT MUTE SUBTITLE 5. 6. 7. 8. 9. 10. ANGLE DISPLAY MODE SETUP PAL/NTSC AUDIO 11. TITLE 12. MENU / , 13. / 14. ENTER 15. 16. 17. 18. 19. 20. 21. 22. 23. 24. / / / 0-9 10+ CLEAR VOLUME+/– 25. ZOOM 26. RESUME 27. 28. 29. 30. 31. 32. GOTO PBC RANDOM PROGRAM REPEAT A-B Press POWER to turn the unit ON or OFF. Press to eject the disc. Press to mute the sound. Changing of the SUBTITLE language on multi-subtitle language DVD disc.
REMOTE CONTROL Preparing the Remote Control Inserting the Batteries 1. Open the battery compartment cover. 2. Insert the new batteries. Make sure that the positive and negative terminals of the batteries are oriented indicated. 3. Close the cover. • Battery: Two AAA size battery Using the Remote Control Face the remote control towards the player front face IR mark (remote control signal receiver). Operation angle: About ±30 degree in each the direction of the front of the IR mark. Loading a Disc 1.
OPERATION on the front panel during playback will stop play temporary. To return to normal playback, press on the remote control on the front panel. or BASIC PLAY Stopping play - Brief press the (Stop) button to stop the unit playback, when press the (Play) button it can continue normal playback. - Press (Stop) button twice, it will stop the playback and go back to initial Track/Chapter. MUTE Will mute the sound, but the disc continues playing.
OPERATION AV2 mode. When select one mode, the corresponding indicator on the front panel will be illuminated. Disc Search (GOTO) FOR DVD Press GOTO button twice, the screen will display the following message: Volume Level Adjustment Press VOLUME / on the front panel or VOLUME +/- on the remote control to increase or decrease the volume level. TITLE 01/01 TIME -- : -- : -00:00:25 Remote Sensor (IR) Point the remote handset to the remote sensor IR on the front panel.
OPERATION On-Screen Display function SINGLE REMAIN Press the DISPLAY button during playback to display the contents of the current disc on the screen.
OPERATION monaural and stereo sound. TOTAL REMAIN 00:40:35 MONO LEFT MONO RIGHT STEREO TOTAL TRACK : 14 TRACK : - 01 MENU function (For DVD Only) Press MENU button while the disc is playing and the disc root menu will be displayed. You can navigate with the remote control navigation keys and select a feature with the ENTER key. (5) Press DISPLAY for the fifth time: The message on the screen will be cleared.
OPERATION angles. - When no different angle is recorded, will be display at screen left top corner. MP3 Disc Play MP3 disc is playing as the format of FOLDER. For example: SMART NAVI ROOT ROOT 0 MP3 MUSIC 1 SKY MP3 HEAR YOUR PLAY MODE DISC Use / , / on the remote control or on the front panel of the unit to select the item or folder, then press ENTER button. Pressing REPEAT button repeatedly can select three kind of repeat play mode. REP-ONE: Play the same song over and again.
SETUP INITIAL SETUP GENERAL SETUP SETUP MANU --- MAIN PAGE -- GENERAL PAGE -- GENERAL SETUP TV DISPLAY NORMAL/PS SPEAKER SETUP PIC MODE NORMAL/LB AUDIO SETUP ANGLE MARK WIDE PREFERENCES OSD LANG CAPTIONS SCR SAVER EXIT SETUP 1. Press SETUP on the remote control or on the front panel in the stop mode. (Press the stop button twice to ensure the player under STOP mode.) MAIN PAGE TV Screen 2. The initial SETUP menu is displayed. 4:3 Video Material Normal 3.
SETUP -- GENERAL PAGE -- -- GENERAL PAGE -TV DISPLAY TV DISPLAY PIC MODE AUTO PIC MODE ANGLE MARK HI-RES ANGLE MARK OSD LANG N-FLICKER OSD LANG CAPTIONS CAPTIONS SCR SAVER SCR SAVER MAIN PAGE MAIN PAGE ENGLISH OSD LANG type setup Select the preferred OSD language by using the / buttons. PIC mode setup Select AUTO, the player PIC mode will depend on DVD disc. Select HI-RES format for best image resolution. Select N-FLICKER format on image or picture under noise affect.
SETUP -- GENERAL PAGE -- AUDIO SETUP -- AUDIO SETUP -- TV DISPLAY PIC MODE AUDIO OUT ANALOG ANGLE MARK OP MODE SPDIF/RAW OSD LANG DYNAMIC SPDIF/PCM CAPTIONS LPCM OUTPUT SCR SAVER ON OFF MAIN PAGE MAIN PAGE SCR SAVER setup Select the SCR SAVER output ON/OFF. AUDIO OUT This is to activate the audio output from ANALOG mode to SPDIF/RAW mode to SPDIF/PCM mode.
SETUP -- AUDIO SETUP -- PREFERENCES SETUP -- PREFERENCES PAGE -- AUDIO OUT OP MODE FULL DYNAMIC LPCM OUTPUT TV TYPE AUTO 6/8 AUDIO NTSC 4/8 SUBTITLE PAL 2/8 DISC MENU OFF PARENTAL PASSWORD DEFAULTS MAIN PAGE SMART NAV MAIN PAGE Dynamic range Control Select DYNAMIC and adjust the dynamic range of a Dolby Digital encoded program. There are 8 steps between full compression and off compression. TV type setup This player can play discs recorded in either PAL or NTSC format.
SETUP -- PREFERENCES PAGE -- -- PREFERENCES PAGE -TV TYPE TV TYPE 1G AUDIO AUDIO 2 SUBTITLE ENGLISH SUBTITLE 3 PG DISC MENU FRENCH DISC MENU 4 PG 13 PARENTAL SPANISH PARENTAL 5 PASSWORD CHINESE PASSWORD 6 PG-R DEFAULTS JAPANESE DEFAULTS 7 NC-17 SMART NAV OFF SMART NAV 8 ADULT MAIN PAGE NO_PARENTAL MAIN PAGE SUBTITLE language setup Select the preferred SUBTITLE language by using the cursor buttons.
SETUP -- PREFERENCES PAGE -- -- PREFERENCES PAGE -- TV TYPE TV TYPE AUDIO AUDIO SUBTITLE SUBTITLE DISC MENU DISC MENU PARENTAL PARENTAL PASSWORD PASSWORD DEFAULTS DEFAULTS NO MENU SMART NAV SMART NAV WITH MENU MAIN PAGE MAIN PAGE RESET DEFAULTS Select reset to become factory initial setting. SMART NAV In this item, you can select NO MENU mode or WITH MENU mode.
SPECIFICATIONS Supply voltage: Current consumption: Signal system: Discs played: Audio output level: Audio signal output characteristics: 12V DC (11V-15V), test voltage 14.4V, negative ground Less than 2A Compositive video 1.0Vp-p 75Ω (1) DVD-VIDEO disc 5”(12 cm) single-sided, single-layer 5”(12 cm) single-sided, double-layer (2) Compact disc (CD-DA) 5”(12 cm) disc 600Ω (2 ch 2.
ELECTRICAL CONNECTION (1) (2) (3) YELLOW PVC CABLE (BLACK) (4) WHITE (5) RED (7) RED (6) BLACK (8) BLACK CAUTION: 1. Put the 9-pin mini din plug (1) into the 9-pin mini din socket (2) on the back of the display. 2. The yellow socket (3) is connected to the VIDEO socket. The white socket (4) is connected to the AUDIO Out-Left socket and the red socket (5) is connected to the AUDIO Out-Right socket. 3. When you want to use the unit, please cut the (7) and (8) two wires from the DC plug (6).
CONTROL & FUNCTION KEYS 9 11 11 10 10 13 12 1 2 4 3 5 6 7 8 7 inch COLOR TFT LCD MONITOR 25
1. POWER Press POWER button (1) to turn on the unit. Press it again to turn it off. 2. POWER INDICATOR LIGHT When the system is on, the indicator light (2) will be illuminated. 3. REMOTE SENSOR Point the remote control handset to the remote sensor (3). Press the function keys on the handset to control the TV, it would be worked for connecting the TV unit or DVD only. 4. SPEAKER Press the SPEAKER button (4) to turn on the speaker. Press it again to turn it off. 5.
® MCD-KIT7 GEBRUIKSAANWIJZING Auto / Mobiele DVD Speler 022492 022477 27
Eigenschappen • • • • • • • • • • Anti shock loopwerk en trilling demping Externe afstand bediening sensor voor eenvoudige bediening via draadloze bediening 6 Talen mogelijkheid voor ondertiteling 8 Talen geluidssporen Meervoudige hoekfunctie (multiple angle) Dolby digital / Mpeg2 audio / lineair PCM decoder MP3 Audio decoder Audio en video RCA tulpaansluitingen aan voorzijde en achterzijde Compatible met PAL DVD / VCD / en NTSC DVD / VCD Ondersteund de volgende typen disks : DVD, MP3, VCD, CD, CD-R, CD-RW
Informatie Over Discs Indelingen die door deze speler worden ondersteund DVD Discs van 12 cm/8 cm (Alleen enkelzijdig beschreven discs) Video-CD Discs van 12 cm/8 cm omstandigheden in de omgeving waarin de discs worden gebruikt, kunnen er enkele krassen op de discs komen (zij het onvoldoende om ze onbruikbaar te maken). Merk op dat dergelijke krassen niet duiden op een probleem met de speler.
Elektrische aansluiting DVD SPELER DC 12V IN INPUT OUTPUT A/V 2 INPUT REMOTE VIDEO L/R DIGITAL AUDIO A/V OUTPUT VIDEO 1 L/R VIDEO 2 GEEL VIDEO-UITGANG 2 (OPTIE) GEEL VIDEO-UITGANG 1 ROOD LICHTNETADAPTER (OPTIE) AUDIO-UITGANG RECHTS WIT AUDIO-UITGANG LINKS (OPTIE) DIGITALE AUDIOUITGANG GEEL VIDEO 2 IN ROOD AUDIO 2 R IN WIT AUDIO 2 L IN ONTVANGER VOOR AFSTANDSBEDIENING 12 V-STEKKER VOOR SIGARETTENAANSTEKER Gebruik de bijgeleverde kabels om de DVD speler aan te sluiten.
1. INTRODUCTIE VAN DEZE DVD-SPELER FRONT VIW 1 18 1. 2. 3. 4. 5. 6. 7. 8. 9. 10. 11. 6 19 20 7 4 11 Aan/uit toets Eject toets Setup toets Audio modus Source (geluidsbron) keuzetoets CD gleuf Afspeel/pauze toets Stop toets Terugspring toets Vooruitspring toets Volume regelaar 8 12 12. 13. 14. 15. 16. 17. 18. 19. 20. 21. 22.
1.2 INTRODUCTIE VAN DEZE DVD-SPELER Voorzijde van de speler Afstandsbediening 1. 2. 8 9 4 5 1 2 3 6 7 10 11 12 14 13 15 16 18 17 19 20 21 24 23 22 25 28 29 32 26 27 30 31 Aan/uit toets Uitwerp toets Indrukken coor aan/uit Werpt de CD/DVD uit de speler 3. Mute toets Onderdrukken van het geluid. 4. Subtitle toets Keuzetoets ondertiteling 5. Angle toets Camera-hoek keuzetoets 6. Display toets Informatie tijdens afspelen 7. Mode toets Keuzetoets signaal ingangen 8.
DIGITAL AUDIO AANSLUITING Indien u gebruik wilt maken van Dolby prologic geluidsweergave, dan dient u een versterker te gebruiken die een Dolby decoder aan boord heeft tezamen met een digitale ingang in vorm van een coaxiale aansluiting. Sluit de DVD speler dan met één van deze kabel typen aan op de versterker.
Opmerkingen • De werking van de afstandsbediening kan worden verstoord door een obstakel tussen afstandsbediening en afstandsbedieningsensor. • Bij fel licht zoals bijvoorbeeld een fluorescentielamp of direct zonnelicht kan de werking eveneens zijn verstoord. • Ook het gebruik van een TV met hetzelfde type infrarood afstandsbediening in dezelfde richting kan problemen geven. • Voor een efficiënte werking bedraagt de maximum afstand tussen afstandsbediening en afstandsbedieningsensor 7 meter.
Overslaan van een passage Druk tijdens weergave op de overslaan toetsen / . De toets brengt u naar de volgende passage en de toets brengt u naar de vorige passage. Opmerking: De / toetsen zijn bij enkele versie 2.0 video-CD’s (met PBCweergavebesturing) mogelijk niet beschikbaar. Pauze (stilbeeld) Druk tijdens weergave op PLAY. Druk nogmaals op PLAY om de normale weergave te hervatten.
Basisbediening On-screen display functie Functie voor meertalige soundtracks op DVD Druk tijdens weergave op de DISPLAY toets om de inhoud van de geplaatste disc op het scherm te laten verschijnen. Voorbeeld: - Druk tijdens weergave op de AUDIO toets. Bij elke druk op de toets wordt overgeschakeld naar de volgende taal. Opmerking: - Het aantal beschikbare talen verschilt per disc. Bij sommige discs is slechts één taal beschikbaar.
Basisbediening Opmerking: Het is niet mogelijk om tijdens weergave een map te kiezen. Dit is alleen mogelijk nadat de STOP toets is ingedrukt. Tijdens weergave toont het scherm de MP3-ID3 identificatiegegevens en niet de gebruikte REPEAT MODE. In dit geval worden de titel van de passage en de naam van de artiest getoond.
Configuratie Configuratie Algemene configuratie SETUP – MAIN PAGE SETUP – GENERAL – TV DISPLAY GENERAL SETUP TV DISPLAY NORMAL/PS SPEAKER SETUP TV TYPE NORMAL/LB DOLBY DIGITAL SETUP PIC MODE WIDE PREFERENCE ANGLE MARK OSD LANG SPDIF EXIT SETUP CAPTIONS Druk vanuit de stopstand op SETUP. (Druk tweemaal op de STOP toets om er zeker van te zijn dat de DVD-speler in de stopstand staat.) MAIN PAGE TV Screen 1. Het SETUP menu voor configuratie van het systeem verschijnt. 2.
Algemene Configuratie - Gebruik de HI-RES instelling voor de hoogste beeldresolutie. - Gebruik de N-FLICKER instelling om beeldruis te onderdrukken. SETUP – GENERAL – ANGLE MARK SETUP – GENERAL – TV TYPE TV DISPLAY TV TYPE MULTI PIC MODE NTSC ANGLE MARK PAL TV DISPLAY TV TYPE OSD LANG PIC MODE SPDIF ANGLE MARK ON OSD LANG OFF CAPTIONS SPDIF MAIN PAGE CAPTIONS Instelling van het TV-type - Deze speler kan zowel DVD’s als videoCD’s weergeven die met het PAL of met het NTSC-systeem zijn opgenomen.
Voorkeuren -- GENERAL PAGE -- -- AUDIO SETUP -- TV DISPLAY AUDIO OUT ANALOG PIC MODE OP MODE SPDIF/RAW ANGLE MARK DYNAMIC SPDIF/PCM OSD LANG LPCM OUTPUT CAPTIONS SCR SAVER ON OFF MAIN PAGE MAIN PAGE Zet de screensaver aan of uit Deze instelling is om de audio uitgang op digitaal of analoog te zetten.
Voorkeuren -- AUDIO SETUP -- SETUP – PREFERENCES – LANGUAGE AUDIO OUT LANGUAGE ENGLISH SUBTITLE FRENCH OP MODE FULL DYNAMIC 6/8 DISC MENU SPANISH LPCM OUTPUT 4/8 LOCALE CHINESE 2/8 PARENTAL JAPANESE OFF PASSWORD DEFAULTS MAIN PAGE MAIN PAGE Dynamic range Met deze instelling kunt u het dynamische bereik instellen Het geluid. Er zijn 8 stappen mogelijk.
Voorkeuren SETUP – PREFERENCES – PARENTAL SETUP – PREFERENCES – DISC MENU LANGUAGE LANGUAGE 1G SUBTITLE SUBTITLE 2 DISC MENU ENGLISH DISC MENU 3 PG LOCALE CHINESE LOCALE 4 PG 13 PARENTAL FRENCH PARENTAL 5 PASSWORD SPANISH PASSWORD 6 PG-R DEFAULTS JAPANESE DEFAULTS 7 NC-17 8 ADULT MAIN PAGE MAIN PAGE NO PARENTAL Instelling van de taal voor het menu van DVD’s Kies met behulp van de cursortoetsen de taal van uw voorkeur voor de menu’s van DVD’s.
Voorkeuren SETUP – PREFERENCES – SMART NAV SETUP – PREFERENCES – DEFAULTS TV TYPE TV TYPE AUDIO AUDIO SUBTITLE SUBTITLE DISC MENU DISC MENU PARENTAL PARENTAL PASSWORD PASSWORD DEFAULTS DEFAULTS NO MENU SMART NAV SMART NAV WITH MENU MAIN PAGE MAIN PAGE RESET Menu inschakelen / uitschakelen Herstellen van de standaard instellingen Kies RESET om de standaard fabrieksinstellingen te herstellen.
Technische Gegevens Voeding: Stroomverbruik: Signaalsysteem: Bruikbare discs: Audio-uitgangsniveau: Audiosignaaluitgang karakteristieken: 12 V gelijkstroom (11 V - 16 V), nominale spanning 14,4 V, negatief geaard Minder dan 2,0 A Composiet videosignaal 1,0Vp-p 75Ω (1) DVD-VIDEO disc 5”(12 cm) enkelzijdig, enkellaags 5”(12 cm) enkelzijdig, dubbellaags (2) Compact disc (CD-DA) 5”(12 cm) disc 600Ω 2-kanaals 2,0 Vrms) (1) Frequentiebereik: 20 Hz-20 kHz (2) Signaal/ruis-verhouding: 80 dB (JIS) (3) Wow en flutt
ELECTRISCHE AANSLUITINGEN (1) (2) (3) GEEL PVC CABLE (ZWART) (4) WIT (5) ROOD (7) ROOD (6) ZWART (8) ZWART ATTENTIE : 1. Plaats de 9-pin mini DIN stekker (1) in de mini DIN aansluiting (2) aan de achterzijde van het scherm. 2. De gele plug (3) wordt verbonden met het VIDEO signaal. De witte plug (4) wordt verbonden met het AUDIO signaal links en de rode plug (5) met het AUDIO signaal rechts. 3. Plaats de DC plug (6) in de 12 Volt OUT aansluiting van de DVD speler.
GEBRUIK EN GEBRUIKSFUNCTIES ( 7 inch ) 9 11 11 10 10 13 12 1 2 4 3 5 6 48 7 8
1. POWER Druk op POWER knop (1) om de unit aan te zetten. Druk nogmaals om de unit uit te zetten. 2. POWER LED Indien de unit aan staat geeft een groen LED (2) dit aan. 3. REMOTE SENSOR Richt de afstandsbediening op de sensor (3). 4. SPEAKER Druk op de SPEAKER knop (4) om de ingebouwde luidspreker aan of uit te zetten. 5. VOLUME Draai de volume knop (5) naar rechts of links om het speaker volume te regelen. 6. COLOR Draai de COLOR knop (6) naar rechts of links om de kleur in te stellen. 7.
® MCD-KIT7 GUIDE D’UTILISATION Système vidéo mobile 022492 022477 50
Table des Matières Sécurité........................................................................................................52 Notes sur les disques .................................................................................53 Le lecteur .....................................................................................................56 Vue frontale...............................................................................................56 Vue arrière ...................................
Sécurité MISE EN GARDE: POUR RÉDUIRE LE RISQUE D’INCENDIE OU DE CHOC ÉLECTRIQUE, NE PAS EXPOSER CET APPAREIL A L’EAU OU A L’HUMIDITÉ. DES CIRCUITS A HAUTE TENSION SE TROUVENT A L’INTERIEUR DU BOITIER. NE PAS OUVRIR LE BOITIER. LE DÉPANNAGE NE DOIT ETRE CONFIE QU`A DU PERSONNEL QUALIFIE. ATTENTION: POUR ÉVITER TOUT CHOC ÉLECTRIQUE, FAIRE CORRESPONDRE LA BROCHE DE LA PRISE DE COURANT AVEC MISE À LA TERRE AVEC L’ORIFICE DE LA FICHE D’ALIMENTATION ET ENGAGER À FOND.
Consignes de Sécurité Importantes ATTENTION: VEUILLEZ LIRE ET RESPECTER CHACUNE DES MISES EN GARDE ET DES CONSIGNES DONNÉES DANS CE GUIDE D’UTILISATION. CONSERVER CETTE NOTICE POUR VOUS Y REPORTER ULTERIEUREMENT. Cet appareil a été conçu et réalisé pour garantir la sécurité des personnes. Un usage impropre peut se traduire par un choc électrique ou un risque d’incendie. Les sécurités incorporées dans cet appareil vous protégeront si vous vous conformez aux procédures suivantes conccrnent l’installation.
Disques DVD Il existe plusieurs types de disques DVD lecture Disque simple face Disque simple face à deux couches Disque double face Disque double face à deux couches sur chaque face Durée maximale de 2 HEURES 4 HEURES 4 HEURES 8 HEURES DVD simple face DVD double face La face imprimée des disques simple face Les DVD double face ne comportent est en général la face supérieures; la face qu’une étroite bande imprimée au centre. enregistrée est la face linférieure.
Zones DVD Des considérations relatives à la distribution des disques DVD ont conduit à la définition de 5 zones géographiques dans le monde. La zone pour laquelle est prévue votre lecteur est indiquée sur “l’étiquette de zone”. Celle-ci devra être identique à celle des disques disponibles dans votre région. En cas de difficulté pour lire un disque, s’assurer que les zones du disque et du lecteur correspondent.
Le Lecteur 1 18 1. 2. 3. 4. 5. 6. 7. 8. 9. 10. 11. 12. 23 23. 24. 25. 26. 27. 6 19 20 Power ( ) EJECT( ) SETUP AUDIO SOURCE Fente disque PLAY/PAUSE ( STOP ( ) PREVIOUS( ) NEXT( ) VOLUME VOLUME 24 4 7 11 8 12 26 27 Connecteur DC 12V INPUT Connecteur DC 12V OUTPUT REMOTE VIDEO 2 INPUT AUDIO 2 INPUT L/R 14 2 13 21 / , / cursor buttons ENTER Téemoin DVD Temoin AV INPUT 1 Temoin AV INPUT 2 VIDEO IN 1 AUDIO IN 1 L AUDIO IN 1 R IR Bouton Reset 28 28. 29. 30. 31. 56 10 5 15 16 17 3 22 13.
Installations Cet appareil peut êetre utilise a domicile comme dans votre voiture. Pour l'installation dans une voiture, veuillez respecter les instructions suivantes. VIS M5x25 VIS DE BLOCAGE MECANIQUE VIS VIS M4x5 M4x5 3 1 3 2 1 4 2 Note: 1. Retirer les deux vis de transport bloquant la mecanique, fixer les supports de chaque cote de l'appareil avec les vis (M4x5), puis fixer l'appareil avec les vis (M5x25). 2.
Connexion Electrique LECTEUR DVD DC 12V IN INPUT OUTPUT DIGITAL AUDIO A/V 2 INPUT REMOTE VIDEO L/R A/V OUTPUT VIDEO 1 L/R VIDEO 2 JAUNE VIDEO 2 OUT (EN OPTION) JAUNE VIDEO 1 OUT ADAPTATEUR AC/DC ROUGE AUDIO R OUT (EN OPTION) BLANC AUDIO L OUT (EN OPTION) DIGITAL AUDIO JAUNE VIDEO 2 IN ROUGE AUDIO 2 R IN BLANC AUDIO 2 L IN CAPTEUR DE LA TELECOMMANDE PRISE ALLUME-CIGARE 58
Télécommande 8 9 4 5 1 2 3 6 7 10 11 12 14 13 15 16 18 17 19 20 21 24 23 22 25 28 29 32 26 27 30 21 59
Télécommande 1. POWER 2. EJECT 3. MUTE 4. SUBTITLE 5. ANGLE 6. DISPLAY 7. MODE 8. SETUP 9. PAL/NTSC 10. AUDIO 11. TITLE 12. MENU 13. / , / 14. ENTER 15. / 16. 17. / 18. / 19. 20. 21. 0-9 22. 10+ 23. CLEAR 24. VOLUME +/– 25. ZOOM 26. RESUME 27. GOTO 28. PBC 29. RANDOM 30. PROGRAM 31. REPEAT 32. A-B Commutateur de mise en marche/arrêet du lecteur. Ejection du disque. Coupe le son. Changement de la langue des sous-titres sur un disque DVD Changement de l'angle de vue en mode DVD.
Utilisation de la Télécommande PREPARATION DE LA TELECOMMANDE Insérer les piles 1. Ouvrir le compartiment des piles. 2. Inserer les piles neuves. Assurez-vous de bien orienter les bornes positive et néegative des piles. 3. Refremer le couvercle. • Piles requises: deux piles de type AAA Utilisation de la télécommande Orienter la telecommande en direction de l'inscription IR situee àa l'avant du lecteur DVD (capteur du signal de la telecommande).
Fonctionnement Touche : Appuyer brièvement pour stopper la lecture du disque. Touche : Appuyer sur cette touche pour arrêter temporairement la lecture du disque (Pause), appuyer de nouveau pour relancer la lecture. Touche et : Avance et retour rapide (Touche 5) Appuyer sur cette touche pour avancer ou reculer sur le disque.
Fonctionnement Pour le VCD/CD: Appuyer sur cette touche pour mettre en fonction le mode répétition de une ou toutes les pistes du disque. REP-ONE REP-ALL REPEAT OFF Rep One: La lecture du morceau est automatiquement répétée. Rep All: La lecture de l’ensemble du disque est automatiquement répétée. A-B La fonction A-B permet la répétition d’un passage en continue. Appuyer sur la touche A-B au début du passage souhaité, appuyer à nouveau sur la touche à la fin du passage souhaité.
Fonctionnement RESET Ce bouton est situé sur la façade avant. Utiliser une pointe de stylo. Une réinitialisation doit être systématiquement effectuée après: • Le branchement de l’appareil. • Les touches ne fonctionnent pas. • Message d’erreur. REMOTE SENSOR IR L’avant de la télécommande doit être dirigé vers le récepteur de la façade de l’appareil ou du Récepteur déporté pour transmettre les informations.
Fonctionnement CD Presser la touche Audio durant la lecture pour sélectionner. MONO LEFT MONO RIGHT STEREO TOUCHE MENU (17) DVD Appuyer sur la touche Menu en cours de lecture du disque et le Menu du disque apparaîtra, la navigation est possible à l’aide des touches 5 et 6 de la télécommmande. Faites votre choix, puis appuyer sur la touche 14 ENTER, pour valider. VCD Appuyer sur la touche Menu en cours de lecture du disque pour choisir le mode PCB ON ou PCB OFF.
Lecture d’un Disque MP3 Insérer un CD au format MP3. pour sélectionner le répertoire désiré puis confirmer en appuyant Utiliser les touches sur la touche ENTER. La liste des morceaux enregistrés s’affichent sur vorte écran: Valider un paramètre du Menu. SINGLE REP-ONE DISC SCAN SHUFFLE ON DISC FOLDER FOLDER REP DISC REP RANDOM PROGRAM PXXX Puis choisir le morceau désiré et confirmer en appuyant sur la touche ENTER.
Menus INITIAL SETUP GENERAL SETUP SETUP MENU --- MAIN PAGE --- GENERAL PAGE --- GENERAL SETUP TV DISPLAY NORMAL/PS SPEAKER SETUP PIC MODE NORMAL/LB AUDIO SETUP ANGLE MARK WIDE PREFERENCES OSD LANG CAPTIONS SCR SAVER EXIT SETUP Fonction Setup Menu MAIN PAGE 1. Pressez la touche Setup après avoir appuyé sur la touche stop. 2. Le menu apparaît à l’écran. 3. Sélectionner à l’aide des touches / le choix désiré et valider par la touche Enter (14).
Menus --- GENERAL PAGE --- --- GENERAL PAGE --- TV DISPLAY TV DISPLAY PIC MODE AUTO PIC MODE ANGLE MARK HI-RES ANGLE MARK OSD LANG N-FLICKER OSD LANG CAPTIONS CAPTIONS SCR SAVER SCR SAVER MAIN PAGE MAIN PAGE ENGLISH PIC mode setup Cette fonction permet de sélectionner différentes définition de l’image. Sélection AUTO de la définition de l’image. Sélection HI-RES pour une meilleure résolution de l’image. Sélection N-FLICKER pour une image affectée par des bruits.
Menus --- GENERAL PAGE --- AUDIO SETUP --- AUDIO PAGE --- TV DISPLAY PIC MODE AUDIO OUT ANALOG ANGLE MARK OP MODE SPDIF/RAW OSD LANG DYNAMIC SPDIF/PCM CAPTIONS LPCM OUTPUT SCR SAVER ON OFF MAIN PAGE MAIN PAGE SCR SAVER setup Sélection oui/non de l’économiseur d’écran pendant des arrêts momentanés. AUDIO OUT Cette fonction permet de configurer la sortie Audio du lecteur DVD (Analogique, SPDIF/RAW/SPDIF/PCM).
Menus --- AUDIO PAGE --- PREFERENCES SETUP --- PREFERENCES PAGE --- AUDIO OUT OP MODE FULL DYNAMIC 6/8 LPCM OUTPUT 4/8 TV TYPE AUTO AUDIO NTSC SUBTITLE PAL DISC MENU 2/8 PARENTAL OFF PASSWORD DEFAULTS SMART NAV MAIN PAGE MAIN PAGE Dynamic Range Control Si vous sélectionnez le système DRC vous pouvez ajuster le niveau souhaité du programme codé du Dolby digital pour cela déplacer le curseur sur l’échelle et le positionner au niveau souhaité.
Menus --- PREFERENCES PAGE --- --- PREFERENCES PAGE --- TV TYPE TV TYPE 1G AUDIO AUDIO 2 SUBTITLE ENGLISH SUBTITLE 3 PG DISC MENU FRENCH DISC MENU 4 PG 13 PARENTAL SPANISH PARENTAL 5 PASSWORD CHINESE PASSWORD 6 PG-R DEFAULTS JAPANESE DEFAULTS 7 NC-17 SMART NAV OFF SMART NAV 8 ADULT MAIN PAGE NO PARENTAL MAIN PAGE PARENTAL (Réglage du niveau de Protection) Parental pour des disques DVD avant des scènes de violences ou interdit aux enfants.
Menus DEFAULTS TABLE --- PREFERENCES PAGE --TV TYPE General Setup TV Display Normal/LB AUDIO PIC Mode AUTO SUBTITLE Angle Mark ON DISC MENU OSD Language English PARENTAL PASSWORD DEFAULTS RESET Captions ON SCR Saver ON Speaker Setup Downmix Stereo Audio Setup Audio Out SPDIF/RAW OP Mode SMART NAV Line Out Dynamic MAIN PAGE DEFAULTS (RESET) En cas de mauvais fonctionnement, ou si vous désirez faire une remise à zéro pour retrouver la configuration d’origine de l’appareil, positionne
Spécifications Voltage Consommation Signal Systéme Disque compatibles Niveau de sortie Audio Caractéristiques : : : : 12V DC (11V-15V), Test voltage 14.4V Moins de 3 Ampére Compositive vidéo 1.0Vp-p 75 Ohm Disques DVD Simple face, simple face à 2 couches Double face, double face à deux couches CD Audio, VCD, CD MP3 : 600 Ohm (2ch 2.
BRANCHEMENTS ELECTRIQUES (1) (2) (3) JAUNE CABLE PVC (NOIR) (4) BLANC (5) ROUGE (6) NOIR (7) ROUGE (8) NOIR ATTENTION 1. Branchez le mini – connecteur DIN (9-pin) male (1) sur le mini – connecteur DIN (9pin) femelle (2) à l’arrière de l’écran LCD. 2. Le connecteur jaune (3) doit être branché sur la sortie VIDEO. Le connecteur blanc (4) doit être branché sur la sortie AUDIO Out-gauche, et le connecteur rouge (5) sur la sortie AUDIO Out-droite. 3.
BOUTONS ET REGLAGES 9 11 11 10 10 13 12 1 2 4 3 5 6 7 8 7 ECRAN COULEUR LCD TFT 75
1. BOUTON MARCHE/ARRET (POWER) Appuyez sur le bouton marche/arrêt (1) pour allumer l’écran. Appuyez encore une fois pour l’éteindre. 2. TEMOIN MARCHE/ARRET Le témoin rouge (2) s’allume quand le système est en marche. 3. RX ( CAPTEUR TELECOMMANDE ) Pointez la télécommande sur le capteur infra-rouge (3). Appuyez sur les boutons pour les fonctions du lecteur DVD. 4. HAUT-PARLEURS (SPEAKER) Appuyez sur le bouton haut-parleurs (4) (SPEAKER) pour écouter le son par les haut-parleurs intégrés.