Marshall Electronics M-LCD7-HDI M-LCD7-HDI-B-C511 M-LCD7-HDI-B-CE6 M-LCD7-HDI-B-NEL3 Portable 7’’ HDMI TFT LCD Monitor User Manual
Product Overview The M-LCD7-HDI is a 7” high-definition widescreen LCD monitor featuring our completely digital TFT-MegaPixel active matrix LCD platform. This monitor is ideal as a light-weight high resolution viewfinder or focus-assist monitor. Our proprietary digital signal processing features, along with multiformat compatibility, accommodate multiple video formats including NTSC and PAL. The HDMI input also accepts VESA (VGA) standards allowing the display to be used as a computer monitor.
Unpacking Carefully unpack the M-LCD7-HDI monitor and verify that the following items are included: ■■ AC model (M-LCD7-HDI) includes: M-LCD7-HDI Monitor AC Power Supply HDMI Cable HDNI – MINI HDMI Cable Car Cigarette Adapter Table Stand PC Cable [9-pin VGA Cable] Multi-function input cable [SKS Cable] Camera mount Remote control Operating Instructions ■■ DC model (M-LCD7-HDI-B-XXX) includes the following additional items: Battery (Canon B511, or Nikon EN-EL3E, or Canon L
Table of Contents ■■ Product Description ........................................................................................................... Remote Control .......................................................................................................... Matched Cable ............................................................................................................ Connection ..................................................................................................
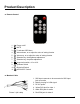
Product Description ■■ Remote Control 1. : Power on/off 2. : MUTE 3. : To activate OSD Menu 4. : Volume down, or to adjust the value of setting function 5. : Volume up, or to adjust the value of setting function 6. : Selection key, the brightness adjustment 7. : Selection key, the phase adjustment 8. : Aspect ratio switch, 4:3 or 16:9 9. 10. 11. U/D L/R : Up/Down Switch : Right/Left Switch : AV1/AV2/PC Switch ■■ Matched Cable 1.
Product Description Picture 4 (VGA cable) 1. Female 9-pin jack connects to male 9-pin plug on picture 3 2. 15-pin VGA signal input end connects to computer VGA port ■■ Connection 1. Connect SKS input end of the AV cable (picture 3) into the AV input jack of the monitor. The other jack of the AV cable should be connected as follows: 2.
Operating Instructions Operation After connecting to power, the unit will be in standby mode (red light). Press the power button on the unit or on the remote control and the buttons of the unit will light up blue. Press the same button again and the unit will return to standby mode. (Note the blue button will shut off 5 or 6 seconds after you turn the unit off.) Push “PC/AV” on the unit or AC/PC on the remote control to switch between AV and PC.
Operating Instructions ■■ Description of OSD: In PC mode: (Color) ■■ In Color mode of OSD, use “ ” or ” ” to select and then push “ ” or ” ” to adjust. Brightness: To adjust the brightness Contrast: To adjust the contrast Color Temp: To adjust the color temperature The color temperature of OSD is adjustable. Press “” on the unit or on the remote control to select “Color Temp,” then choose a color temperature such as 6500 Ks, 7500 Ks or 9300 Ks by pressing “ ” or ” ”.
Operating Instructions Note: when you select “USER,” a mini box will appear on the bottom right corner of the OSD, as pictured below: ■■ (Adjust): Auto Config: To automatically adjust to factory default setting If the auto adjust is not satisfactory, use manual adjust.
Operating Instructions ■■ Language: language selection: H Position: To adjust the picture in horizontal V Position: To adjust the picture in vertical OSD Time out: To adjust the clock Transparent: To adjust the level of transparency ■■ (Function): Reset: Back to the original factory setting Display Ratio: To change the display ratio: 16:9, 4:3 LR Rotation: To change the picture left/right UD Rotation: To change the picture up/down ■■ Sound Volume: To adjust the volume.
Operating Instructions ■■ In AV mode: ■■ Color: Brightness: To adjust the brightness Contrast: To adjust the contrast Hue: To adjust the hue in NTSC mode Saturation: To adjust the saturation ■■ OSD: ■■ Language: 8 languages for OSD as shown above: H Position: To adjust the picture in horizontal V Position: To adjust the picture in vertical OSD Time out: To adjust the clock Transparent: To adjust the level of transparency M-LCD7-HDI Manual 11
Operating Instructions ■■ Function: Reset: Manufacturer default setting Display Ratio: To change the display ratio: 16:9, 4:3 LR Rotation: To change the picture (mirror image flip) UD Rotation: To change the picture up/down ■■ Sound: Volume: To adjust the volume 12 M-LCD7-HDI Manual
Specifications Specifications Display Panel Resolution Up Resolution Brightness Contrast Viewing Angle Video Signal Input VGA Signal Input Speaker Color System Voltage Signal Input Power Consumption Work Temperature Store Temperature Size (mm) Weight (w/o battery) M-LCD7-HDI TFT LCD 7’’ 1152000 Pixels 800x480 (VGA) 1920x1440 (VGA) 300 cd/m2 500:1 o o o o 70 /70 , 50 /60 (L/R, U/D) 0.7 ~ 1.4Vp-p/75 Ohms H:30 ~ 60kHz V:60 ~ 75Hz > 250mW/8 Ohms PAL -4.43; NTSC -3.
Troubleshooting Troubleshooting ■■ Only black and white image Adjust the levels of color saturation and brightness ■■ Power on but no picture Make sure the AV and VGA cable are secure from the video out connector & VGA signal output connector. Make sure you are using the standard power adapter included with the monitor. ■■ Wrong or abnormal colors If any color is missing, check the cables to make sure they are securely connected.
Warranty Marshall Electronics warranties to the first consumer that this M-LCD7-HDI LCD monitor will, under normal use, be free from defects in workmanship and materials, when received in its original container, for a period of one year from the purchase date. This warranty is extended to the first consumer only, and proof of purchase is necessary to honor the warranty.
Marshall Electronics, Inc. 1910 East Maple Ave. El Segundo, CA 90245 Tel: (800) 800-6608 / (310) 333-0606 • Fax: 310-333-0688 www.marshall-usa.