
Operating instructions

5
Installation and Initial Setup
■
Unpacking
Carefully unpack the V-R261-DLW monitor and verify that the following items are included:
• V-R261-DLW Monitor
• V-PS24-7.5 Power Supply with XLR Connector
• Operating Instructions
■
Installation
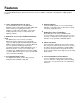
The V-R261-DLW can be combined with a desktop stand for desktop use. (Marshall Part V-ST23-32).
VESA standard 75mm hole patterns allows custom mounting installations. Marshall Electronics can provide an
optional VESA stand with pivot and tilt as well. (Marshall Part VP-LCD171H-ST-01).
■
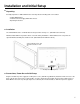
Connections, Power-On and Initial Setup
Plug the V-PS24-7.5 power supply into an AC power source (100-240 V @ 50/60 Hz). Attach the XLR connector to the
back of the monitor. Connect the required cables for video signals input and output. (Power must be applied to the V-
R261-DLW for the active loop-though output to be activated.) The monitor defaults to ‘ON’ when power is supplied.
V-R261-DLW with desktop stand
(Marshall Part Number V-ST23-
32)
Desktop Stand Mounting Holes