
Manual


200-236012
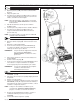
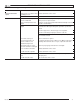
1. Turn the pressure switch to the OFF position (see A).
2. Close the tank petcock (see D). Turn in the clockwise
direction.
3. Plug in the power cord.
High temperatures are generated
by the electric motor and the pump. To prevent burns
or other injuries, DO NOT touch the compressor while
it is running. Allow it to cool before handling or
servicing. Keep children away from the compressor
at all times.
4. Turn the pressure switch to the ON position (see C).
When adjusting from a higher to a
lower pressure, turn the knob counterclockwise past
the desired setting, then turn clockwise to reach the
desired pressure. Do not exceed operating pressure of
the tool or accessory being used.
5. Adjust the air pressure regulator (G) to the working
pressure of the tool being used.
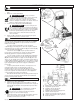
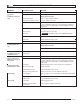
This air compressor is a dual purpose unit designed to
deliver air to hopper spray guns at coupling (M) and to small air
tools, such as finish nailers, at coupling (F).
There are two air outlets available. The Air Tool Outlet (F)
(0 - 120 PSI) for air tools has a conventional air pressure
regulator (G) with a line pressure gauge (H) and an automatic
shutoff hose coupling (F).
The second air outlet (M) is for Hopper Gun use. Air
pressure is controlled by an adjustable pop-off control valve (L)
which bleeds off excess air at the hopper gun.
There is an air outlet selector valve (K) between the tank
pressure switch (I) and the hopper gun hose coupling (M).
Turning the selector valve (K) knob 1/4 turn clockwise selects
the air tool outlet (F). Turning the valve counterclockwise
selects the hopper gun outlet (M), allowing air to discharge from
the hopper gun hose coupling (M and/or the pressure control
valve (L).
When operating a hopper gun, the pressure is read on the
tank pressure gauge (J), which is mounted on the tank
pressure switch (I). Pressure should be read with the gun
connected and air flowing through its opening. Pressure is
increased by turning the control knob (N) clockwise (inward).
A 3/8” inside diameter by 50-foot air hose with a shutoff
coupling and male barb .210 minimum hole diameter coupler is
provided to connect to hopper gun.
1. Turn the pressure switch to the OFF position (see A).
2. Unplug the power cord.
3. Reduce pressure in the tank through the outlet hose. You
can also pull the relief valve ring (see E) and keep it open
to relieve pressure in the tank.
Escaping air and moisture can
propel debris that may cause eye injury. Wear safety
goggles when opening petcock.
4. Tip the compressor so the petcock is at the bottom of the
tank. Then open the petcock (see B) to allow moisture
to drain from the tank.
WARNING:
WARNING:
CAUTION:
OPERATING INSTRUCTIONS
DAILY STARTUP
DUAL OPERATING INSTRUCTIONS
SHUTDOWN
B
OPEN
OUVERT
ABIERTO
A
C
ON
OFF
F Air tool outlet (high pressure)
G Air pressure regulator
H High pressure line gauge
I Tank pressure switch
J Low pressure line and tank gauge
K Pressure selector valve
L Pressure pop-off control valve (low pressure)
M Hopper gun outlet
N Control knob
E
D
CLOSE
FERMÉ
SE CIERRAN