C4.8T, C.6.8T, C8.1T User’s Guide The Martin Experience All material © 2007. Martin Audio Ltd. Subject to change without notice.
Installation Guide Martin Audio Ceiling Loudspeakers C4.8T, C6.8T, C8.1T Description Martin Audio C4.8T, C6.8T and C8.1T ceiling loudspeakers are all 2-way designs using soft dome tweeters for the widest dispersion and excellent off-axis performance. All models have perforated steel grilles, UL94 V-0 baffle materials, steel back cans and feature rising clamp connectors that accept up to 2.5sqm conductors. Unpacking Thank you for purchasing a Martin Audio ceiling loudspeaker system.
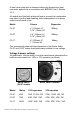
A steel cover plate with a clamped cable entry protects the input connector against fire in accordance with BS5839: Part 8, Section 10.3. All models are fitted with a thermal fuse to prevent the loudspeaker from short circuiting and disabling other loudspeakers in its group under the influence of fire. Model Drivers Dispersion C4.8T 4”(100mm) LF 0.75”(19mm) HF 180deg C6.8T 6.5”(165mm) LF 0.75”(19mm) HF 150deg C8.
Note that all models are protected with a PTC (positive temperature coefficient) device and will quieten, if overdriven. The PTC device will reset itself once the signal is reduced to a more sensible level.
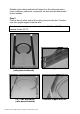
Suitable hole cutting methods will depend on the ceiling structure, local conditions, personnel, equipment etc and must be determined by the installer. Step 2 Place a tile rail either side of the ceiling hole and clip the C-bracket over the upright edges of the tile rails. Note the rail orientations – outwards for the C4.8T and C6.8T, inwards for the C8.1T. C4.8T & C6.8T rail orientation (rails placed outwards) C8.1T rail orientation (rails placed inwards) All material © 2007. Martin Audio Ltd.
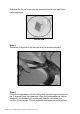
Note that the tile rail ends may be reshaped to suit your particular ceiling structure. Tile rail end Step 3 Screw the C-bracket to the tile rails with the screws provided. C-bracket screwed to tile rail Step 4 Place the loudspeaker into the ceiling hole (and through the centre of the C-bracket) from the underside. Align the loudspeaker so that an imaginary line between the woofer and tweeter runs along the corridor or concourse. This provides the smoothest sound coverage. All material © 2007.
2-way ceiling loudspeaker orientation Make sure that the C4.8T and C6.8T swivel-tabs do not coincide with the C-bracket gap. Loudspeaker in place. Note swivel-tab positions before fully tightening It is permissible for one of the five C8.1T swivel-tabs to coincide with a C-bracket gap in order to maintain driver orientation. All material © 2007. Martin Audio Ltd. Subject to change without notice.
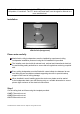
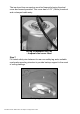
Step 5 Screw the loudspeaker to the C-bracket by tightening the screws from the underside of the baffle. Tightening the swivel-tab screws Step 6 Connect your pre-installed amplifier cable to the ceiling loudspeaker. Amplifier power input is via a 4-pin rising clamp plug providing + and – inputs and + and – Loop Through connections at the top of the loudspeaker can. Input & Loop Through connector All material © 2007. Martin Audio Ltd. Subject to change without notice.
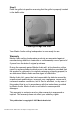
The input and loop connectors must be fireproofed using the steel cover and screws provided. This cover has a 0.75” (19mm) knockout and a clamped cable entry. Ceiling loudspeaker rear can – fireproof steel cover fitted Step 7 Fit a steel safety wire between its rear can safety tag and a suitable overhead supporting structure to provide backup support in the event of ceiling damage. Safety tag location All material © 2007. Martin Audio Ltd. Subject to change without notice.
Step 8 Push the grille into position ensuring that the grille is properly located in the baffle slots. Locate grille tags into slots Your Martin Audio ceiling loudspeaker is now ready for use. Warranty Martin Audio ceiling loudspeaker products are warranted against manufacturing defects in materials or craftsmanship over a period of 5 years from the date of original purchase.