
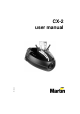
User manual


CX-2 user manual AC power connection 7
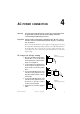
AC
POWER
CONNECTION
4
Warning! For protection from dangerous electric shock, the fixture must
be grounded (earthed). The AC mains supply shall have
overload and ground-fault protection.
Important! Check voltage setting before applying power. Do not connect
the CX-2 to an electrical dimmer system: doing so can damage
the electronics.
Before use verify that the fixture’s power supply is correctly tapped for the local
AC voltage. The default voltage setting is printed on the serial number label near
the AC input. The “EU” version may be set to 230 or 245 V AC and the “US”
version may be set to 110 or 120 V AC. Use the setting that is closest to the local
supply voltage.
To change the voltage setting
1 Disconnect the fixture from AC power.
Release the 4 cover locks by turning
them a quarter-turn counterclockwise.
Lift the cover straight off.
2 Locate and disconnect plug PL124 on
the back edge of the printed circuit
board. It has red, yellow, and blue
wires.
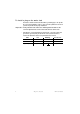
3 To select 230 V AC (EU version) or 110
V AC (US version), flip and move the
plug
up
so that the
red
wire connects
to the
top
pin.
4 To select 245 V AC (EU version) or 120
V AC (US version), flip and move the
plug
down
so that the
red
wire
connects to the
bottom
pin.
5 Replace the top cover before applying
power.
red
red
Setting for
110 V (US) / 230 V (EU)
Setting for
120 V (US) / 245 V (EU)