MAC 250 Wash user manual
Dimensions All measurements are expressed in millimeters 538 469 364 119 375 315 393 Min. c/c 410 270° 270° 128.5° 128.5° 560 © 2005 Martin Professional A/S, Denmark. All rights reserved. No part of this manual may be reproduced, in any form or by any means, without permission in writing from Martin Professional A/S, Denmark. Printed in Denmark. P/N 35000164 Rev.
Contents Introduction . . . . . . . . . . . . . . . . . . . . . . . . . . . . . . . . . . . . . . . . . . . . . . . . . . . . . . . . . . . . . . . . . . . . . . . . 5 Features. . . . . . . . . . . . . . . . . . . . . . . . . . . . . . . . . . . . . . . . . . . . . . . . . . . . . . . . . . . . . . . . . . . . . . . . . . 5 Safety information . . . . . . . . . . . . . . . . . . . . . . . . . . . . . . . . . . . . . . . . . . . . . . . . . . . . . . . . . . . . . . . . . . 5 Setup . . . . . . . . . . . . .
This page is intentionally left blank
Introduction Thank you for selecting the Martin MAC 250 Wash, a moving head wash light with a range of color-changing and control options and a 250 watt long-life discharge lamp. The MAC 250 Wash features a newly-designed glass reflector that gives extremely high light output.
• Check that power supply settings match the local AC power before use. • Do not expose the fixture to rain or moisture. • Refer any service operation not described in this manual to a qualified technician. PROTECTION FROM UV RADIATION AND LAMP EXPLOSION • Do not operate the fixture with missing or damaged covers, shields, lenses or ultraviolet screens. • Allow the fixture to cool for at least 45 minutes before opening it or removing the lamp.
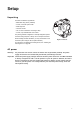
Setup Unpacking The MAC 250 Wash is supplied with: • MSD 250/2 lamp (factory installed) • 3-meter, 3-wire IEC power cable • Wide-angle lens • This user manual • Two 1/4-turn T-brackets for mounting a clamp • 5-meter, 3-pin shielded XLR control cable The packing material or flightcase is carefully designed to protect the fixture during shipment - always use it to transport the fixture. When installing the MAC 250 Wash, you may find it useful to lock the head in place using the tilt lock (see illustration).
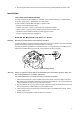
CONFIGURING FOR LOCAL AC POWER Frequency 50 60 Voltage 250 230 210 100 120 Figure 2: Power supply settings 1. Disconnect the fixture from power. 2. Remove the 2 Phillips screws in the access cover directly behind the power and data connectors (see Figure 2). Lift off the cover. 3. Locate the selection switches. 4. Move the voltage switch to the setting that most closely matches the local AC voltage. If your voltage falls between 2 settings, select the higher voltage.
2. Plug the prepared power cable into the AC input socket and a grounded (earthed) AC power outlet. Installation LOCATION AND ORIENTATION The MAC 250 Wash may be installed in any orientation. It can be fastened directly to a suitable surface, hung with a rigging clamp, or placed directly on a level surface. For safe operation, install the MAC 250 Wash in a location where: • there are no flammable materials nearby • the fixture is at least 0.
5. Install a safety cable that can bear at least 10 times the weight of the fixture securely to the structure and anchor the cable to the dedicated attachment point on the base. The attachment point is designed to fit a carabiner clamp. Figure 4: Safety cable attachment point 6. Check that there are no combustible materials or surfaces to be illuminated within 0.1 meter (4 inches) of the fixture, and that there are no flammable materials nearby. 7.
Control panel You can set the MAC 250 Wash’s DMX address, configure individual fixture settings (personality), read out data, and execute service utilities from the MAC 250 Wash’s control panel. Settings can also be changed remotely via the DMX link with the Martin MP-2 uploader. See also the control menu overview starting on page 28. Menu navigation The DMX address and any error messages are displayed after the fixture resets. To enter the menu, press [Menu].
• , the pan and tilt invert menu, allows you to swap the pan and tilt channels (→), invert pan movement (→), and invert tilt movement (→). These options can be useful in situations where you want some fixtures to mirror the performance of others with the same DMX address, or when fixtures are not oriented as programmed. • , the pan/tilt speed menu, provides 2 settings: and (normal).
settings are overridden. The message scrolls in the display if you try to change speed settings via the or control options. CMY BLACKOUT • (CMY blackout) in the menu makes the shutter blackout more effective. When set to , the CMY flags are activated 3 seconds after the shutter is closed. This absorbs any light output that escapes past the shutter. The CMY flags open automatically when the shutter is opened.
displays the DMX start code. Packets with a start code other than 0 may cause irregular performance. The remaining readouts under display the DMX values received on each of the 13 channels available in both 16-bit and 16-bit Extended modes, from (shutter, channel 1) to (effect speed, channel 13). If the fixture does not behave as expected, reading the DMX values can help you troubleshoot the problem.
Lamp power and reset shortcuts The control panel buttons can be used to control lamp power and reset the fixture. • To strike the lamp, press [Enter] and [Up]. • To douse the lamp, press [Enter] and [Down]. • To reset the fixture, press [Menu] and [Up]. LED signal readouts Four LEDs next to the digital display give additional information about fixture status: • Ready: fixture is ready for operation. • DMX: fixture is receiving a valid DMX signal. • Lamp: lamp is struck and lit.
DMX control The MAC 250 Wash is compatible with USITT DMX 512 controllers and can be added to a standard DMX data link. This section briefly describes the DMX-controllable effects. See “DMX protocol” on page 26 for an overview of DMX control options. DMX operating modes The MAC 250 Wash has two DMX operating modes, 16-bit and 16-bit Extended. 16-bit mode uses 13 DMX channels and 16-bit Extended mode uses 19 DMX channels.
COLOR The color wheel can be scrolled continuously – allowing for split color effects – or in steps, and rotated randomly or continuously in both directions at different speeds. In 16-bit Extended mode, the color setting selected on channel 10 can be fine-tuned on channel 11.
Optics Color filters STANDARD CONFIGURATION The MAC 250 Wash provides 6 dichroic color filters as shown below. Position 6 1 5 2 3 Color 1 Blue 108 2 Green 206 3 Red 308 4 UV 5 Pink 312 6 CTC 5500 - 2900 K Table 2: Standard colors 4 Figure 5: Color wheel (viewed from lamp side) REPLACING A COLOR FILTER Danger! Intense heat. Avoid contact by persons and materials. The exterior of the fixture can get very hot – up to 160° C (320° F).
3. Put on clean lint-free gloves or use a clean lint-free cloth to avoid having to clean filters after handling. 4. Turn the color wheel to access the desired color filter. Press the filter away from the wheel slightly to release it from the retaining lugs (A) and then lift it out of the wheel (B) – see Figure 7. A B A Figure 7: Color filter replacement 5. Color filters must be installed with the coated side facing towards the lamp as in Figure 8.
Installing the wide-angle lens A 61.5° cutoff-angle wide-angle lens is supplied with the MAC 250 Wash, together with all items necessary to install it. To install the wide-angle lens: 1. Disconnect the fixture from power and allow it to cool. 2. Set the tilt lock and remove top and bottom head covers. 3. See Figure 9. Prepare to hold the front lens assembly as it is released, then remove the four retaining screws and remove the assembly. 4. See Figure 10.
Service The MAC 250 Wash requires regular maintenance to maintain peak performance. Refer any service that is not described here to a professional technician. Cleaning is vital. Excessive dust, grease, and smoke fluid buildup will degrade performance and cause overheating and damage that is not covered by the warranty. Cleaning schedules for lighting fixtures vary greatly depending on the operating environment.
INSTALLING A LAMP Danger! Intense heat. Avoid contact by persons and materials. The exterior of the fixture can get very hot – up to 160° C (320° F). When replacing the lamp, disconnect the fixture from AC power and allow it to cool for at least 45 minutes before proceeding. Protect eyes and hands with safety goggles and gloves. 3 mm #2 Figure 12: Lamp installation 1. Locate the lamp access cover at the back of the fixture head and remove the two Phillips screws. 2. Pull out the lamp socket. 3.
3. Remove the head covers using a flathead screwdriver to loosen the four quarter-turn screws. 4. Release the air filter from the lower cover by hooking a fingertip under the edge of its clip and pulling up. 5. Clean the air filter with a vacuum or compressed air. If the filter is contaminated with smoke residue or other oily substances, soak and squeeze clean in a warm water/detergent solution, then blot dry.
Replacing fuses MAIN FUSE The main fuse holder is built into the mains input socket. Warning! Always replace the fuse with one of the same type and rating! FU SE To replace the main fuse: 1. Unplug the mains cable from the input socket. 2. Pry open the fuse holder and remove the fuse. 3. Replace the fuse with one of the same type and rating. The fuse rating is listed on the serial number label. 4. Close the fuse holder and replace the mains cable.
NORMAL UPDATE To update fixture software, connect an upload device to the fixture just like a DMX controller and perform a DMX mode upload as described in the uploader’s documentation. There is no need to isolate the MAC 250 Wash from other types of fixtures on the DMX link. After a software upload, when the MAC 250 Wash boots up it performs a check-sum test of the flash memory and then resets. If the firmware is corrupted, a check-sum error () occurs.
DMX protocol Channel – 16 Bt (16-Bit Mode) Channel – 16 Ex (16-bit Extended) 1 1 a. If DMX Reset is disabled in the control menu (→=), the fixture can only be reset via DMX if all 3 CMY channels are set to a value from 230 - 232 (91%). b. A 5 second delay can be applied to the reset command from the control menu under →. c. If DMX Lamp Off is disabled in the control menu (→=), the lamp can only be doused via DMX if all 3 CMY channels are set to a value from 230 - 232 (91%).
6 10 0 - 179 0 26 51 77 102 128 153 0 - 70 0 10 20 30 40 50 60 Color wheel scroll and rotation, random CMY Continuous scroll – full color positions White CTC 5500-2900 K Pink 312 UV Red 308 Green 206 Blue 108 180 - 183 184 - 187 188 - 191 192 - 195 196 - 199 200 - 203 204 - 207 71 - 72 72 - 73 74 - 75 75 - 76 77 - 78 78 - 79 80 - 81 Stepped scroll Blue 108 Green 206 Red 308 UV Pink 312 CTC 5500-2900 K White 208 - 226 227 - 245 82 - 88 89 - 96 Continuous rotation Clockwise, fast → slow Counterclock
Control menu Factory default settings are shown in bold type. Menu Item Options Notes (default settings in bold print) - (16-bit mode) 1 - (16-bit Extended mode) DMX address (default address = ) 16-bit Map DMX pan control to tilt channel and vice versa.
→ → → Return all personality settings (not calibrations) to factory defaults Load custom configuration 1 Save custom configuration 1 Load custom configuration 2 Save custom configuration 2 Load custom configuration 3 Save custom configuration 3 Total hours of operation with power on since manufacture Hours of operation since counter reset.
Reset fixture Lamp on Lamp off Open shutter - - Cyan - Magenta Yellow - → - - Pan left → right - Tilt up → down (Press and hold [Enter] for 3 secs.
Adjustment submenu This menu is accessed in →. Factory default settings are shown in bold type.
Error messages Display readout Appears if... What to do ...there is no communication between the control panel and motherboard (this display appears briefly when switching on the fixture). • Check fuses. • Check cable between control panel and motherboard. • Reinstall software. • Contact service technician. ...the EEPROM memory cannot be read. • Contact service technician. ...a display programming error occurs due to contaminated upload data. • Repeat upload procedure.
Troubleshooting Problem One or more of the fixtures is completely dead. Fixtures reset correctly but all respond erratically or not at all to the controller. Fixtures reset correctly but some respond erratically or not at all to the controller. No light and error message displayed. Lamp cuts out intermittently. Probable cause(s) Remedy No power to fixture. • Check that power is switched on and cables are plugged in. Primary fuse blown. • Replace fuse.
Circuit board connections Disable Enable 34 MAC 250 Wash
MAC 250 Wash Specifications PHYSICAL Base length. . . . . . . . . . . . . . . . . . . . . . . . . . . . . . . . . . . . . . . . . . . . . . . . . . . . 375 mm (14.8 in.) Base width . . . . . . . . . . . . . . . . . . . . . . . . . . . . . . . . . . . . . . . . . . . . . . . . . . . . 315 mm (12.4 in.) Yoke width. . . . . . . . . . . . . . . . . . . . . . . . . . . . . . . . . . . . . . . . . . . . . . . . . . . . . 393 mm (15.5 in.) Height . . . . . . . . . . . . . . . . . . . . . . . . . . . . . . . . . .
MAC 250 Wash wide-angle lens with frost Total output . . . . . . . . . . . . . . . . . . . . . . . . . . . . . . . . . . . . . . . . . . . . . . . . . . . . . . . .5100 lumens One-tenth peak output . . . . . . . . . . . . . . . . . . . . . . . . . . . . . . . . . . . . . . . . . . . . . . .4700 lumens Half-peak output . . . . . . . . . . . . . . . . . . . . . . . . . . . . . . . . . . . . . . . . . . . . . . . . . . . .2600 lumens Cutoff angle . . . . . . . . . . . . . . . . . . . . . . . . . . . . . . . .
APPROVALS EU EMC . . . . . . . . . . . . . . . EN 55 103-1, EN 55 015, EN 61 547 EU safety. . . . . . . . . . . . . . . . . . . . . . . . . . . . . . . .EN 60598-2-17 US safety. . . . . . . . . . . . . . . . . . . . . . . . . . . . . . . . ANSI/UL 1573 Canadian safety . . . . . . . . . . . . . . . . . . . . . . CSA C22.2 NO 166 CONSTRUCTION Housing . . . . . . . . . . . . . . . . . . . . . . . . . . . . . . . . . . . . . UV-resistant fiber-reinforced composite Ingress protection factor . . . . . . . . . . .