
Operator`s manual


Roboscan Pro 1220 - operator’s manual 23
© 1995-1996 Martin Professional A/S
section 6
HARDWARE SETTINGS AND
ADJUSTMENTS
The Roboscan Pro 1220 comes fully prepared from the factory, however, lamp adjustment and
some pre-setting may be necessary before you can operate the fixture properly. You may also need
to readjust some of the mechanical parts after extensive use. The procedures for doing this are care-
fully described in this chapter.
IMPORTANT!
We recommend that you read the following information carefully before
attempting to make any alterations whatsoever. If you do not feel completely
confident in making these adjustments you should consult your Martin dealer
for assistance.
Removing and Replacing Modules
The Roboscan Pro 1220 has been designed with ease of servicing and maintenance in mind and is
constructed in a totally modular fashion. If there is a problem in any particular section, or you want
to put in your own custom gobos or you need to clean parts of the fixture, it is a simple operation to
remove and replace any module.
WARNING!
Before attempting any of the following you must ensure that the fixture is dis-
connected from the mains supply.
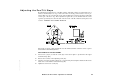
REMOVING A MODULE
1.
Remove the main-cover from the fixture as described in the section called 'INSTALLING THE
PRO 1220'.
2.
Locate the module that you wish to remove from the fixture. You will see that there are PCB
connectors connecting the module to a wiring loom, remove these connectors taking care to
note the location and direction of each one.
3.
On each side of every module there is a finger screw. Unscrew these two screws and carefully
pull the module straight out of the fixture.