
Operator`s manual


28 Roboscan Pro 1220 - operator’s manual
5. Reset the Roboscan Pro 1220 a number of times to check the accuracy of the new reset posi-
tion.
6. Again, select the service sequence named 'SP 6' and toggle between 'St 2' and 'St 3' whilst
checking that adjustment screw (B1) does NOT touch the mechanical stop (B2) during these
steps. If it does then adjust screw (B1) accordingly.
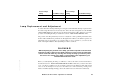
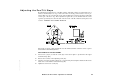
TILT-MOTOR ADJUSTMENT
1. Select 'St 4' (step 4) so that the top mechanical-stop (C1) in the previous figure is positioned
at the edge of the mirror bracket (C2).
2. Loosen the two allen-screws (E) holding the motor shaft while ensuring that the motor does
not slide vertically from its current position.
3. Carefully turn the motor and mirror clockwise (ensure that the motor shaft does NOT turn.)
until there is a distance of about 1/2 to 1 mm between the edge of the mirror bracket (C2) and
the top mechanical Stop (C1).
4. Tighten the allen-screws.
5. Toggle between 'St 4' and 'St 5', thus moving the mirror between the extreme tilt positions,
check that bottom mechanical-stop (D1) does NOT touch the edge of the mirror bracket (D2)
during these steps. If it does then re-adjust as described making the distance between (C2)
and (C1) even smaller.
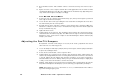
Adjusting the Pan/Tilt Dampers
Re-adjustment of the Pan or Tilt dampers is necessary if the end Stop adjustments have caused
either of the motors to slide along its axis.
1. Loosen the dampers marked (F1) and (F2) in the previous figure, until the spring-loaded plas-
tic pin is not touching the motor.
2. Select, via the control module, service sequence 'SP11'.
3. Toggle between 'St 1' and 'St 2' in the sequence, thus moving the mirror slowly between the
extreme left and right. Whilst the mirror is moving watch the beam movement to ensure that it
is smooth. Tighten the pan damper (F2) until the smoothness of the mirror movement is
affected and it becomes more 'twitchy'. At this point you should turn the dampers slightly back
so that you restore the full smoothness of mirror movement.
4. Similarly, toggle between 'St 3' and 'St 4', thus moving the mirror slowly between the extreme
tilt positions and adjust the tilt damper (F1) in the same way you adjusted the pan damper.
NOTE: If the dampers are set to a position that is too loose you will find that the mirror will lose
steps when running at higher speeds.