
User manual


RUSH DC1 Aqua User Manual
18
cause interference. If you use a DMX splitter, terminate each branch of the
link.
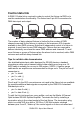
Connecting the DMX data link
To connect the fixture to data:
1. Connect the DMX data output from the controller to the closest fixture’s
male XLR DMX input connector.
2. Connect the DMX output of the fixture closest to the controller to the DMX
input of the next fixture and continue connecting fixtures output to input.
Terminate the last fixture on the link with a 120-Ohm resistor.
Fixture setup
This section explains the fixture characteristics that can be set that determine
how it can be controlled and will behave. These settings are made using the
menus available from the control panel, and are retained, even when the
fixture is powered off.
Using the control menus
See also the control menu structure table in ‘Control menus’ on page 28.
To access the control menus, press the MENU button. Navigate the menu
structure using the MENU, ENTER, DOWN and UP buttons. Select any
required menu option using the ENTER button. To return to a higher level in
the menu structure without making any change, press the MENU button (this
will occur automatically after an interval where there has been no user input).
DMX addressing
The DMX address, also known as the start channel, is the first channel used to
receive instructions from a DMX controller. The fixture can be controlled using
signals sent by a DMX controller on twelve channels. Each DMX controlled
fixture must have a DMX address set. For example, if a fixture has a DMX
address of 10, it uses channels 10, 11, 12 and 13. The next fixture on the DMX
link can be set to a DMX address of 14.
For independent control, each fixture must be assigned its own control
channels. Two fixtures of the same type may share the same address, if
identical behavior is desired. Address sharing can be useful for diagnostic
purposes and symmetric control, particularly when combined with the inverse
pan and tilt options.