
User`s manual


Logos User’s Manual
page 10 revised
The following instructions assume the
mounting surface is of wood frame and
standard sheet rock construction. Mounting to
another construction should be referred to a
bonded contractor.
This is a two person operation, do not attempt
it alone.
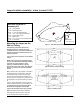
NOTE: The Logos bracket is designed with a
specific top and bottom and must be installed
right side up for the speaker to rotate
properly. To determine which is the top,
examine the arms on each end of the bracket
(figure 1.) - the flat side of the arm indicates
the top.
It
is imperative that the hex head lag bolts hit
the wall studs squarely to insure proper
support for the weight of the Logos speaker.
. Position the Logos bracket on the wall in
the desired position for the speaker, and have
your assistant hold it in place. The mounting
holes on the bracket are set for standard 16 in.
stud spacing. Use a stud finder to locate the wall
studs nearest to the mounting holes you want to
hit.
Figure 2. shows the bracket centered, you may
want to offset the bracket for your installation -
. Re-position the bracket to match the
mounting holes with the location of the wall
studs, and mark their position through the
Step 1
Step 2
Revised contents of
accesory kit
1 ea. - Logos speaker
1 ea. - Mounting bracket
2 ea. - 1.75 in. dia. Metal cylinders
2 ea. - 1/2 in. x 2.5 in. Button head bolts
1 ea. - 5/16 in. Allen wrench
6 ea. - Rubber feet
4 ea. - 1/4 in. x 2 1/2 in. Hex head lag screws
4ea.-#12washer
Mounting the Logos on the
Wall or Ceiling
40 in.
wall studs
mark location
Figure 2. Wall or ceiling mounting
Figure 1. - Determine top and bottom
Figure 3. Check for level
16 in.
16 in.
level
Screw in
lag bolts
(with washers)
TOP
BOTTOM
Arm
TOP
BOTTOM
flat edge
flat edge
side view of arm
Logos bracket assembly / setup (revised 3-99)