
User`s manual

Logos User’s Manual
bolt
cylinder cylinder
top of speaker
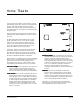
clearance area
bolt
page 11
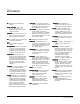
Step 3
Step 4
Step 5
Step 6
Step 7
Step 8
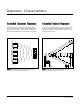
. Drill a 9/64 in. pilot hole through
one of the upper (for the top of the
bracket) pencil register marks you made
in the previous step. Get out your level,
you’re going to need it for the next step.
Get your assistant to hold the bracket in
place while you secure the first lag
screw through the bracket in the pilot
hole you just drilled. Check for level as
shown (figure 3) and make any changes
necessary to the register marks you
made previously. Unscrew the lag bolt
and remove the bracket.
. Drill the remaining pilot holes for
the other lag screws. Have your
assistant hold the bracket to the wall
while you drive the lag screws through
the supplied washers firmly into the wall
studs.
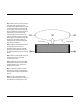
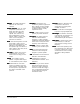
. Place a metal cylinder in each of
the large holes in the back lower
corners of the Logos.
. Raise the Logos to the bracket
and align the center holes of the metal
cylinders with the 1/2 in. holes in the
uprights of the bracket.
. Insert the supplied 2 in. bolts
through the bracket and cylinder holes
and snug them using the supplied allen
wrench.
. To direct the speaker at the
listening position slightly loosen each of
the end bolts, tip the logos to it’s best