® MDA16 MDA8 Operating Manual
CAUTION RISK OF ELECTRIC SHOCK DO NOT OPEN CAUTION: TO REDUCE THE RISK OF ELECTRIC SHOCK, DO NOT REMOVE COVER (OR BACK). NO USER-SERVICEABLE PARTS INSIDE. REFER SERVICING TO QUALIFIED SERVICE PERSONNEL. The exclamation point within an equilateral triangle is intended to alert the user to the presence of important operating and maintenance (servicing) instructions in the literature accompanying the appliance.
Do not install this equipment in a confined space such as a case or similar. Install it away from direct sunlight, heat sources, vibration, dust, moisture, and/or cold. Do not cover this unit with a newspaper, tablecloth, curtain, etc. in order not to obstruct heat radiation. If the temperature inside this unit rises, it may cause fire, damage to this unit, and/or personal injury. Install this unit near the AC outlet and where the AC power plug can be reached easily.
IMPORTANT INFORMATION FOR UK CUSTOMERS: DO NOT cut off the mains plug from this equipment. If the plug fitted is not suitable for the power points in your home or the cable is too short to reach a power point, then obtain an appropriate safety approved extension lead or consult your dealer. If, nonetheless, the mains plug is cut off, REMOVE THE FUSE and dispose of the PLUG immediately, to avoid possible shock hazard by inadvertent connection to the mains supply.
TABLE OF CONTENTS 1. Introduction and Quick Start . . . . . . . . . . . . . . . . . . . . . 6 1.1 Before Making Connections . . . . . . . . . . . . . . . . . . 6 1.2 Box Contents . . . . . . . . . . . . . . . . . . . . . . . . . . . . . . . 6 1.3 In-Use Notices . . . . . . . . . . . . . . . . . . . . . . . . . . . . . . 6 1.4 Rack and Shelf Mounting . . . . . . . . . . . . . . . . . . . . 6 1.5 Front Panel (Status Lights) . . . . . . . . . . . . . . . . . . . 7 1.
1. INTRODUCTION AND QUICK START Thank you for purchasing the MartinLogan MDA. All MartinLogan products are engineered to recreate the passion of a live musical performance and emotional involvement experienced in the best movie theaters by utilizing the highest level of circuit design, superior parts and manufacturing techniques, innovative features, and intuitive ergonomics. We are confident that their inclusion in a system significantly enhances the enjoyment of recordings. 1.
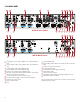
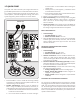
1.5 FRONT PANEL (STATUS LIGHTS) MDA16 Front Panel MDA8 Front Panel Power: When blue, the MDA is on and ready to play. When red, the MDA has entered network standby mode. LAN: When blue, a 100M or faster network is connected. Red indicates a 10M connection. When off, there is no network connection. Numbers: When the top indicator turns blue, the indicated channel is active. The bottom indicator turns blue when audio is detected. When flashing blue or red, it is in fault mode.
1.
1.7 QUICK START This quick start section includes just enough information to get the MDA operational and to run Anthem Room Correction. For a deeper understanding of speaker and subwoofer connection options, advanced configuration settings, and control system integration, please review the rest of this manual. ANALOG OUT L R en each contact on the Euroblock when inserting the speaker wire. c. Follow positive (+) and negative (–) indications shown on the Euroblock connector. d.
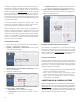
The MDA is configured using an interface accessed using a web browser. Identify the MDA’s IP address to proceed. You can discover the MDA’s IP address using the ARC Genesis software (available on AnthemARC.com). Start the program, choose Launch ARC, and hover your mouse cursor over the MDA, wait for a second, and it shows the IP address in the device discovery screen. Note that the last few characters of the unit’s name correspond to the end of the MAC address printed at the back of the MDA. c.
2. THE USER INTERFACE For optimum performance and enjoyment, your MDA should be appropriately set up. If you’re using a subwoofer or subwoofers, ARC (Anthem Room Correction) sets crossovers and levels for a perfect blend with the main speakers. The rest of the settings mostly relate to your preferences. Please fully configure all zones with the proper output modes (single-ended, stereo or mono bridge), speaker profile and subwoofer settings (present or not, active or passive) before running ARC. 2.
2.4 ZONES Zones: Adjusts the settings of individual zones, allowing zone naming, source selection, mode setup, listening mode, speaker profile, level adjustment, tone control, volume configuration, and subwoofer setup. The top of the page shows the individual zones. Inputs: Allows input naming and level balancing (trim). See section 2.5 for additional details. General: Displays device information and allows device naming, network configuration, and displays input selection. See sections 2.6 – 2.
a left and right configuration. When activated, the even-numbered zone turns grey, and the odd-numbered zone controls the settings. This setting allows a high output mode for a pair of speakers with each zone acting as a discrete channel. The listening mode is automatically set to stereo when selecting Stereo Bridge mode. See section 3.5 for additional details. Zone Power: Toggles the zone between active and standby.
2.5 INPUTS SETTINGS Bulk Action: Use this when you want to change input names without clicking apply after each change. Enter names for all applicable inputs, select Check All from under the Bulk Items drop-down, then select Apply from under the Bulk Items drop-down. Input Name: Assign a custom name for each input (up to 16 characters). You must click Apply to save this setting. 14 This name corresponds with the input list in the MDA’s user interface.
2.6 GENERAL: PREFERENCES Auto-Off Delay: Sets the length of time a zone waits to enter standby mode after not receiving an audio signal. This option only applies when you set the On Mode switch on the back of the MDA to Auto. tical output. This setting can be manipulated dynamically through IP/RS232. Selecting an output in the user interface does not prevent this setting from being changed through IP or RS232. Auto-On Delay: Sets the amount of time that the MDA waits to power up when in standby.
2.7 GENERAL: INFORMATION Model Name: Displays the MDA model. Device Name: Assign a name to the MDA (up to 16 characters) and click Apply to save this setting. The name of the MDA appears in ARC allowing easy identification. Note that the last few characters of the unit’s name correspond to the end of the MAC address printed at the back of the unit. Firmware Version: Displays the current firmware version of the MDA.
2.8 GENERAL: NETWORK SETTINGS IP Mode: Toggles the MDA between DHCP and Static network assignments. Changes take effect after clicking Apply. If errors occur when adjusting static IP settings, the MDA can be manually set back to DHCP using the DHCP Reset / Factory Image button located on the MDA’s back panel (refer to troubleshooting). IP Address: Displays the MDA’s current IP address. Adjustable if Static is selected. Changes take effect after clicking Apply.
2.9 GENERAL: INPUT STATUS Displays the name assigned to each zone. Displays the input playing in the zone and allows you to reassign inputs. This control can be used to confirm that the unit is appropriately responding to commands from a 3rd party automation system, or as an easy way to control which inputs are playing in which zones. 18 The user interface design is subject to change.
2.10 STORE/LOAD SETTINGS User Settings: Allows you to store the current settings to the User Settings and load them back. The User Settings are stored locally on the MDA and don’t require an external file. Latest Version: Displays the latest available firmware version. If there is an active internet connection, the MDA checks our servers and display a notification at the bottom of the screen if an update is available.
3. CONNECTIONS AND BACK PANEL CONTROLS 3.1 LOCAL AREA NETWORK CONNECTION A network connection is required to access the configuration interface, run Anthem Room Correction, and use IP control. Connect to your router using an Ethernet (CAT5) cable. • bridge mode uses a single zone whereas stereo bridge uses two consecutive zones to drive a stereo pair. Bridge a zone to power a passive subwoofer to complement a stereo pair.
3.3 CONNECTING STEREO SPEAKERS Connect a pair of speakers to a zone using a Euroblock (also known as a PhoenixTM) connector. These connectors are included with the MDA and come preinstalled. Euroblock connectors accept speaker wire up to 12 gauge. Use speakers as low as 4 Ohms in this configuration. 1. 2. 3. 4. 5. 6. ANALOG OUT L R Remove the zone’s Euroblock connector from the MDA by gently pulling it until it releases.
3.4 CONNECTING MONO SPEAKERS USING ONE BRIDGED ZONE A zone set to mono mode can be used to drive a single speaker, allowing the MDA to deliver more power per channel. Enabling mono bridge sets the listening mode to mono automatically. Bridge mode only supports speakers rated for 8 Ohms or higher. Any zone set to Mono Bridge can use an active sub connected via the zone’s Sub Out.
3.5 CONNECTING STEREO SPEAKERS USING TWO BRIDGED ZONES ANALOG OUT L Using two zones to drive a single stereo pair of speakers allows the MDA to deliver more power per channel. When bridging, two consecutive zones are used to drive the stereo pair (Zones 1 and 2, 3 and 4, 5 and 6, or 7 and 8). Bridge mode only supports speakers rated for 8 Ohms or higher.
3.6 SUBWOOFER OUTPUTS If you’re using this MDA to power a passive (non-powered) subwoofer refer to the next section. To connect a powered subwoofer, use an RCA cable, connect a zone’s Sub Out to a powered subwoofer LFE input, and enable the subwoofer using Zones > Subwoofer. If the powered subwoofer doesn’t have an LFE input, connect to either the left or right input and set the sub’s low-pass filter (commonly referred to as crossover) to its highest or bypass setting.
3.7 CONNECTING A PASSIVE (NON-POWERED) SUBWOOFER USING A BRIDGED ZONE ANALOG OUT L R If using a passive (non-powered) subwoofer, an even-numbered zone can be configured to power the sub. This mode only supports subwoofers rated at 8 Ohms or higher. The even-numbered zone is bridged to provide more power. For example, in Zone 1 connect the left/right speakers using the stereo pair configuration and in Zone 2 connect the passive subwoofer by following these instructions: 1.
3.8 DIGITAL INPUTS Stereo digital audio sources can be connected using coaxial or optical cables. The MDA16 has two digital optical inputs, and two digital coaxial inputs and The MDA8 has one digital optical input. All of these inputs support the PCM stereo format (up to 24-bit / 192kHz). If using sources that have an option for selecting between PCM and Bitstream (or Dolby Digital) audio output, select PCM. If the source outputs a non-PCM stream (such as a Dolby or DTS stream), the audio will mute. 3.
back panel flashes as will the Power indicator on the front of the MDA. You can also match the MAC Address shown under General > Information with the unique MAC Address printed on the back of each MDA. 3.19 ARC MICRO-USB CONNECTION If a local area network connection is not available the Anthem Room Correction (ARC) software can still connect to the unit by making use of this micro-USB connector. Connect a USB type A to micro B cable between the MDA and your PC or Mac. 3.
4. ANTHEM ROOM CORRECTION (ARC®) Please visit AnthemARC.com for detailed information about using Anthem Room Correction. The most significant detriment to the sound of an audio system is almost always the room it resides within—especially true in the realm of bass. Even in a professionally treated sound room, bass can quickly become boomy or anemic. Anthem Room Correction helps audio systems sound their best in any space.
4.1 USING ARC WITH AN MDA In addition to correcting the acoustic response of subs and speakers in each zone, ARC also: • Adjusts the left/right balance of the speakers. • Sets the crossover point between the speakers and subwoofer (do not manually change this after running ARC). • Adjust the subwoofer’s level relative to the speakers.
5. UPDATING FIRMWARE When connecting to the MDA’s web interface, the MDA checks our server (if there is an active internet connection) and, if an update is available, displays a notification at the bottom of the screen. Alternatively, an update file can be downloaded from our web site and installed later. 5.1 UPDATING FIRMWARE (USING AN INTERNET CONNECTION) 1. 2. 30 Using a web browser on your computer, access the MDA’s user interface.
6. FAULT MODES 6.1 FRONT PANEL POWER LED 6.2 FRONT PANEL LAN LED Power LED Status or Fault LAN LED Speed or Fault Blue On Blue 100M Red Network Standby Red 10M Off Standby (no LAN connection) or no AC power Off No LAN connection Red (flashing) Power on error (see section 6.3) 6.3 FRONT PANEL ZONE LEDS Power LED Top Zone LED Bottom Zone LED Status or Fault Blue Blue Off MDA enabled, no music detected. Blue Normal operation: MDA enabled, music playing. Blue Zone over temp.
7. TROUBLESHOOTING Manually Resetting Network IP Mode to DHCP If errors occur when adjusting static IP settings, the MDA can be manually set back to DHCP. Using a pin or straightened paperclip, depress the DHCP Reset / Factory Image button for about 1 second. The blue ID LED turns on to indicate the selection of DHCP. It should take a few seconds for the server to reassign an address. Manually Loading the Factory Image This function restores the MDA to its original factory image.
8. FREQUENTLY ASKED QUESTIONS How do I find the IP address of my MDA? We recommend using Anthem’s ARC Genesis software or using a utility called Fing. See section 2.2 for additional details. I’m connecting my DVD player to the MDA using a TOS input, but even if the disc is playing, I do not hear any sound. The MDA digital input only supports a PCM stream. Access your DVD player setup menu and change the output format to PCM.
9. SPECIFICATIONS MDA8 MDA16 Warranty 3 years (parts and labor) 3 years (parts and labor) Channels / Zones 8 channels / Up to 4 zones 16 channels / Up to 8 zones Power Output RMS per Channel (8 Ohm) 60 Watts 60 Watts Power Output RMS per Channel (4 Ohm) 120 Watts 120 Watts High Output Mode (Bridged) RMS per Channel (8 Ohm) 200 Watts 200 Watts Frequency Response 10Hz – 20kHz ±0.5dB 10Hz – 20kHz ±0.5dB THD + N (1 kHz at 50W into 8 Ohms/100W into 4 Ohms) <0.4% / <0.4% <0.4% / <0.
10. LIMITED WARRANTY SERVICE Should you be using your MartinLogan product in a country other than the one in which it was originally purchased, we ask that you note the following: 1. 2. 3. The appointed MartinLogan distributor for any given country is responsible for warranty servicing only on units distributed by or through it in that country in accordance with its applicable warranty.
Owner Responsibilities: • Provide normal/reasonable operating care and maintenance; • Prior to returning a product to MartinLogan for repairs covered by the Limited Warranty, the dealer from whom the speaker was purchased should first be contacted to see if they can resolve the issue; • If a product is returned to MartinLogan for warranty work: o The product must be properly packaged and shipped to MartinLogan or an authorized MartinLogan repair center by the customer at his or her sole expense; o The produ
11.
12.
13.
® Lawrence, Kansas, USA tel. 785.749.0133 fax 785.749.5320 ©2019 MartinLogan Ltd. All rights reserved. www.martinlogan.com Rev.