
Specifications


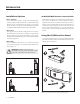

10 Installation
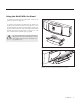
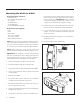
Mounting the Motif On A Wall
Required hardware (included):
(6) Wall Anchors
(6)1”PhillipsHeadWoodScrews
(2) Push pins
(2) Wall Brackets
(2) Shoulder Bolts
(2) Threaded Rubber Bumpers
Required tools (not supplied):
Level
Pencil
Electric Drill
1/8” (0.125”) Drill Bit
1/4” (0.25”) Drill Bit
PhillipsHeadScrewdriver
NOTE: These instructions assume the mounting surface
is of wood frame and standard sheet rock construction. If
you wish to mount the Motif to another type of material
or construction, you should consult a bonded contractor.
NOTE: Before beginning,study the Horizontal and
VerticalHardwareConfigurationdrawings(figures7&8).
IMPORTANT! This template is used for both horizontal
and vertical installations. When drilling pilot holes and
tracing keyholes make sure you’re using the 2 pilot hole
and 2 keyhole locations intended for your installation.
1 Position the template. Install the center push pin.
2 Level the template. Install the second push pin.
3 Using a pencil trace two keyholes located on the template.
4 Using a 1/8-inch drill bit, drill two pilot holes located
on the template.
5 Remove the template.
6 If a pilot hole does not hit a stud use a 1/4-inch drill bit
to widen the hole and install a wall anchor.
7 Install both wall brackets using only the top screw. Do
not over tighten the top screw.
8 Align each wall brackets keyhole with a traced keyhole
and tighten the top screw.
9 On the back of the Motif, install two shoulder bolts in
the top holes and two rubber bumpers in the bottom
holes.Testfitthespeaker.Adjustthebracketpositions
until the speaker fits. IMPORTANT! At this point do
not allow the speaker to hang freely—there are not
enough screws installed to fully support its weight.
10 Drill two more pilot holes (per bracket) at the screw hole
locations on the left & right sides of both wall brackets.
11 If a pilot hole does not hit a stud remove the wall
bracket , use a 1/4-inch drill bit to widen the hole, and
install a wall anchor.
12 Install both wall brackets using all 3 screws per bracket.
Tighten the screws.
13 Hangthespeakeronthewallbrackets.
Figure 7.VerticalHardwareConfiguration
Figure 8.HorizontalHardwareConfiguration