
Specifications


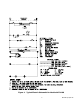


8
ModPac II, 9/09-15
Installation
2.1 Equipment Inspection
Concealed Damage
Inspect all cartons and packages upon receipt for damage in transit. Remove cartons and check
for concealed damage. Important: keep the unit upright at all times. Remove access panels
and examine component parts. (Note: the bottom brackets for Models AVP24-60 are stored in
the condenser air compartment. Remove them before replacing the side screen). Inspect refriger-
ant circuit for fractures or breaks. The presence of refrigerant oil usually indicates a rupture. If
damage is apparent, immediately le a claim with the freight carrier.
Units that have been turned on their sides or tops may have concealed damage to compressor mo-
tor mounts or to the oil system. If the unit is not upright, immediately le a claim for concealed
damages and follow these steps:
1. Set unit upright and allow to stand for 24 hours with primary power turned on.
2. Attempt to start the compressor after 24 hours.
3. If the compressor will not start, makes excessive noise, or will not pump, return the unit to
the freight carrier.
2.2 Installation Requirements
General
1. Inspect unit for completeness. Check for missing parts (e.g. hardware). Refer to the
installation kit information in section 2.3.
2. Remove access panels and check for loose wires. Tighten screw connections if necessary.
3. Complete and mail the warranty registration card.
You must consider all of the following when choosing the installation site:
1.
Noise. Install the unit so that the least amount of noise will be transmitted to inhabited
spaces.
2. Condensate Drainage.
Condensate produced during operation must be discharged to a suit-
able drain.
3.
Placement.
A) Place the unit in a shaded area, if possible.
B) Install it above ground for protection against ooding.
WARNING
Failure to observe and follow Warnings and Cautions and these Instructions could
result in death, bodily injury or property damage. Read this manual and follow its
instructions and adhere to all Cautions and Warnings in the manual and on the
Marvair unit.