
Use and Care Guide


7
INSTALLATION
Required tools
You will need the following tools:
Components
provided:
Top hinge
cover
rear screw
Top hinge cover
front screw
Lower
hinge
screw
Top
hinge
screw
Tools necessary:
Phillips™ Head
or #2 square
drive head
(or)
(or)
(or) (or)
And
Socket wrench set
Adjustable
wrench
3/8" Fixed
wrench
1/4" Nut
driver
This Use & Care Guide provides general installation and
operating instructions for your model. We recommend
using a service or kitchen contracting professional to install
your refrigerator. Use the refrigerator only as instructed in
this Use & Care Guide. Before starting the refrigerator,
follow these important rst steps.
Location
• Choose a place that is near a grounded, non-GFCI,
electrical outlet. Do Not use an extension cord or an
adapter plug.
• If possible, place the refrigerator out of direct sunlight
and away from the range, dishwasher, or other heat
sources.
• The refrigerator must be installed on a oor that is level
and strong enough to support a fully loaded refrigerator.
• Consider water supply availability for models equipped
with an automatic ice maker.
!
CAUTION
DO NOT install the refrigerator where the temperature will
drop below 55°F (13°C) or rise above 110°F (43°C). The
compressor will not be able to maintain proper tempera-
tures inside the refrigerator.
DO NOT block the toe grille on the lower front of your re-
frigerator. Sufcient air circulation is essential for the proper
operation of your refrigerator.
Installation
• Allow the following clearances for ease of installation,
proper air circulation, and plumbing and electrical con-
nections:
Sides & Top ⅜ inch (9.5 mm)
Back 1 inch (25.4 mm)
NOTE
NOTE
If your refrigerator is placed with the door hinge against a
wall, you may have to allow additional space so the door
can be opened wider.
Door opening
The refrigerator doors are designed to shut by themselves
within a 20 degree opening.
Your refrigerator should be positioned to allow easy access
to a counter when removing food. For best use of refrigera-
tor drawers and freezer baskets, the refrigerator should be
in a position where both can be fully opened.
Guidelines for nal positioning of your refrig-
erator
• All four corners of the cabinet must rest rmly on the
oor.
• The cabinet should be level at the front and rear.
• The sides should tilt ¼ inch (6 mm) from front to back
(to ensure that doors close and seal properly).
• Doors should align with each other and be level.
Most of these conditions can be met by raising or
lowering the adjustable front rollers.
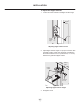
Figure 9
Rough In
Measurements
Electrical
Water
1” (2.5 cm)
air gap
24” (61 cm)
cabinet depth
41- 1/4”
(105 cm)
w/ door open 90
4” (10.2 cm)
gap
for door swing
25” (63.5 cm)
counter depth
36-1/2”
(92.7 cm)
4/1-07
(
)mc 4.871
no cowl
76-1/4”
”
(
193.7 cm)
6” cowl
Dimensions
Body Width
35 5/8”
(90.5 cm)
Hinge
3/8”
front leg
adjusters
front
stabilizers
with freezer drawer open
26 7/8”
(68.3 cm)
23 5/8”
(60.0 cm)
44 1/2”
(113.0 cm)
68 3/16”
(173.2 cm)
25”
(63.5 cm)
70”
(177.8 cm)